Subaru Outback (BR): Combination Switch (Light)
A: REMOVAL
1) Position the front wheels straight ahead. (After moving a vehicle 5 m (16 ft) or more with front wheels positioned straight ahead, make sure that the vehicle moves straight ahead.)
2) Turn the ignition switch to OFF.
3) Disconnect the ground cable from battery and wait for at least 60 seconds before starting work.
4) Remove the driver's airbag module assembly.
CAUTION: Before handling the airbag module, refer to "CAUTION" of "General Description" in "AIRBAG SYSTEM". <Ref. to AB-9, CAUTION, General Description.>
- Using a hexagon wrench etc. wrapped by protective tape, insert the snap pins and release the locks (3 locations).
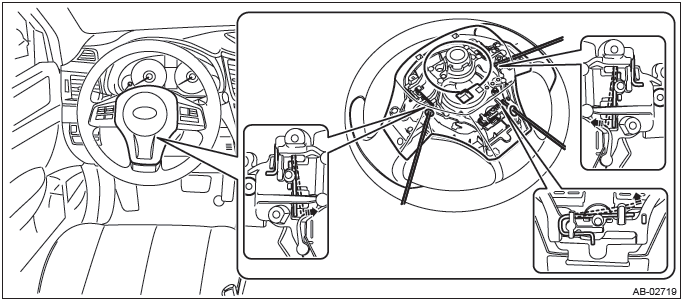
- Disconnect the horn harness and airbag connector and remove the airbag module assembly. <Ref. to AB-18, PROCEDURE, Airbag Connector.>

5) Remove the steering wheel.
CAUTION:
- Always use the steering wheel puller for removal to avoid deforming the steering wheel.
- If the steering wheel has been removed, make sure that the roll connector is not turned from the original position.
Preparation tool: Steering wheel puller
- Disconnect the connector and remove the nut.
- Put alignment marks and remove the steering wheel using a steering puller.
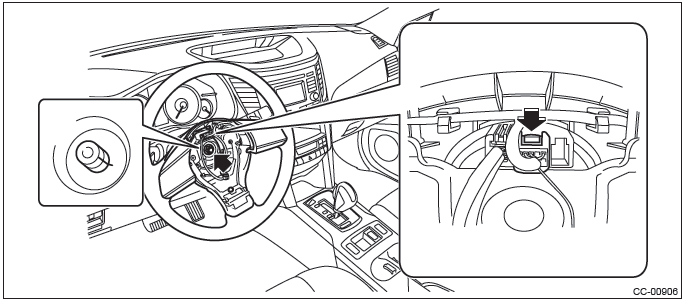
6) Remove the steering column cover.
- Lower the lever of the steering column.
- Release the claws and remove the screws, then detach the steering column lower cover.

- Separate the steering column upper cover and steering upper cover, and remove the steering column upper cover.
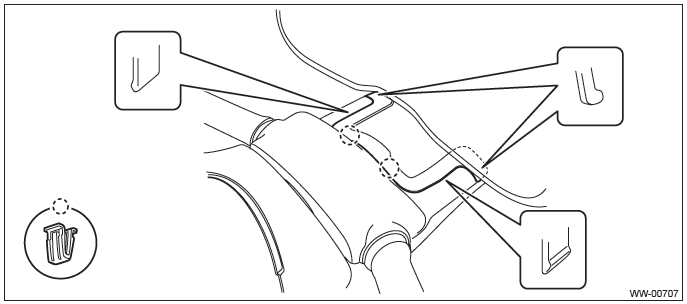
7) Remove the roll connector.
CAUTION: Make sure that the roll connector is not turned from the original position.
- Disconnect the connector under the roll connector.
- Release the claws and remove the roll connector.
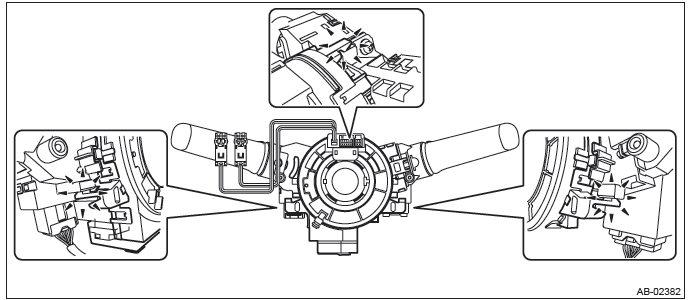
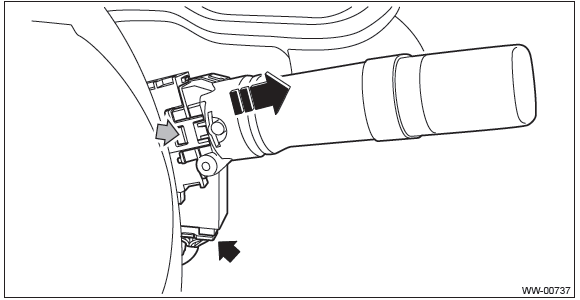
8) Remove the wiper switch assembly.
- Disconnect the connector from wiper switch.
- Release the claws, and pull out the wiper switch assembly.
CAUTION: Do not press the claws with excessive force. They may be damaged.
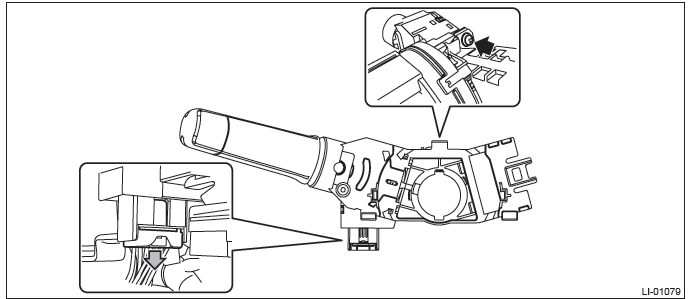
9) Remove the combination switch (light).
- Disconnect the connector of combination switch.
- Remove the screws and detach the combination switch (light).
B: INSTALLATION
1) Install each part in the reverse order of removal.
CAUTION:
- Before handling the airbag module, refer to "CAUTION" of "General Description" in "AIRBAG SYSTEM". <Ref. to AB-9, CAUTION, General Description.>
- Do not allow harness and connectors to interfere or get tangled up with other parts.
2) Before installing steering wheel, be sure to adjust the direction of roll connector with steering. <Ref. to AB- 101, ADJUSTMENT, Roll Connector.>
Tightening torque:
Combination switch (light): 3.5 N*m (0.36 kgf-m, 2.6 ft-lb)
Steering wheel: 39 N*m (3.98 kgf-m, 28.8 ft-lb)
Clearance:
Between column cover and steering wheel: 2 - 4 mm (0.08 - 0.16 in)
C: INSPECTION
1) Disconnect the combination switch (light) connector.
2) Measure the resistance between combination switch (light) connector terminals.
Preparation tool: Circuit tester
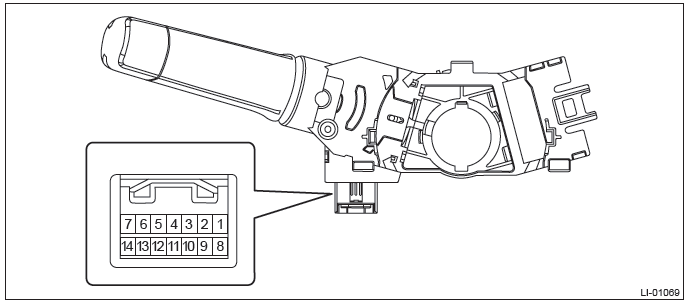
3) Replace the combination switch (light) if the inspection result is not within the standard value.
1. LIGHTING SWITCH

2. DIMMER & PASSING SWITCH

3. TURN SIGNAL SWITCH

4. FRONT FOG LIGHT SWITCH

Light Control Sensor
A: REMOVAL
NOTE: The light control sensor is integrated with the sunload sensor.
1) Disconnect the ground cable from battery.
2) Remove the light control sensor.
CAUTION: Be careful not to damage the sensors and interior trims when removing.
- Release the claws and clips, then detach the side speaker cover (RH).
- Push out the light control sensor by pressing the left and right claws.
- Disconnect the connector, and remove the light control sensor.
B: INSTALLATION
Install each part in the reverse order of removal.
C: INSPECTION
For the inspection of the light control sensor, refer to "AUTO HEADLIGHT SYSTEM CHECK" of "Headlight System". <Ref. to LI-6, AUTO HEADLIGHT SYSTEM CHECK, INSPECTION, Headlight System.>
READ NEXT:
 Headlight Assembly
A: REMOVAL
CAUTION:
Do not perform work with wet hands.
1) Disconnect the ground cable from battery.
2) Remove the clips and remove the air intake duct. (When removing the headlight
RH)
3) Remove t
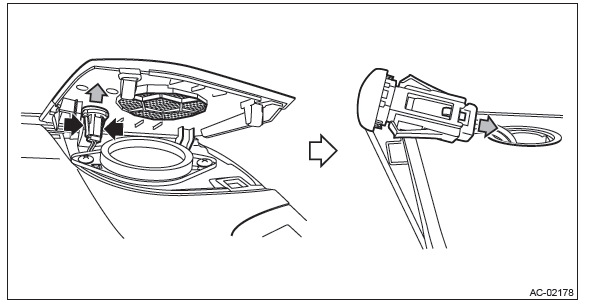
Headlight Bulb
A: REMOVAL
1. HIGH BEAM
CAUTION:
Because the halogen bulb operates at a high temperature, dirt and oil
on the bulb surface reduces
the bulb's service life. Hold the flange portion when replacing
Front Side Marker Light Bulb
A: REMOVAL
1) Disconnect the ground cable from battery.
2) Remove the clips and remove the air intake duct. (When removing the front
turn signal light bulb RH)
3) Turn the steering wheel in the opp
SEE MORE:
Front Hood
A: REMOVAL
1. FRONT HOOD INSULATOR
Release the clips to remove the front hood insulator.
CAUTION:
Do not reuse any clips damaged during removal. The damaged clip cannot fix the
insulator securely.
Therefore, always replace with a new part.
2. FRONT HOOD SEAL
Remove the clip, and remove the seal.
Printed antenna
CAUTION
Do not use sharp instruments or window cleaner containing abrasives to clean
the inner surface of the window on which the antenna is printed. Doing so may damage
the antenna printed on the window.
The antenna is printed on the inner surface of the rear window glass.
NOTE
Antenna pe
