Subaru Outback (BR): Rear Seat Belt
A: REMOVAL
1. OUTER BELT ASSEMBLY RH & LH (SEDAN MODEL)
1) Disconnect the ground cable from battery and wait for at least 60 seconds before starting work.
CAUTION: The airbag system is fitted with a backup power supply. After disconnecting the battery ground cable, the airbag may operate if you do not wait for 60 seconds before starting the service of airbag system.
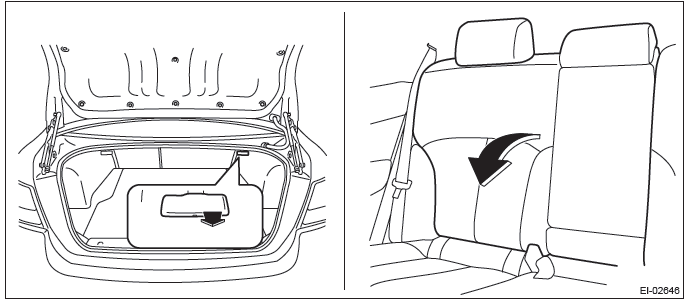
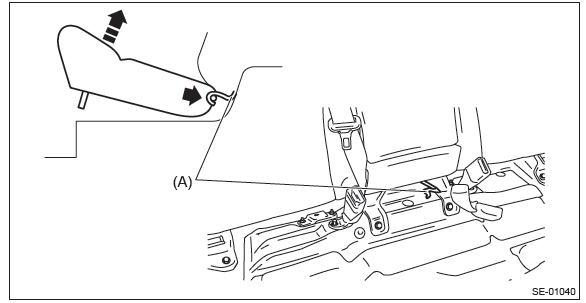
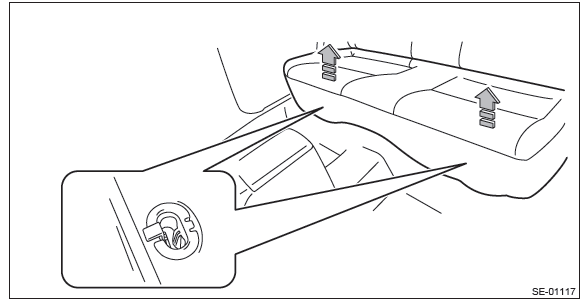
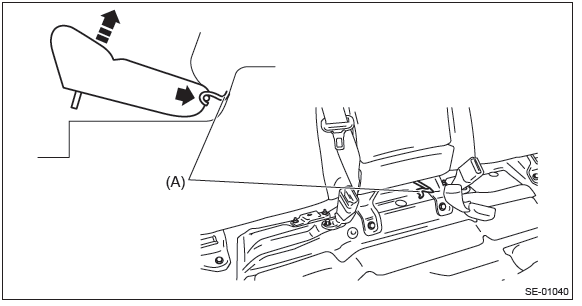
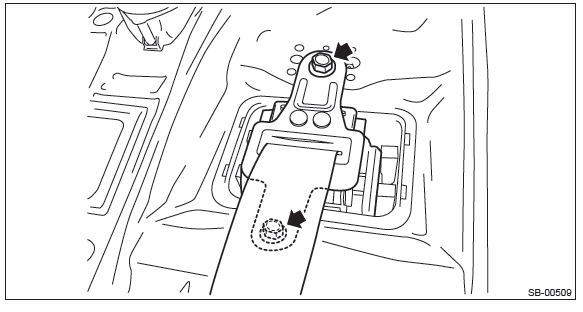
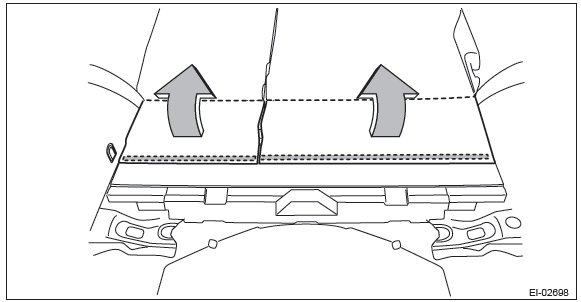
2) Remove the rear seat cushion.
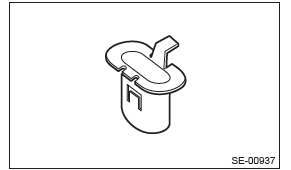
- Pull up the seat cushion and release the hook.
CAUTION: If the hook is disconnected from the vehicle body, replace the hook with the new part to prevent the decline of the fixed force of the seat.
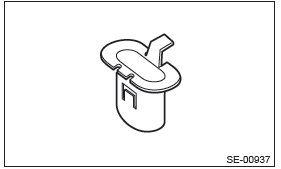
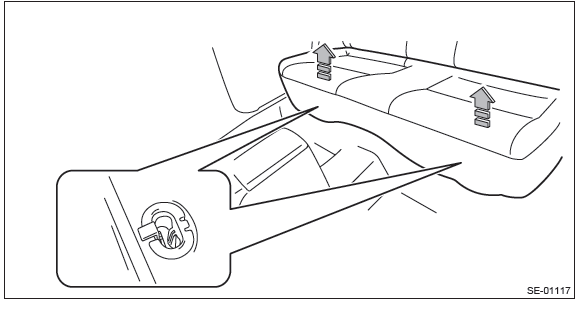
- Remove the hook (A) by pushing it back while lifting the front side of the seat cushion, and remove the seat cushion.
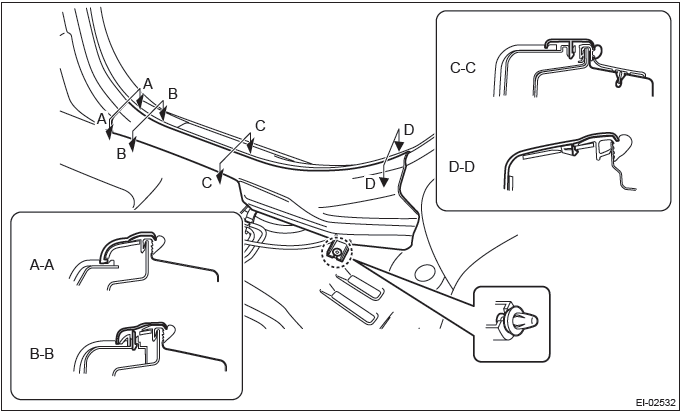
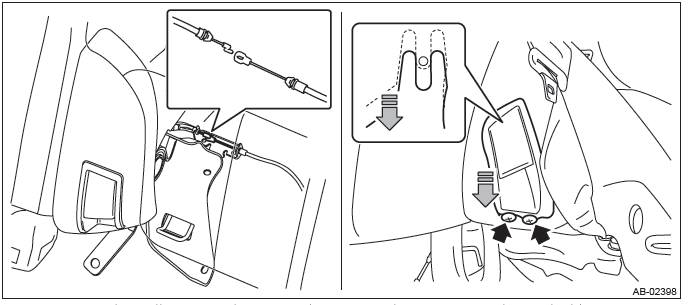
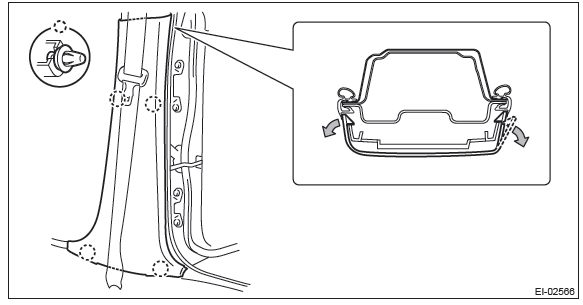
3) Release the clips and claws, and then remove the side sill cover - rear INN. (On the side where seat belt assembly is removed)
CAUTION: Do not pull with excessive force. Doing so may damage the claws of the side sill cover INN.

NOTE: To release the claws of the side sill cover INN, the following steps are recommended.
1. Take out the weather strip from under the side sill cover INN.
2. Turn over the floor mat and release the claw (C-C and D-D) by accessing from behind the side sill cover INN.
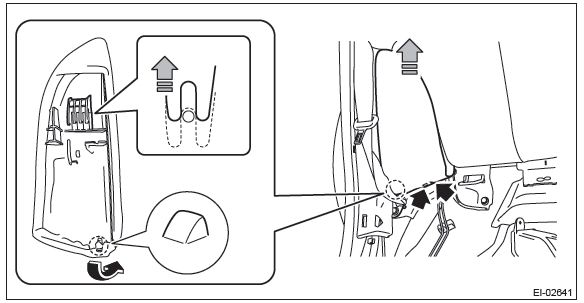
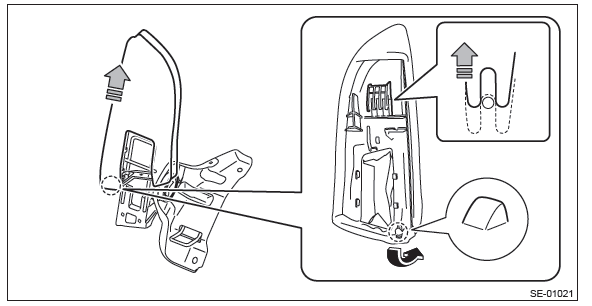
4) Remove the rear quarter trim LWR. (On the side where seat belt assembly is removed)
- Remove the backrest side pad assembly.
- Remove the screws.
Preparation tool: Stubby screwdriver
- Turn over the bottom end of the backrest side pad in the forward direction so that the claws are released.
- Remove the backrest side pad by pulling it up.
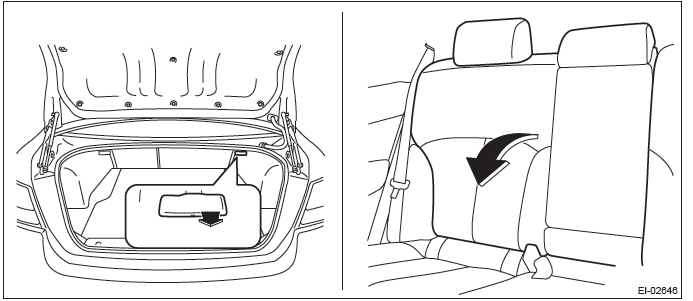
- Pull the release lever in the trunk room, and then tilt the backrest forward.
- Release the clips of the trunk trim panel assembly - side.
- Remove the clips, and remove the rear quarter trim LWR.

5) Remove the rear quarter trim UPR. (On the side where seat belt assembly is removed)
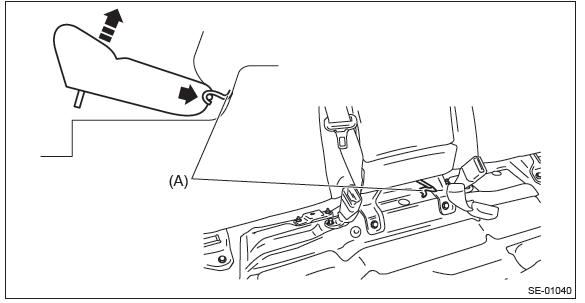
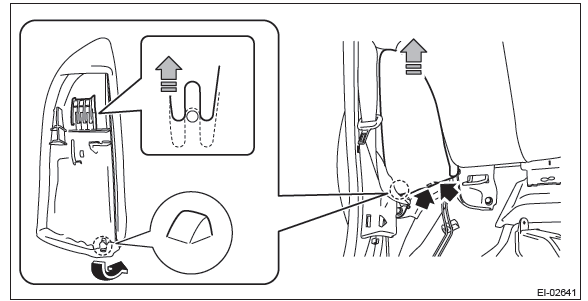
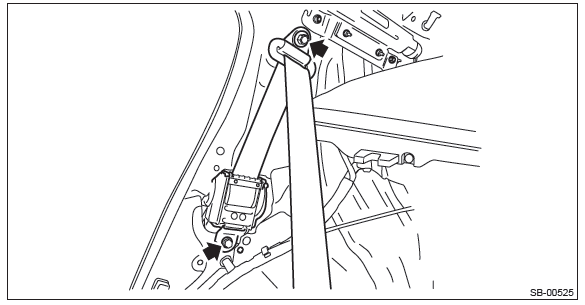
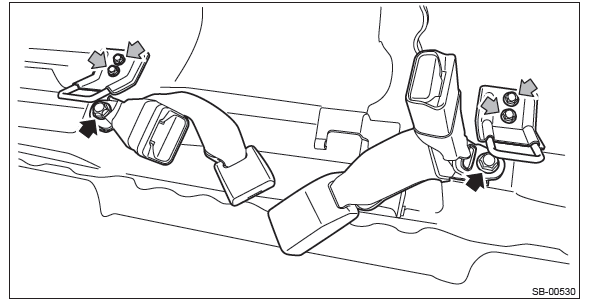
- Remove the lower anchor bolt of the outer belt assembly.

- Release the clips, and remove the rear quarter trim UPR.
- Pull out the seat belt and remove the rear quarter trim UPR.
6) Remove the outer seat belt assembly.
- Remove the bolts and remove the seat belt anchor.
- Remove the bolts, and remove the seat belt retractor assembly.
2. OUTER BELT ASSEMBLY RH & LH (OUTBACK MODEL)
1) Disconnect the ground cable from battery and wait for at least 60 seconds before starting work.
CAUTION: The airbag system is fitted with a backup power supply. After disconnecting the battery ground cable, the airbag may operate if you do not wait for 60 seconds before starting the service of airbag system.
2) Remove the rear seat cushion.
- Pull up the seat cushion and release the hook.
CAUTION: If the hook is disconnected from the vehicle body, replace the hook with the new part to prevent the decline of the fixed force of the seat.

- Remove the hook (A) by pushing it back while lifting the front side of the seat cushion, and remove the seat cushion.
3) Release the clips and claws, and then remove the side sill cover - rear INN. (On the side where seat belt assembly is removed)
CAUTION: Do not pull with excessive force. Doing so may damage the claws of the side sill cover INN.

NOTE: To release the claws of the side sill cover INN, the following steps are recommended.
1. Take out the weather strip from under the side sill cover INN.
2. Turn over the floor mat and release the claw (C-C and D-D) by accessing from behind the side sill cover INN.
4) Tilt the backrest forward, and then turn over the backrest backside mat.
5) Remove the backrest side pad assembly. (On the side where seat belt assembly is removed)
- Disconnect the backrest cable and reclining lever cable.
- Remove the screws and remove the reclining lever assembly by pulling it downward.
Preparation tool: Stubby screwdriver
- Turn over the bottom end of the backrest side pad in the forward direction so that the claws are released.
- Remove the backrest side pad by pulling it up.
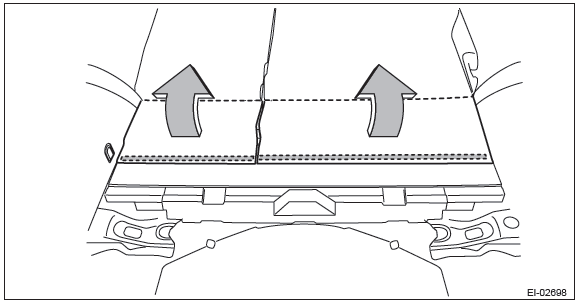
6) Remove the clips, and remove the luggage floor box and rear floor edge cover.
7) Remove the rear quarter trim LWR. (On the side where seat belt assembly is removed)
- Remove the caps, screws, and bolts. (A), (C)
- Take out the hook and remove the screw inside. (B)
- Remove the clips, and remove the rear quarter trim LWR.
8) Remove the outer seat belt assembly.
- Remove the seat belt lower anchor bolt.
- Open the cap and remove the bolt to remove the seat belt anchor.
- Remove the bolts, and remove the seat belt retractor assembly.
3. SHOULDER BELT ASSEMBLY CTR (SEDAN MODEL)
1) Disconnect the ground cable from battery and wait for at least 60 seconds before starting work.
CAUTION: The airbag system is fitted with a backup power supply. After disconnecting the battery ground cable, the airbag may operate if you do not wait for 60 seconds before starting the service of airbag system.
2) Remove the rear seat cushion.
- Pull up the seat cushion and release the hook.
CAUTION: If the hook is disconnected from the vehicle body, replace the hook with the new part to prevent the decline of the fixed force of the seat.
- Remove the hook (A) by pushing it back while lifting the front side of the seat cushion, and remove the seat cushion.
3) Release the clips and claws, and remove the side sill covers - rear INN on the left and right sides.
CAUTION: Do not pull with excessive force. Doing so may damage the claws of the side sill cover INN.

NOTE: To release the claws of the side sill cover INN, the following steps are recommended.
1. Take out the weather strip from under the side sill cover INN.
2. Turn over the floor mat and release the claw (C-C and D-D) by accessing from behind the side sill cover INN.
4) Remove the left and right rear quarter trim LWR.
- Remove the left and right backrest side pad.
- Remove the screws.
Preparation tool: Stubby screwdriver
- Turn over the bottom end of the backrest side pad in the forward direction so that the claws are released.
- Remove the backrest side pad by pulling it up.
- Pull the release lever in the trunk room, and then tilt the left and right backrest forward.
- Release the clips of the trunk trim panel assembly - side.
- Remove the clips, and remove the left and right rear quarter trim LWR.
5) Remove the left and right rear quarter trim UPR.
- Remove the lower anchor bolt of the outer belt assembly.
- Release the clips, and remove the rear quarter trim UPR.

- Pull out the seat belt and remove the rear quarter trim UPR.
6) Release the clips and remove the trunk trim panel assembly - front on the left and right sides.
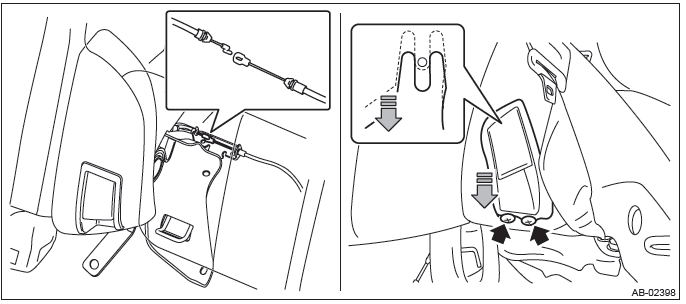
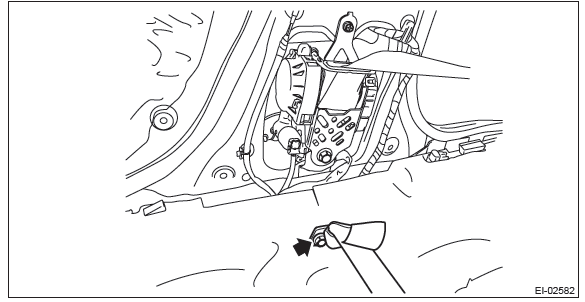
7) Remove the lower anchor of the shoulder belt assembly CTR.
- Remove the nuts and remove the ISO-FIX anchor.
- Remove the bolts, and remove the lower anchor of shoulder belt assembly CTR.
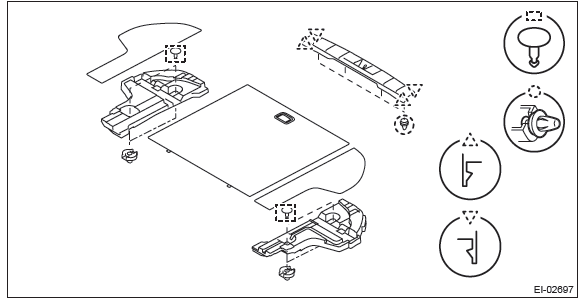
8) Remove the rear shelf panel assembly.
- Release the clips to float the rear shelf panel assembly.
- Release the belt guide and guide the anchor of rear center seat belt to behind the shelf panel.
- Disconnect the connector of high-mounted stop light.
- Remove the rear shelf panel assembly.
9) Remove the bolts, and remove the shoulder belt assembly CTR.
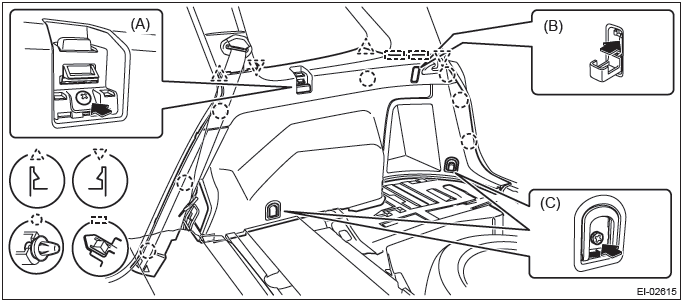
4. SHOULDER BELT ASSEMBLY CTR (OUTBACK MODEL)
1) Disconnect the ground cable from battery and wait for at least 60 seconds before starting work.
CAUTION: The airbag system is fitted with a backup power supply. After disconnecting the battery ground cable, the airbag may operate if you do not wait for 60 seconds before starting the service of airbag system.
2) Remove the rear seat cushion.
- Pull up the seat cushion and release the hook.
CAUTION: If the hook is disconnected from the vehicle body, replace the hook with the new part to prevent the decline of the fixed force of the seat.

- Remove the hook (A) by pushing it back while lifting the front side of the seat cushion, and remove the seat cushion.

3) Release the clips and claws, and remove the side sill covers - rear INN on the left and right sides.
CAUTION: Do not pull with excessive force. Doing so may damage the claws of the side sill cover INN.
NOTE: To release the claws of the side sill cover INN, the following steps are recommended.
1. Take out the weather strip from under the side sill cover INN.
2. Turn over the floor mat and release the claw (C-C and D-D) by accessing from behind the side sill cover INN.
4) Tilt the backrest forward, and then turn over the backrest backside mat.
5) Remove the left and right backrest side pad assembly.
- Disconnect the backrest cable and reclining lever cable.
- Remove the screws and remove the reclining lever assembly by pulling it downward.
Preparation tool: Stubby screwdriver
- Turn over the bottom end of the backrest side pad in the forward direction so that the claws are released.
- Remove the backrest side pad by pulling it up.
6) Remove the clips, and remove the luggage floor box and rear floor edge cover.
7) Remove the left and right rear quarter trim LWR.
- Remove the caps, screws, and bolts. (A), (C)
- Take out the hook and remove the screw inside. (B)
- Remove the clips, and remove the rear quarter trim LWR.
8) Remove the left and right rear quarter trim UPR.
- Open the cap and remove the bolt to remove the seat belt anchor.
- Remove the clips, and remove the rear quarter trim UPR - front.
- Remove the clips, and remove the rear quarter trim UPR - rear.
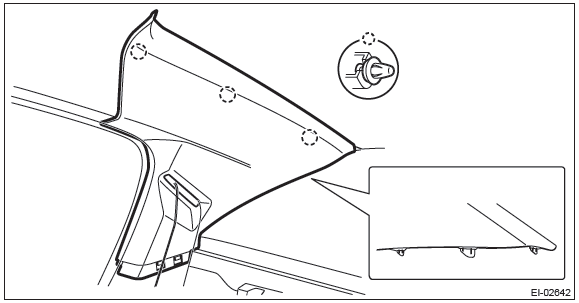
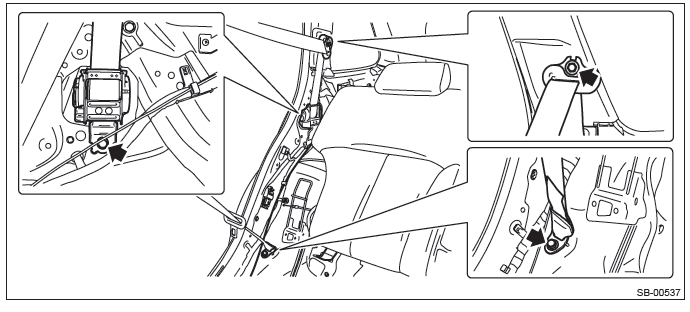
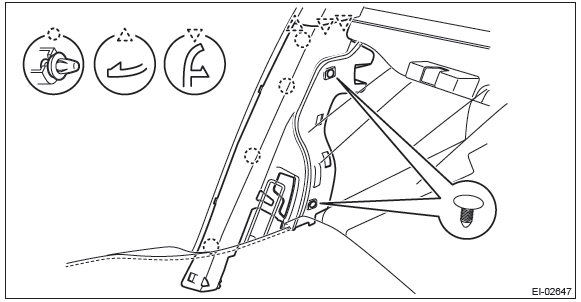
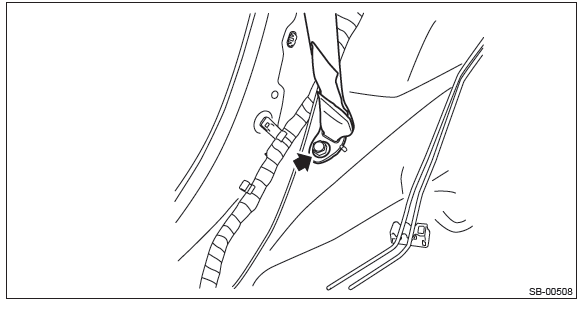
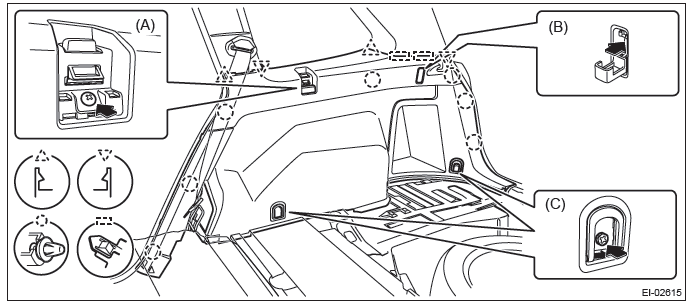
9) Remove the left and right front pillar trims.
- Pull the upper part of the front pillar trim towards the center of the vehicle.
- Insert long-nose pliers into the top part of the trim, grip the clip with the pliers and twist 90º in that position.
CAUTION: Be careful not to damage the pillar trim surface and curtain airbag module when inserting the pliers.
- Holding the clip twisted as in the previous step, remove the front pillar trim from the clip.
- Remove the clip and the front pillar trim.
10) Release the claws, and then remove the side sill cover - front INN on the left and right sides.
CAUTION: Do not pull with excessive force. Doing so may damage the claws of the side sill cover INN.
NOTE: To release the claws of the side sill cover INN, the following steps are recommended.
1. Take out the weather strip from under the side sill cover INN.
2. Turn over the floor mat and release the claw (C-C) by accessing from behind the side sill cover INN.
11) Remove the left and right center pillar trim LWR.
- Release the clip by pulling the center pillar trim LWR toward you.
- Expand the claws of center pillar trim LWR outward and remove it from the center pillar trim UPR.
CAUTION: Do not expand the center pillar trim LWR excessively. Doing so may damage the trim.
NOTE: First release the claw located to the rear of the vehicle.
12) Remove the left and right center pillar trim UPR.
- Remove the seat belt lower anchor bolt.
- Release the clip by pulling the center pillar trim UPR toward you.
- Remove the center pillar trim UPR by lowering the entire trim.
- Pull out the seat belt from the center pillar trim UPR.
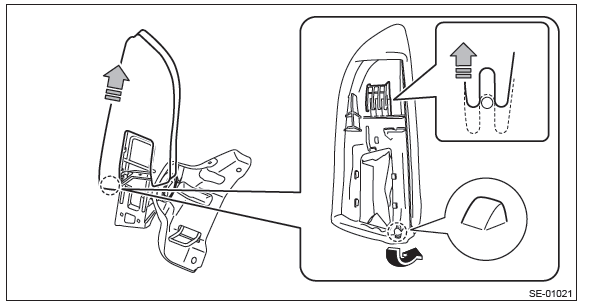
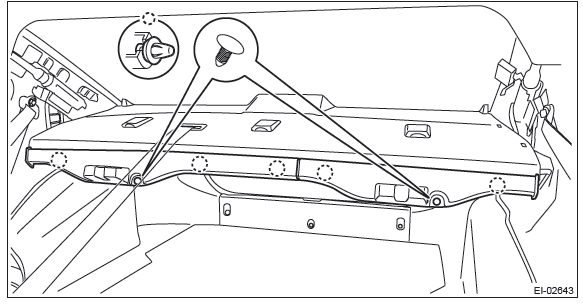
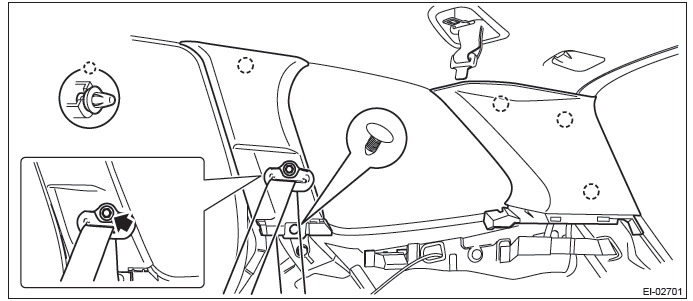
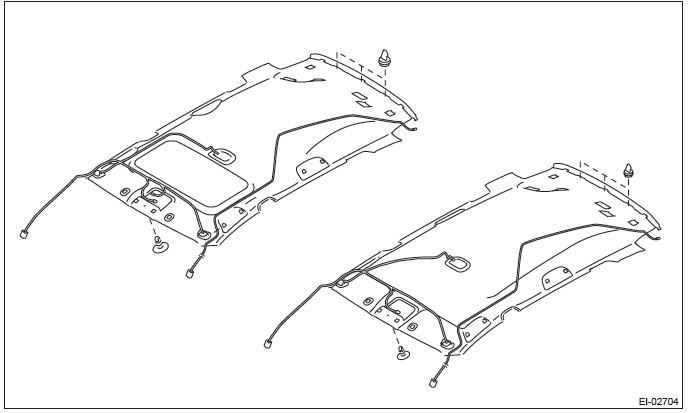
13) Remove the overhead console assembly.
- Push and open the rear end of the overhead console lid, and remove the screws.
- Disconnect the connector and remove the overhead console assembly.
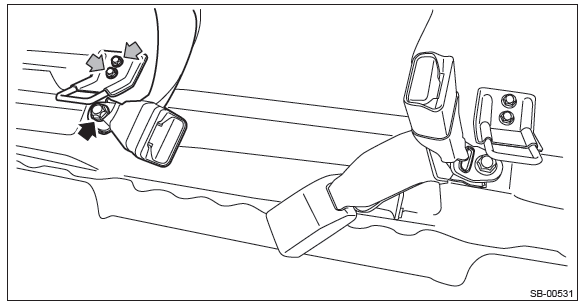
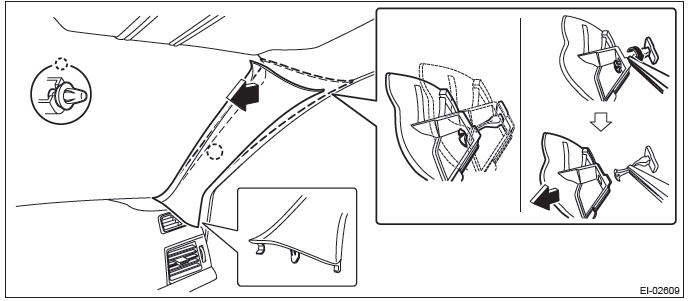
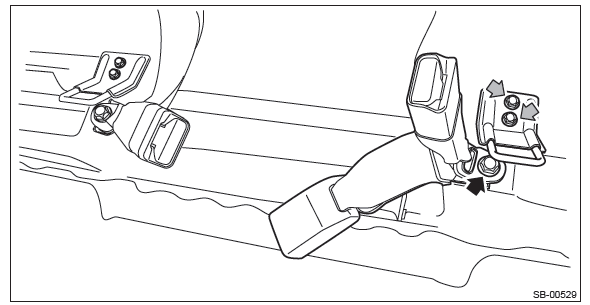
14) Remove the left and right sun visor assembly.
- Remove the cover, loosen the screws, and remove the sun visor assembly.
- Press the both sides of the sun visor hook using a flat tip screwdriver.
- Remove the sun visor hook by pulling toward you.
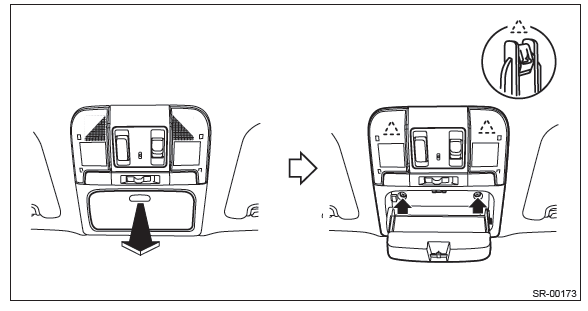
15) Remove the room light assembly.
- Release the claws and remove the cover.
- Remove the two screws.
- Disconnect the connector and remove the room light assembly.
16) Remove the luggage room light.
- Release the claws and remove the luggage room light main body.
- Disconnect the connector and remove the luggage room light.
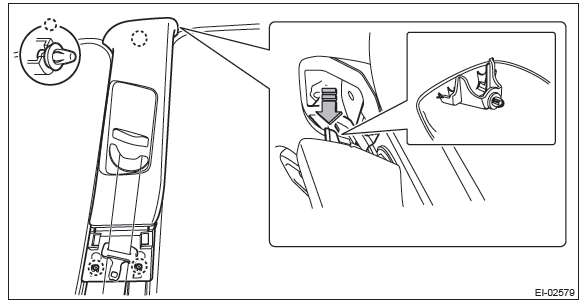
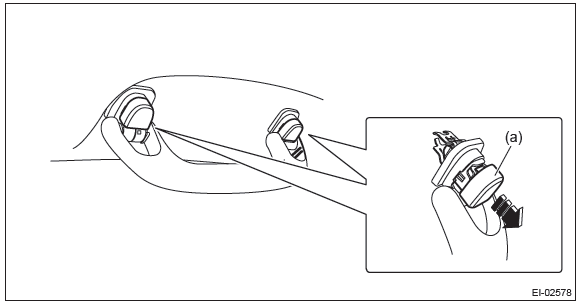
17) Remove all assist grip assembly.
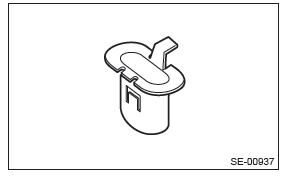
- Remove the cap (a).
- Pull the assist grip toward you (to the vehicle center) and remove the metal clip from the bracket.
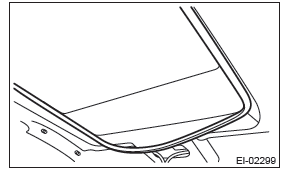
18) Remove the sun roof garnish. (model with sunroof)
19) Disconnect the roof harness connector at the front pillar RH.
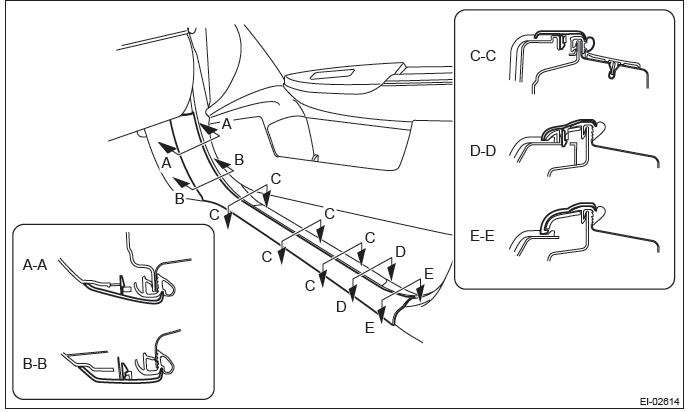
20) Remove the roof trim assembly.
- Release the clips and remove the feeder cable from the roof trim.
- Take out the roof trim assembly from the rear gate opening to outside.
21) Remove the bolts, and remove the shoulder belt assembly CTR.

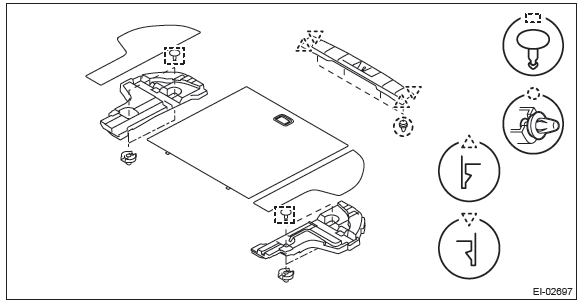
5. CENTER BELT RH ASSEMBLY & LH ASSEMBLY
1) Disconnect the ground cable from battery and wait for at least 60 seconds before starting work.
CAUTION: The airbag system is fitted with a backup power supply. After disconnecting the battery ground cable, the airbag may operate if you do not wait for 60 seconds before starting the service of airbag system.
2) Remove the rear seat cushion.
- Pull up the seat cushion and release the hook.
CAUTION: If the hook is disconnected from the vehicle body, replace the hook with the new part to prevent the decline of the fixed force of the seat.

- Remove the hook (A) by pushing it back while lifting the front side of the seat cushion, and remove the seat cushion.

3) Remove the center belt RH assembly & LH assembly.
- Remove the bolts and remove the ISO-FIX anchor.
- Remove the bolts, then remove the center belt RH assembly & LH assembly.
- Sedan model
- OUTBACK model
B: INSTALLATION
1. OUTER BELT RH ASSEMBLY & LH ASSEMBLY (SEDAN MODEL)
CAUTION: If the hook is disconnected from the vehicle body, replace the hook with the new part to prevent the decline of the fixed force of the seat.

1) Before installation, perform a unit inspection of retractor. <Ref. to SB-63, INSPECTION, Rear Seat Belt.>
2) Install the outer belt assembly.
CAUTION:
- During installation, make sure that the seat belts are not twisted.
- After installation, make sure that the seat belts are smoothly extended and wound.
Tightening torque: REAR SEAT BELT (SEDAN MODEL): <Ref. to SB-3, REAR SEAT BELT (SEDAN MODEL), COMPONENT, General Description.>
3) Install the remaining parts in the reverse order of removal.
4) After installation, check the following points.
- The seat belt is not twisted.
- The seat belt can be pulled out and retracted smoothly.
2. OUTER BELT RH ASSEMBLY & LH ASSEMBLY (OUTBACK MODEL)
CAUTION: If the hook is disconnected from the vehicle body, replace the hook with the new part to prevent the decline of the fixed force of the seat.
1) Before installation, perform a unit inspection of retractor. <Ref. to SB-63, INSPECTION, Rear Seat Belt.>
2) Install the outer seat belt retractor.
Tightening torque:
Rear seat belt (OUTBACK model): <Ref. to SB-4, REAR SEAT BELT (OUTBACK MODEL),
COMPONENT,
General Description.>
3) Install the rear quarter trim UPR.
4) Install the outer belt shoulder anchor.
5) Install the outer belt lower anchor.
CAUTION:
- During installation, make sure that the seat belts are not twisted.
- After installation, make sure that the seat belts are smoothly extended and wound.
Tightening torque:
Rear seat belt (OUTBACK model): <Ref. to SB-4, REAR SEAT BELT (OUTBACK MODEL),
COMPONENT,
General Description.>
6) Install the remaining parts in the reverse order of removal.
7) After installation, check the following points.
- The seat belt is not twisted.
- The seat belt can be pulled out and retracted smoothly.
3. SHOULDER BELT CTR ASSEMBLY (SEDAN MODEL)
CAUTION: If the hook is removed from vehicle body, replace the hook with the new part to avoid the deterioration of seat securing.
1) Install the shoulder belt retractor.
Tightening torque:
REAR SEAT BELT (SEDAN MODEL): <Ref. to SB-3, REAR SEAT BELT (SEDAN MODEL),
COMPONENT,
General Description.>
2) Install the rear shelf trim.
3) Install the shoulder belt lower anchor.
CAUTION:
- During installation, make sure that the seat belts are not twisted.
- After installation, make sure that the seat belts are smoothly extended and wound.
Tightening torque:
REAR SEAT BELT (SEDAN MODEL): <Ref. to SB-3, REAR SEAT BELT (SEDAN MODEL),
COMPONENT,
General Description.>
4) Rear quarter upper trim 5) Install the remaining parts in the reverse order of removal.
6) After installation, check the following points.
- The seat belt is not twisted.
- The seat belt can be pulled out and retracted smoothly.
4. SHOULDER BELT CTR ASSEMBLY (OUTBACK MODEL)
CAUTION: If the hook is removed from vehicle body, replace the hook with the new part to avoid the deterioration of seat securing.
1) Install the shoulder belt retractor.
Tightening torque:
Rear seat belt (OUTBACK model): <Ref. to SB-4, REAR SEAT BELT (OUTBACK MODEL),
COMPONENT,
General Description.>
2) Install the roof trim.
3) Install the remaining parts in the reverse order of removal.
4) After installation, check the following points.
- The seat belt is not twisted.
- The seat belt can be pulled out and retracted smoothly.
5. CENTER BELT ASSEMBLY RH & LH
1) Install the center belt assembly.
Tightening torque:
REAR SEAT BELT (SEDAN MODEL): <Ref. to SB-3, REAR SEAT BELT (SEDAN MODEL),
COMPONENT,
General Description.>
Rear seat belt (OUTBACK model): <Ref. to SB-4, REAR SEAT BELT (OUTBACK MODEL),
COMPONENT,
General Description.>
2) Install the ISO-FIX anchor.
Tightening torque: 25 N*m (2.55 kgf-m, 18.4 ft-lb)
3) Install the rear seat cushion.
CAUTION: If the hook is disconnected from the vehicle body, replace the hook with the new part to prevent the decline of the fixed force of the seat.
4) Install the remaining parts in the reverse order of removal.
5) After installation, check the following points.
- The seat belt is not twisted.
- Check that the airbag warning light lights up for approximately 6 seconds and then turns off when connecting the battery ground cable and turning the ignition switch to ON.
C: INSPECTION
1. VISUAL INSPECTION
Check for the following, and replace with new parts if necessary.
- Seat belt is slackened, bent or worn.
- Seat belt is abnormally wound or extended.
- Inner belt ASSY is deformed or damaged.
- Seat belt buckle cannot be engaged properly.
2. ELR LOCK MECHANISM INSPECTION
1) Hold the retractor upright (as installed in the vehicle) and check the ELR lock mechanism.
2) Tilt the retractor from the upright posture and check the following points.
- It does not lock if the inclination angle is 12º or less.
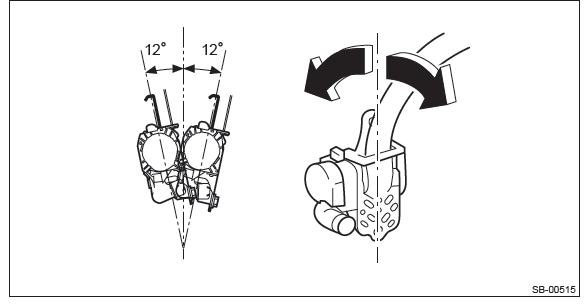
- It remains locked if the inclination angle is 27º or more.
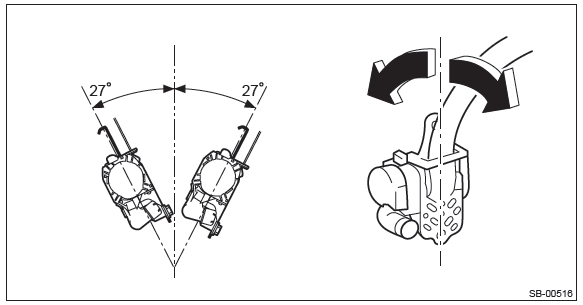
3) If the ELR lock mechanism does not operate correctly, replace the outer belt assembly with a new part.
READ NEXT:
 General Description of Lighting System
A: SPECIFICATION
B: CAUTION
Before disassembling or reassembling parts, always disconnect the battery ground cable from battery.
When replacing the audio, control module and other par
Combination Switch (Light)
A: REMOVAL
1) Position the front wheels straight ahead. (After moving a vehicle 5 m (16
ft) or more with front wheels positioned
straight ahead, make sure that the vehicle moves straight ahead.)
2)
SEE MORE:
Propeller Shaft
A: REMOVAL
CAUTION:
Do not disassemble the center EDJ of the propeller shaft.
Before removing propeller shaft, wrap the metal parts attached to the
rubber boot of center EDJ
with a cloth or rubber material, as shown in the figure. The rubber boot may
be damaged due to interference
with adja
Type B inside mirror (if equipped)
1) Electronic compass display
2) Rear view image display
3) HomeLink® button 1
4) HomeLink® button 2
5) Function indicator
6) HomeLink® button 3
7) Photosensor
8) Power button
9) Compass button
The mirror has the following features.
● Auto-dimming function for anti-glare capabil
