
Subaru Outback (BR): Rear window side seating position
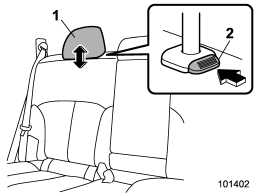
1) Head restraint 2) Release button
To raise:
Pull the head restraint up.
To lower:
Push the head restraint down while pressing the release button on the top of the seatback.
To remove:
While pressing the release button, pull out the head restraint.
To install:
Install the head restraint into the holes that are located on the top of the seatback until the head restraint locks.
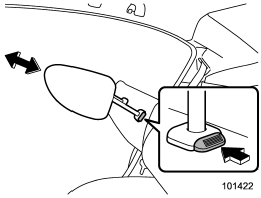
The head restraint should be adjusted so that the center of the head restraint is closest to the top of the occupant’s ears. When the seats are not occupied, lower the head restraints to improve rearward visibility.
NOTE
For Legacy, it is not possible to remove or install the head restraint without folding down the rear seatback. Fold down the rear seatback and then remove or install the head restraint.
READ NEXT:
 Rear center seating position
CAUTION
The head restraint is not intended to be used at the lowest position. Before sitting on the seat, raise the head restraint to the extended position.
A) When not used (retracted po
Armrest
To lower the armrest, pull on the top edge of the armrest.
WARNING
To avoid the possibility of serious injury, passengers must never be allowed
to sit on the center armrest while the vehicle is
SEE MORE:
Valet mode
When you choose the valet mode, the alarm system does not operate. In valet mode,
the remote transmitter is used only for locking and unlocking the doors and rear
gate (Outback) and panic activation.
To enter the valet mode, change the setting of your vehicle’s alarm system for
deactivation
Universal Joint
A: REMOVAL
1) Adjust the tilt position of the steering column to the lowest position and
lock the tilt lever.
2) Prevent the steering wheel from turning using the seat belt.
3) Remove the universal joint.
Place alignment marks on universal joint.
Remove the universal joint bolt and remove the
