Subaru Outback (BR): Auto-dimming mirror with compass (if equipped)
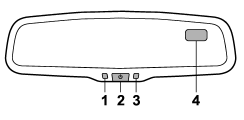
1) LED
2) Switch
3) Sensor
4) Compass display
The auto-dimming mirror has an anti-glare feature which automatically reduces glare coming from headlights of vehicles behind you. It also contains a built-in compass.
● By pressing and holding the switch for less than 3 seconds, the automatic dimming function is toggled on or off. When the automatic dimming function is on, the LED indicator will illuminate. Even with the mirror in anti-glare mode, the mirror surface turns bright if the transmission is shifted into reverse. This is to ensure good reward visibility during reversing.
● By pressing and releasing the switch for 3 seconds, the compass display is toggled on or off. When the compass is on, an illuminated compass reading will appear in the upper right corner of the mirror.
When cleaning the mirror, use a paper towel or similar material dampened with glass cleaner. Do not spray glass cleaner directly on the mirror as that may cause the liquid cleaner to enter the mirror housing and damage the mirror.
READ NEXT:
 Photosensors in the mirror
The Subaru Outback (BR) features a mirror equipped with photosensors on both its front and rear sides. These sensors are designed to detect bright glare from headlights of vehicles behind you during
Compass calibration zones
Calibration Zones for Compass
1. Check the "Compass calibration zones" map displayed above to ensure that the compass zone setting matches your geographic area accurately.
2. Hold down t
Compass calibration
1. If a “C” is displayed in the compass window, the compass needs to be calibrated.
2. Drive the vehicle in a circle at 5 mph (8 km/h) or less until the display reads
a direction.
3. You can a
SEE MORE:
Trunk Lid
A: REMOVAL
1. TRUNK LID DAMPER STAY
1) Open the trunk lid.
2) Remove the trunk lid damper stay.
Float the lock pin using a flat tip screwdriver, etc. and slide it.
Remove the trunk lid damper stay by pulling the damper stay mounting
point.
2. TRUNK LID HINGE
1) Open the trunk lid.
2) Remove
Initialization of power window
If the vehicle’s battery is disconnected due to situations such as battery or
fuse replacement, the following functions are deactivated.
● One-touch auto up/down function
● Anti-entrapment function
Initialize the power window in the following procedure to reactivate such functions
