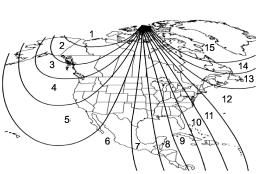
Subaru Outback (BR): Compass calibration zones
Subaru Outback (BR) 2010-2015 Owners Manual / Instruments and controls / Mirrors / Auto-dimming mirror with compass (if equipped) / Compass calibration zones

Calibration Zones for Compass
1. Check the "Compass calibration zones" map displayed above to ensure that the compass zone setting matches your geographic area accurately.
2. Hold down the switch for 6 seconds until the zone selection menu appears (a number will appear in the mirror compass window).
3. Press the switch multiple times until the appropriate zone setting for your location is shown.
4. Let go of the button after 10 seconds to exit the zone setting mode.
READ NEXT:
 Compass calibration
1. If a “C” is displayed in the compass window, the compass needs to be calibrated.
2. Drive the vehicle in a circle at 5 mph (8 km/h) or less until the display reads
a direction.
3. You can a
 Auto-dimming mirror with compass and HomeLink® (if equipped)
1) HomeLink® button 1
2) HomeLink® button 2
3) LED
4) HomeLink® button 3
5) Sensor
6) Automatic dimming on/off button
7) Compass display button
8) Compass display
The auto-dimming mirror
 Photosensors
The mirror has a photosensor attached on both the front and back sides. During
nighttime driving, these sensors detect distracting glare from vehicle headlights
behind you and automatically dim
SEE MORE:
 Seek tuning (SEEK)
If you press the “” or “”
side of the “SEEK” button briefly, the radio will automatically search for a receivable
station and stop at the first one it finds. This function may not be available,
however, when radio signals are weak. In such a situation, perform manual tuning
to
 CHECK ENGINE warning light/Malfunction indicator lamp
CAUTION
If the CHECK ENGINE warning light/ malfunction indicator lamp illuminates while
you are driving, have your vehicle checked/repaired by your SUBARU dealer as soon
as possible. Continued vehicle operation without having the emission control system
checked and repaired as necessary could
© 2010-2026 Copyright www.suoutback.com

