Subaru Outback (BR): Battery (inspection, removal, installation)
.webp "Starting-Charging Systems Battery (inspection, removal, installation)")
A: REMOVAL
1) After disconnecting the battery ground terminal, remove the terminal cover, then disconnect the positive terminal.
2) Remove the battery cable holder from the battery rod.
3) Remove flange nut from the battery rod and remove battery holder.
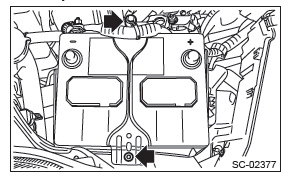
Remove the battery.
B: INSTALLATION
Install in the reverse order of removal.
Tightening torque: 3.5 N*m (0.4 kgf-m, 2.6 ft-lb)
NOTE:
- Clean the battery cable terminals and apply grease to retard the formation of corrosion.
- Connect the positive (+) terminal, and then connect the negative (-) terminal of the battery.
- After the battery is installed, initial diagnosis of the electronic throttle control is performed. Wait for 10 seconds or more after turning the ignition switch to ON, and then start the engine.
C: INSPECTION
WARNING:
- Electrolyte is corrosive acid, and has toxicity; be careful of handling the fluid.
- Make sure the electrode does not come into contact with skin, eyes or clothing. Especially at contact with eyes, flush with water for 15 minutes and get prompt medical attention.
- In addition, be careful not to let the electrode contact with the coated parts.
- Be careful when handling the batteries because they produce explosive gases.
- Be sure to keep battery away from any fire.
- For safety, in case an explosion does occur, wear eye protection or shield your eyes when working near any battery. In addition, never lean over the battery.
- Ventilate sufficiently when using or charging battery in enclosed space.
- Before starting work, remove rings, metal watch-bands, and other metal jewelry.
- Never allow metal tools to contact the positive battery terminal and anything connected to it while you are at the same time in contact with any other metallic portion of the vehicle.
1. EXTERNAL PARTS
Check the battery case, top cover, vent plugs, and terminal posts for dirt or cracks. If necessary, clean with water and wipe with a dry cloth.
Apply a thin coat of grease on the terminal posts to prevent corrosion.
2. ELECTROLYTE LEVEL
Check the electrolyte level in each cell. If the level is below MIN level, bring the level to MAX level by pouring distilled water into the battery cell. Do not fill beyond MAX level.
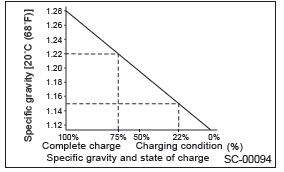
3. SPECIFIC GRAVITY OF ELECTROLYTE
1) Measure specific gravity of electrolyte using a hydrometer and a thermometer.
Specific gravity varies with temperature of electrolyte so that it must be corrected at 20ºC (68ºF) using the following calculation:
S20 = St + 0.0007 × (t - 20)
S20: Specific gravity corrected at electrolyte temperature of 20ºC (68ºF)
St: Measured specific gravity
t: Measured temperature (ºC)
Judge whether or not battery must be charged, according to corrected specific gravity.
Standard specific gravity: 1.220 - 1.290 [at 20ºC (68ºF) ]
2) Measuring the specific gravity of the electrolyte in the battery will disclose the state of charge of the battery. The relation between specific gravity and state of charge is as shown in the figure.
D: MEASUREMENT
WARNING:
Do not bring an open flame close to the battery when working.
CAUTION:
- Prior to charging, corroded terminals should be cleaned with a brush and common caustic soda solution.
- Be careful since battery electrolyte overflows while charging the battery.
- Observe instructions when handling the battery charger.
- Before charging the battery on the vehicle, disconnect the battery ground terminal to prevent damage of generator diodes or other electrical units.
1. JUDGMENT OF BATTERY IN CHARGED CONDITION
1) Specific gravity of electrolyte should be held within the specific range from 1.250 to 1.290 for one hour or more.
2) Voltage per battery cell should be held at a specific value in a range from 2.5 to 2.8 V for one hour or more.
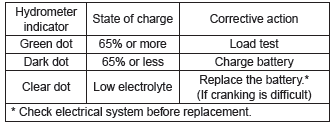
2. CHECK CONDITION OF CHARGE WITH HYDROMETER
3. NORMAL CHARGING
Charge the battery at the current value specified by manufacturer or at approximately 1/10 of battery's ampere-hour rating.
4. QUICK CHARGING
CAUTION:
- Observe the items in "3. NORMAL CHARGING".
- Never use 10 A or more when charging the battery because it will shorten the battery life.
Quick charging is a method that the battery is charged in a short period of time with a relatively large current by using a quick charger.
Since a large current flow raises electrolyte temperature, the battery is subject to damage if the large current is used for prolonged time. For this reason, quick charging must be carried out within a current range that will not raise the electrolyte temperature to 40ºC (104ºF) or more.
Also the quick charging is a temporary mean to bring battery voltage up to some level, and battery should be charged slowly with low current as a rule.
READ NEXT:
 Basic Diagnostic Procedure of Engine - H4SO
A: PROCEDURE
1. ENGINE
Check List for Interview
A: CHECK
1. CHECK LIST NO. 1
Check the following item when problem has occurred.
NOTE: Use copies of this page for interviewing customers.
Engine Control Module (ECM) I/O Signal
A: ELECTRICAL SPECIFICATION
Input/output name:
Crankshaft position sensor
Camshaft position sensor
Measuring condition:
After warming-up
At idling
Engine Condition Data
A: ELECTRICAL
SEE MORE:
Behavior with key lock-in prevention function non-operational
● If the lock lever is turned to the rear (“LOCK”) position with the driver’s
door open and the driver’s door is then closed with the lock lever in that position,
the driver’s door is locked. . If the spare key is used to lock the driver’s door
from the outside of the vehicle
Preparing to drive
You should perform the following checks and adjustments every day before you
start driving.
1. Check that all windows, mirrors, and lights are clean and unobstructed.
2. Check the appearance and condition of the tires. Also check tires for proper
inflation.
3. Look under the vehicle for any s
