Subaru Outback (BR): Front Seat Belt
A: REMOVAL
1. OUTER BELT ASSY
CAUTION:
- The airbag system is fitted with a backup power supply. After disconnecting the battery ground cable, the airbag may operate if you do not wait for 60 seconds before starting the service of airbag system.
- Do not drop or subject the pretensioner to any impact.
- Since the pretensioner and bracket are integrated as a unit, do not disassemble them.
1) Before working, turn the ignition switch to OFF, disconnect the battery ground cable, and wait for 60 seconds or more.
NOTE: Remove the front and rear bolts from the slide rail of the power seat before removing the battery ground.
2) Tilt the backrest forward and move the seat to the front most position.
CAUTION: For the power seat, after moving the seat, check that the battery ground has been removed. If not, disconnect the battery ground cable and wait for 60 seconds or more.
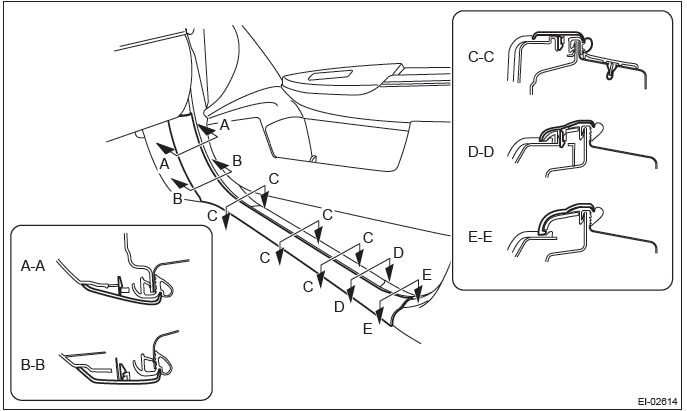
3) Release the claws, and then remove the side sill cover - front INN. (On the side where seat belt assembly is removed)
CAUTION: Do not pull with excessive force. Doing so may damage the claws of the side sill cover INN.
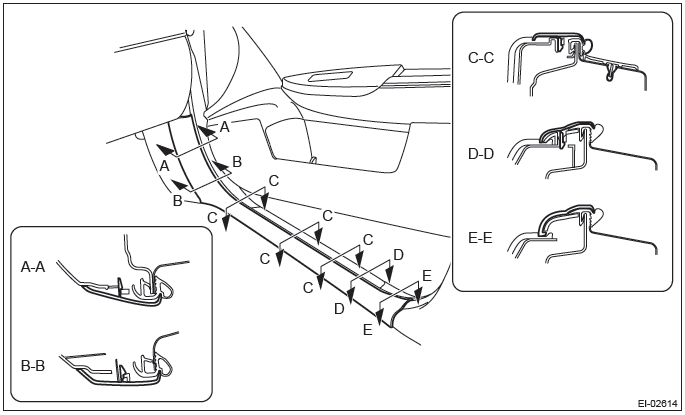
NOTE: To release the claws of the side sill cover INN, the following steps are recommended.
1. Take out the weather strip from under the side sill cover INN.
2. Turn over the floor mat and release the claw (C-C) by accessing from behind the side sill cover INN.
4) Release the clips and claws, and then remove the side sill cover - rear INN. (On the side where seat belt assembly is removed)
CAUTION: Do not pull with excessive force. Doing so may damage the claws of the side sill cover INN.
NOTE: To release the claws of the side sill cover INN, the following steps are recommended.
1. Take out the weather strip from under the side sill cover INN.
2. Turn over the floor mat and release the claw (C-C and D-D) by accessing from behind the side sill cover INN.
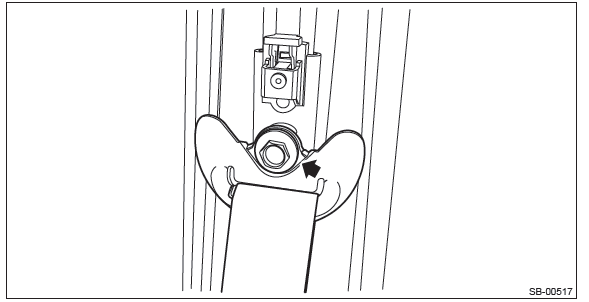
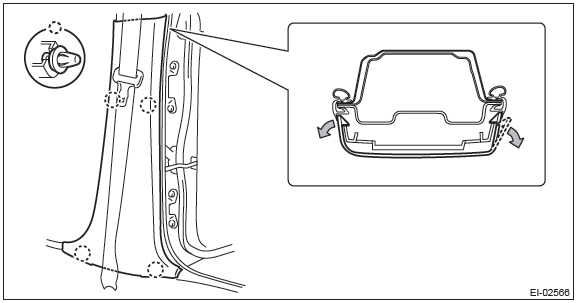
5) Remove the center pillar trim LWR. (On the side where seat belt assembly is removed)
- Release the clip by pulling the center pillar trim LWR toward you.
- Expand the claws of center pillar trim LWR outward and remove it from the center pillar trim UPR.
CAUTION: Do not expand the center pillar trim LWR excessively. Doing so may damage the trim.
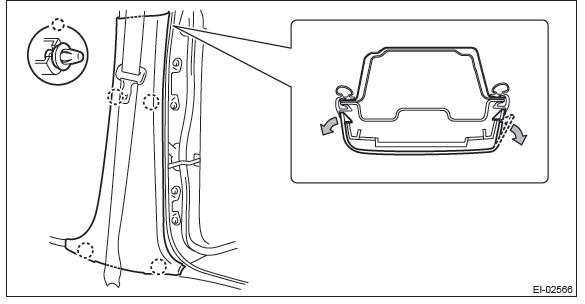
NOTE: First release the claw located to the rear of the vehicle.
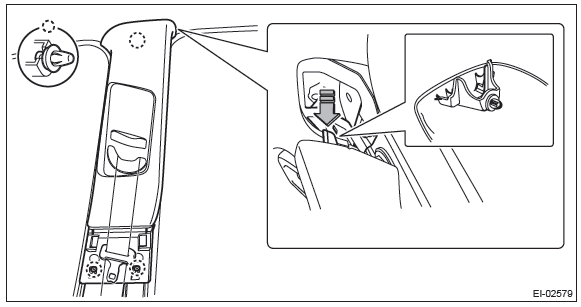
6) Remove the center pillar trim UPR. (On the side where seat belt assembly is removed)
- Release the clip by pulling the center pillar trim UPR toward you.
- Remove the center pillar trim UPR by lowering the entire trim.
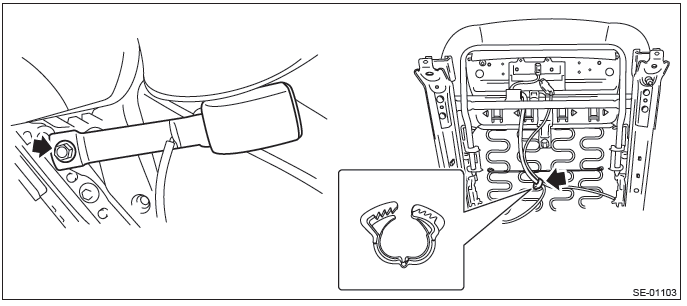
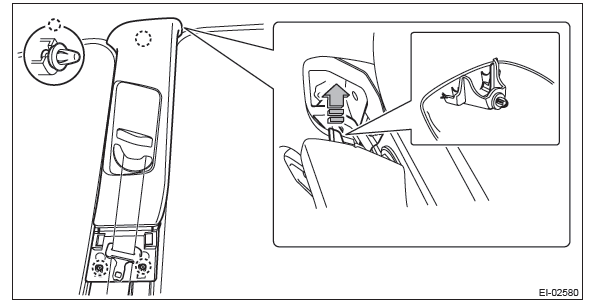
- Remove the shoulder anchor bolt.
7) Remove the seat belt assembly.
- Turn over the floor mat to disconnect the belt tension sensor connector.
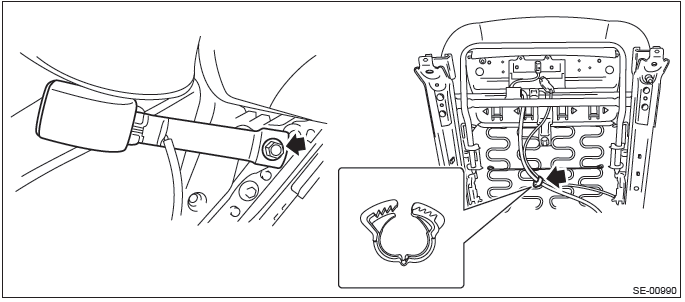
- Remove the bolt to remove the seat belt retractor and lower anchor bolt.
- Pull out the seat belt from the center pillar trim UPR.
2. INNER BELT ASSY
CAUTION: The airbag system is fitted with a backup power supply. After disconnecting the battery ground cable, the airbag may operate if you do not wait for 60 seconds before starting the service of airbag system.
1) Turn the ignition switch to OFF.
2) Disconnect the ground cable from battery and wait for at least 60 seconds before starting work.
NOTE: For the power seat, remove the slide rail installing bolt before removing the battery ground.
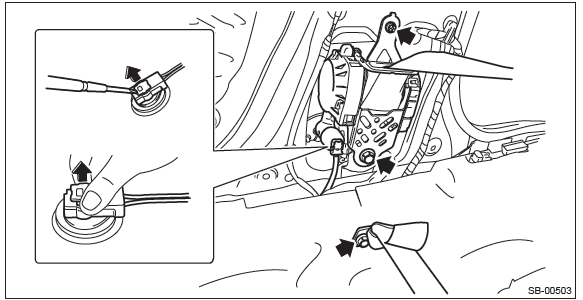
3) Remove the front seats.
- Remove the slide rail installing bolt.
- Tilt the backrest forward and move the seat to the front most position.
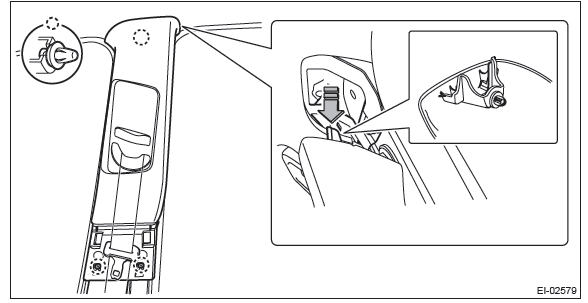
- Remove the rear bolt cover (A) and remove the two bolts.
- Move the seat to the rearmost position.
- Remove the front bolt cover (B) and remove the two bolts.
- Disconnect the connector under the seat.
CAUTION: Disconnect the ground cable from battery, and wait 60 seconds before disconnecting the connector.
- Seat belt warning light connector (driver's seat)
- Occupant detection system harness connector (passenger's seat)
- Side airbag connector
- Seat heater connector (model with seat heater)
- Power seat connector (model with power seats)
- Headrest monitor connector (model with headrest monitor)
4) Remove the inner seat belt assembly.
- Remove the nut and remove the inner seat belt assembly.
- Remove the clip for the inner seat belt harness located under the seat cushion.
3. ADJUSTABLE ANCHOR ASSY
CAUTION:
- The airbag system is fitted with a backup power supply. After disconnecting the battery ground cable, the airbag may operate if you do not wait for 60 seconds before starting the service of airbag system.
- Do not drop or subject the pretensioner to any impact.
- Since the pretensioner and bracket are integrated as a unit, do not disassemble them.
1) Before working, turn the ignition switch to OFF, disconnect the battery ground cable, and wait for 60 seconds or more.
NOTE: For the power seat model, move the seat all the way forward before removing the battery ground terminal.
2) Tilt the backrest forward and move the seat to the front most position.
CAUTION: For the power seat, after moving the seat, check that the battery ground has been removed. If not, disconnect the battery ground cable and wait for 60 seconds or more.
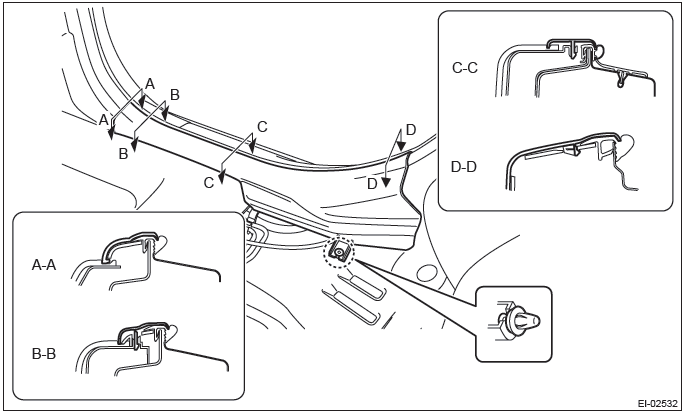
3) Release the claws, and then remove the side sill cover - front INN. (On the side where seat belt assembly is removed)
CAUTION: Do not pull with excessive force. Doing so may damage the claws of the side sill cover INN.
NOTE: To release the claws of the side sill cover INN, the following steps are recommended.
1. Take out the weather strip from under the side sill cover INN.
2. Turn over the floor mat and release the claw (C-C) by accessing from behind the side sill cover INN.
4) Release the clips and claws, and then remove the side sill cover - rear INN. (On the side where seat belt assembly is removed)
CAUTION: Do not pull with excessive force. Doing so may damage the claws of the side sill cover INN.
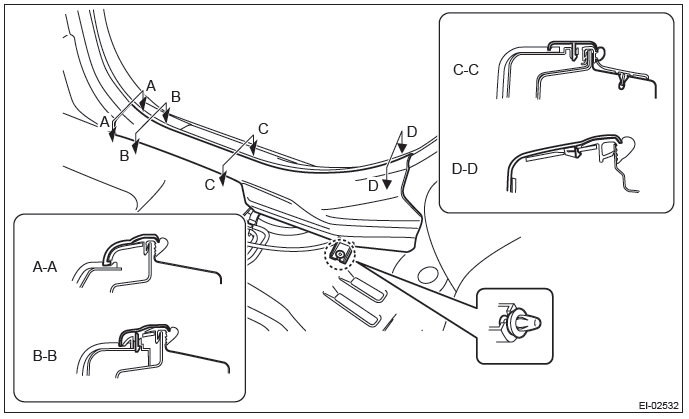
NOTE: To release the claws of the side sill cover INN, the following steps are recommended.
1. Take out the weather strip from under the side sill cover INN.
2. Turn over the floor mat and release the claw (C-C and D-D) by accessing from behind the side sill cover INN.
5) Remove the center pillar trim LWR. (On the side where seat belt assembly is removed)
- Release the clip by pulling the center pillar trim LWR toward you.
- Expand the claws of center pillar trim LWR outward and remove it from the center pillar trim UPR.
CAUTION: Do not expand the center pillar trim LWR excessively. Doing so may damage the trim.
NOTE: First release the claw located to the rear of the vehicle.
6) Remove the center pillar trim UPR. (On the side where seat belt assembly is removed)
- Release the clip by pulling the center pillar trim UPR toward you.
- Remove the center pillar trim UPR by lowering the entire trim.
- Remove the shoulder anchor bolt.

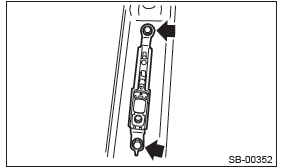
7) Remove the two bolts to remove the adjustable anchor assembly.
B: INSTALLATION
1. OUTER BELT ASSY
CAUTION:
- The parts of the driver and passenger sides are not the same. Before installation, make sure that the correct part is used.
- During installation, make sure that the seat belts are not twisted.
- After installation, make sure that the seat belt can be pulled out and retracted smoothly.
- Make sure that the seat belt harness is not caught anywhere. Wrong harness rooting may cause the harness short from pinch.
- Do not reuse the clips in the upper section of the center pillar
trim. Always replace with a new part.
Once the pillar trim is removed, the clip retention power deteriorates and the center pillar trim may come off.
1) Before installation, perform a unit inspection of retractor. <Ref. to SB-28, INSPECTION, Front Seat Belt.>
2) Install the outer belt assembly.
Tightening torque:
Front seat belt: <Ref. to SB-2, FRONT SEAT BELT, COMPONENT, General
Description.>
3) Assemble the center pillar trim LWR to the center pillar trim UPR securely.
CAUTION: Do not forget to install the seat belt.

4) Assemble the center pillar trim LWR and center pillar trim UPR to the body.
CAUTION: Do not reuse the clips in the upper section of the pillar trim. Always replace with a new part.
- Guide the seat belt through the center pillar trim UPR.
- Insert the upper claws of the pillar trim.
- Attach the pillar trim by fitting the lower clips to the body.
5) Install the remaining parts in the reverse order of removal.
6) After installation, check the following points.
- The seat belt is not twisted.
- The seat belt can be pulled out and retracted smoothly.
- The adjustable anchor can be moved smoothly.
- Check that the airbag warning light lights up for approximately 6 seconds and then turns off when connecting the battery ground cable and turning the ignition switch to ON.
2. INNER BELT ASSY
CAUTION:
- Before installation, make sure that the correct part is used.
- During installation, make sure that the seat belts are not twisted.
- Make sure that the seat belt harness is not caught. Wrong routing of harnesses may cause short circuits because of getting caught.
1) Install the inner belt assembly.
Tightening torque: Front seat belt: <Ref. to SB-2, FRONT SEAT BELT, COMPONENT, General Description.>
2) Locate the seat belt harness and retain it with a harness clip.
3) Install the seat assembly to the body.
CAUTION:
- The seat mounting bolts differ between the front mounting points and
the rear mounting points.
Make sure that you are using correct bolts at correct positions.
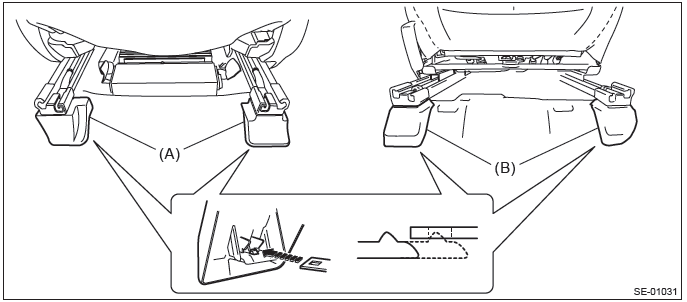
- Tighten the slide rail installing bolt gradually in several steps to the specified torque in the order as shown in the figure.
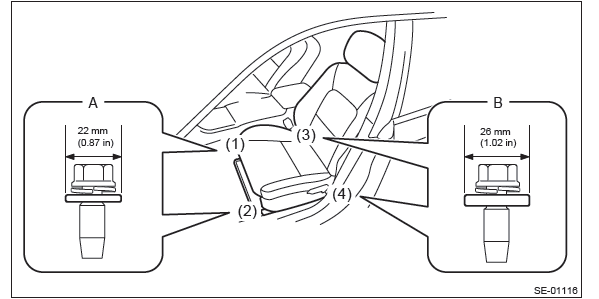
- Front (bolt A): Washer diameter 22 mm (0.87 in)
- Rear (bolt B): Washer diameter 26 mm (1.02 in)
Tightening torque:
Front seat assembly: 53 N*m (5.4 kgf-m, 39.1 ft-lb)
4) Check that no harness is caught by sliding the seat back and forth.
3. ADJUSTABLE ANCHOR ASSY
Referring to the installation procedure for outer belt ASSY, install the parts in the reverse order of removal.
Tightening torque:
Front seat belt: <Ref. to SB-2, FRONT SEAT BELT, COMPONENT, General
Description.>
C: INSPECTION
1. VISUAL INSPECTION
Check for the following, and replace with new parts if necessary.
- Pretensioner is cracked or deformed.
- Adjustable anchor assembly is cracked or deformed.
- Seat belt is slackened, bent or worn.
- Seat belt is abnormally wound or extended.
- Inner belt ASSY is deformed or damaged.
- Seat belt buckle cannot be engaged properly.
2. ELR LOCK MECHANISM INSPECTION
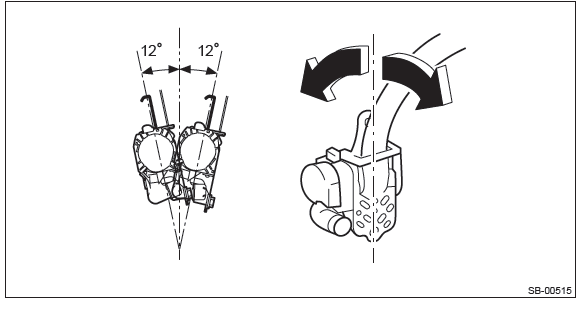
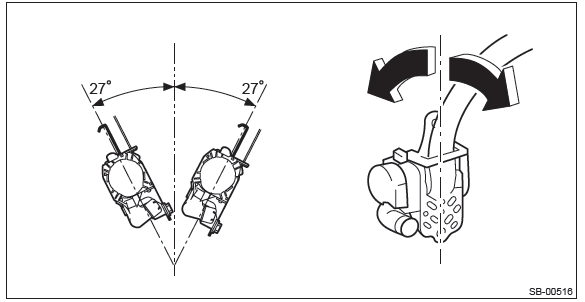
1) Hold the retractor upright (as installed in the vehicle) and check the ELR lock mechanism.
2) Tilt the retractor from the upright posture and check the following points.
- It does not lock if the inclination angle is 12º or less.
- It remains locked if the inclination angle is 27º or more.
3) If the ELR lock mechanism does not operate correctly, replace the outer belt assembly with a new part.
3. SEAT BELT SWITCH INSPECTION
Preparation tool: Circuit tester
- Driver's seat
Check the resistance between the terminals when the inner belt assembly is in each of the following operation conditions.
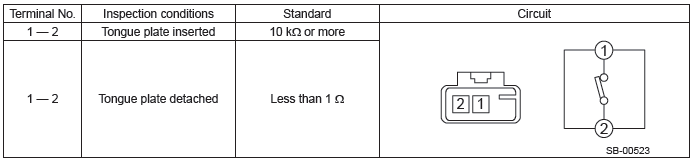
Replace the inner belt assembly if the inspection result is not within the standard value.
- Passenger's seat
Check the current value between the terminals when the inner belt assembly is in each of the following operation conditions.
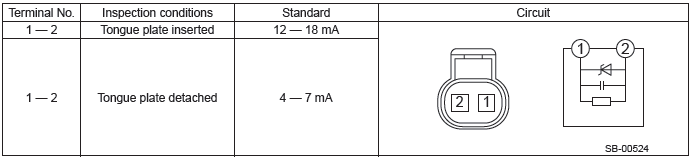
Replace the inner belt assembly if the inspection result is not within the standard value.
READ NEXT:
 Rear Seat Belt
A: REMOVAL
1. OUTER BELT ASSEMBLY RH & LH (SEDAN MODEL)
1) Disconnect the ground cable from battery and wait for at least 60 seconds
before starting work.
CAUTION:
The airbag system is fitted wit
General Description of Lighting System
A: SPECIFICATION
B: CAUTION
Before disassembling or reassembling parts, always disconnect the battery ground cable from battery.
When replacing the audio, control module and other par
SEE MORE:
Security General Description
A: COMPONENT
1. DOOR LOCK ASSEMBLY
Front
Rear
Inner remote ASSY
Front door latch and door lock actuator ASSY
Door outer handle
Door outer handle cover
Key cylinder (driver's side only)
Door outer handle spacer
Front door outer handle frame ASSY
Front fog light switch (if equipped)
The front fog lights operate under the following conditions.
● when the light switch is in the “”
position
● when the light switch is in the “AUTO” position and the headlights turn on automatically
However, the front fog lights turn off when the headlights are switched to
