Subaru Outback (BR): Front Wiper Motor and Link
A: REMOVAL
1) Disconnect the ground cable from battery.
2) Remove the front wiper arm assembly.
CAUTION: Follow the steps below when standing up the wiper arm. Not following the steps may cause contacting of wiper arms and damages of wiper arms.
1. Stand up the driver's side wiper arm.
2. Stand up the passenger's side wiper arm.
Fold the wiper arms in the reverse order.
- Remove the cap.
- Remove the nuts, and remove the front wiper arm assembly.

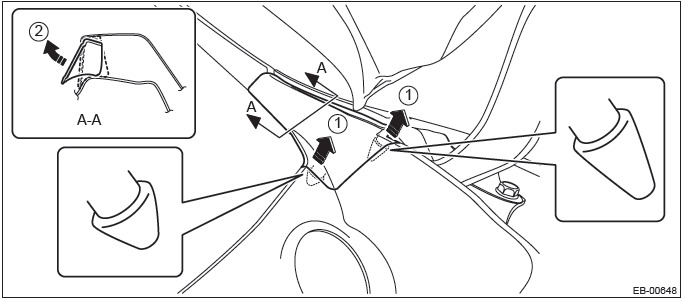
3) Remove the cowl panel side.
- Detach the pins of the cowl panel side.
- Remove the cowl panel side from inside the fender panel by pulling it.
CAUTION: Applying excessive pulling force may damage the cowl panel side. If it is difficult to remove, use a plastic remover or equivalent tool.
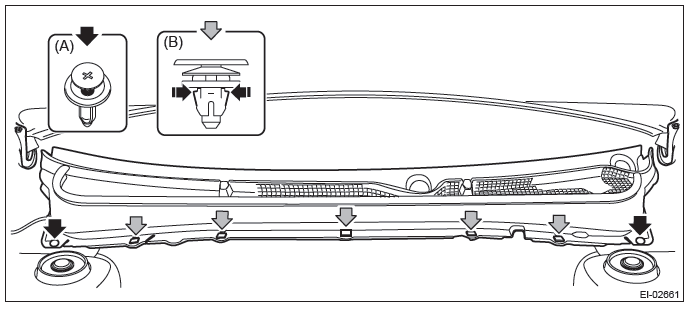
4) Remove the cowl panel.
- Release the clip (A).
- Push the claw of the clip (B) from both sides to remove it.
CAUTION: When removing the clip (B), push the claw of the clip from both sides.
The clip may be damaged if forcibly pulled.
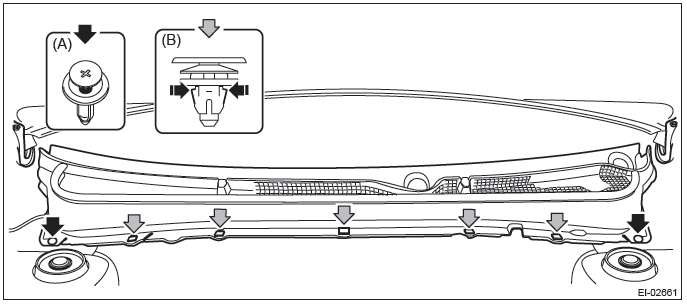
- Disconnect the washer hose.
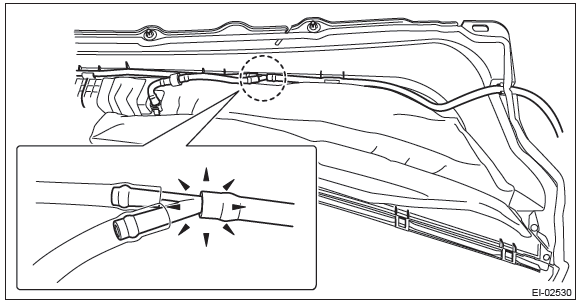
5) Remove the wiper link assembly.
- Disconnect the motor connector.
- Remove the bolts and harness clips and remove the wiper link assembly.
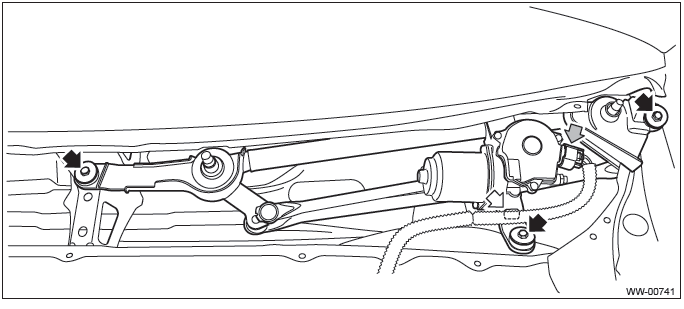
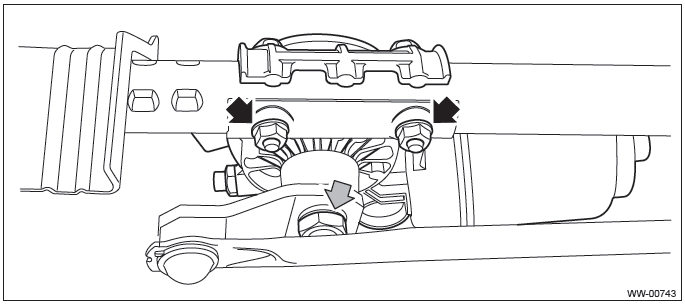
6) Remove the wiper motor assembly.
- Remove the nuts on the link plate and motor assembly to be disconnected from the link assembly.
- Remove the nuts and remove the wiper motor assembly.
B: INSTALLATION
1) Connect the ground cable to battery.
2) To check whether the motor is at the automatic stop position, connect the harness to the motor and switch the wiper switch to ON/OFF.
3) Disconnect the ground cable from battery.
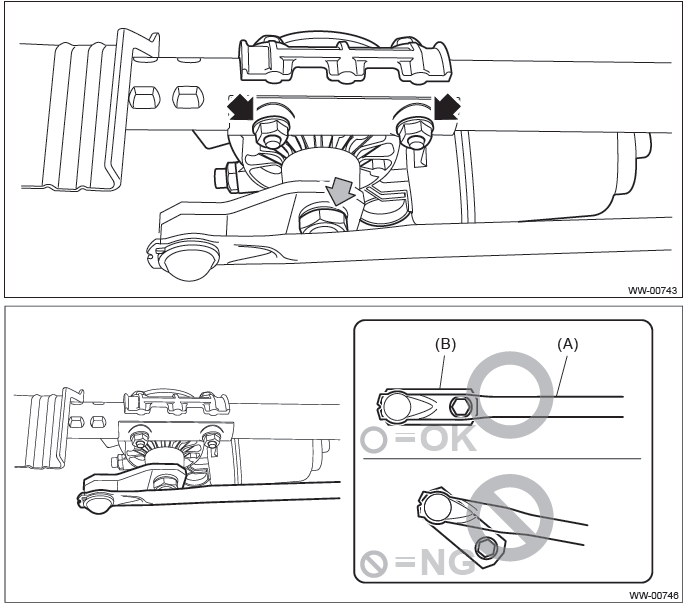
4) Install the wiper motor assembly.
CAUTION: Tighten the nuts so that the rod (A) and link plate (B) align.
Tightening torque:
Refer to "COMPONENT" of "General Description". <Ref. to WW-3, FRONT WIPER,
COMPONENT,
General Description.>
5) Install the wiper link assembly and cowl panel in the reverse order of removal.
Tightening torque:
Refer to "COMPONENT" of "General Description". <Ref. to WW-3, FRONT WIPER,
COMPONENT,
General Description.>
C: INSPECTION
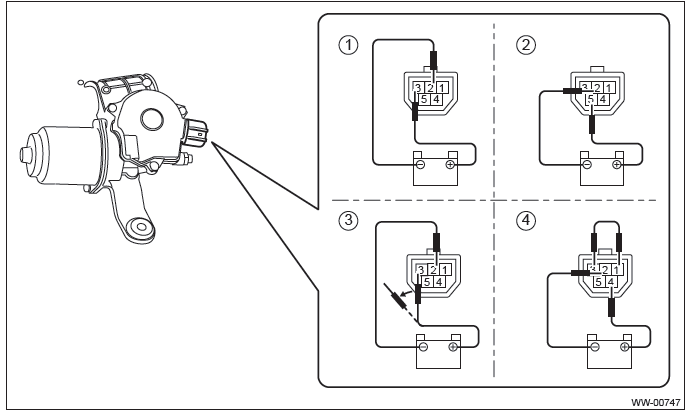
1) When the battery is connected to the terminal of connectors, confirm that the motor operates at low speed.
2) When the battery is connected to the terminal of connectors, confirm that the motor operates at high speed.
3) Connect the battery to the terminals of connector, then run the motor at low speed and disconnect the terminal in mid motion.
4) Connect the battery and confirm that the motor stops at the automatic stop position after the motor operates at low speed again.
Front Washer Nozzle
A: REMOVAL
1) Disconnect the ground cable from battery.
2) Remove the front wiper arm assembly.
CAUTION: Follow the steps below when standing up the wiper arm. Not following the steps may cause contacting of wiper arms and damages of wiper arms.
1. Stand up the driver's side wiper arm.
2. Stand up the passenger's side wiper arm.
Fold the wiper arms in the reverse order.
- Remove the cap.
- Remove the nuts, and remove the front wiper arm assembly.

3) Remove the cowl panel side.
- Detach the pins of the cowl panel side.
- Remove the cowl panel side from inside the fender panel by pulling it.
CAUTION: Applying excessive pulling force may damage the cowl panel side. If it is difficult to remove, use a plastic remover or equivalent tool.
4) Remove the cowl panel.
- Remove clips (A).
- Push the claw of the clip (B) from both sides to remove it.
CAUTION: When removing the clip (B), push the claw of the clip from both sides.
Be careful because the clip can be damaged if you pull unnecessarily hard on them.
- Disconnect the washer hose.
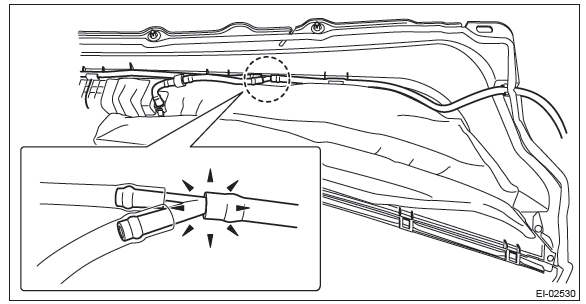
5) Remove the front washer nozzle.
- Push the claw using a flat tip screwdriver, etc.
- When the washer nozzle lifts up, pull out the nozzle using a clip remover, etc.
- Disconnect the washer hose and remove the washer nozzle.

B: INSTALLATION
1) Install each part in the reverse order of removal.
Tightening torque:
Refer to "COMPONENT" of "General Description". <Ref. to WW-3, FRONT WIPER,
COMPONENT,
General Description.>
2) Adjust the washer nozzle position. <Ref. to WW-34, ADJUSTMENT, Front Washer Nozzle.>
C: INSPECTION
- Make sure the nozzle and hose are not clogged.
- Make sure the hose is not bent.
D: ADJUSTMENT
1) Turn the wiper switch to OFF position.
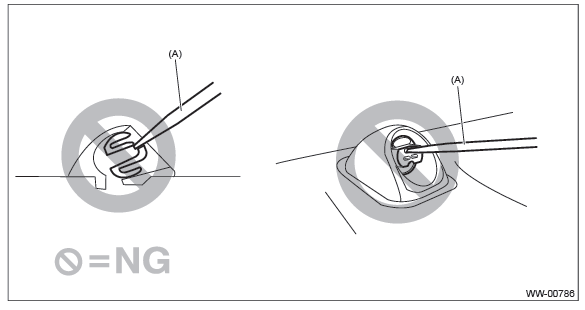
2) While the vehicle is at a standstill, insert the washer nozzle adjustment tool (a) into upper side (b) and lower side (c) of the washer nozzle to perform necessary adjustment.

CAUTION: Washer nozzle is made of resin. If precision screwdriver (A) or equivalent is inserted into discharge port for adjustment, the discharge port can be deformed, and washer fluid cannot be sprayed.
3) Adjust the injection position of the washer fluid as shown in the figure.
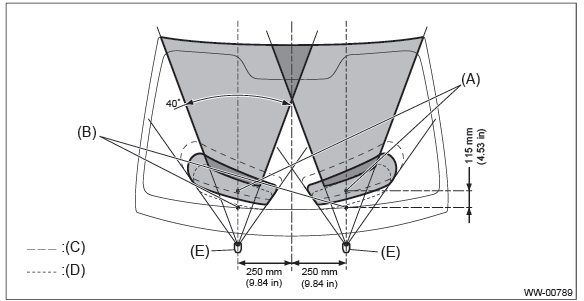
- Lower-side spray position center
- Ceramic line position on the nozzle center
- Washer fluid elevation angle, lower limit of spray area
- Washer fluid elevation angle, upper limit of spray area
- Washer nozzle
READ NEXT:
 Rear Wiper Arm
A: REMOVAL
1) Pull up the wiper arm cover.
2) Remove the nut and remove the wiper arm.
B: INSTALLATION
1) Install in the reverse order of removal.
2) Operate the rear wiper once.
3) Align the blad
Entertainment General Description
A: CAUTION
Before disassembling or reassembling parts, always disconnect the battery ground cable from battery.
When replacing the audio, control module and other parts provided with m
SEE MORE:
Roof Molding
A: REMOVAL
CAUTION:
Be careful not to damage the body.
1) Remove the roof rail assembly. (OUTBACK model) <Ref. to EI-59, REMOVAL,
Roof Rail.>
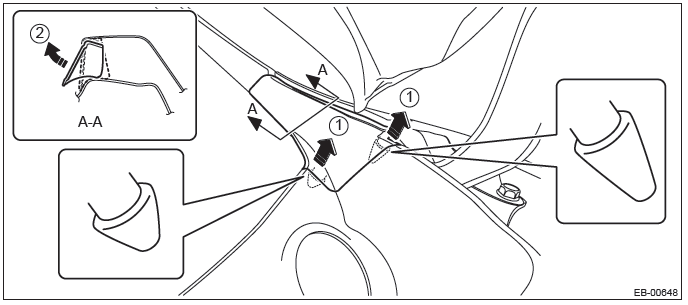
2) Turn over the front end of roof molding.
3) Using a flat tip screwdriver, slide the internal clip in the direction of
arrow.
Right: Slide toward
Steering Gearbox
A: REMOVAL
1) Remove the cradle. <Ref. to FS-20, REMOVAL, Cradle.>
2) Remove the bolts, and remove left and right main mounting brackets.
3) Remove the bolts and remove the steering gearbox.
CAUTION:
Be careful not to damage the steering boot.
B: INSTALLATION
1) Before installation, check t
