Subaru Outback (BR): Headlights
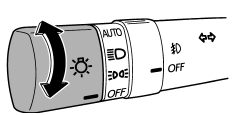
To turn on the headlights, turn the knob on the end of the turn signal lever.
 first position
Instrument panel illumination, tail lights, front side marker lights and license plate lights are on.
 second position
Headlights, instrument panel illumination, front side marker lights, tail lights and license plate lights are on.


Auto on/off headlights
When the ignition switch is in the “ON” position, the headlights, instrument panel illumination, front side marker lights, tail lights and license plate lights are automatically on or off depending on the level of the ambient light.
NOTE
The sensitivity of the auto on/off headlights can be changed by your SUBARU dealer. Contact your SUBARU dealer for details.
READ NEXT:
 Sensor for the auto on/off headlights
The sensor is on the instrument panel as shown in the illustration.
CAUTION
If any object is placed on or near the sensor, the sensor may not detect the
level of the ambient light correctly and
High/low beam change (dimmer)
To change from low beam to high beam, push the turn signal lever forward. When
the headlights are on high beam, the high beam indicator light “”
on the combination meter is also on.
To swit
Headlight flasher
CAUTION
Do not hold the lever in the flashing position for more than just a few seconds.
To flash the headlights, pull the lever toward you and then release it. The high
beam will stay on for as
SEE MORE:
Steps to take if EBD system malfunctions
If a malfunction occurs in the EBD system, the system stops working and the brake
system warning light and ABS warning light illuminate simultaneously.
The EBD system may be malfunctioning if the brake system warning light and ABS
warning light illuminate simultaneously during driving.
Even
Keys
1) Master key
2) Submaster key
3) Valet key
4) Key number plate
5) Security ID plate
Three types of keys are provided for your vehicle:
Master key, submaster key and valet key. The master key and submaster key fit
all locks on your vehicle.
● Ignition switch
● Driver’s door
© 2010-2026 Copyright www.suoutback.com
