Subaru Outback (BR): Instrumentation/Driver Info
General Description
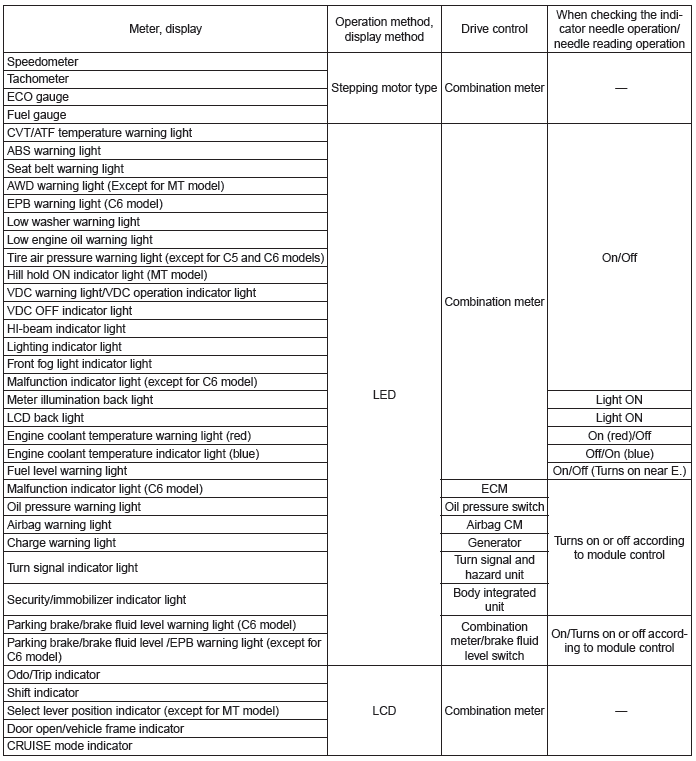
A: SPECIFICATION
- Combination meter
- Clock

B: CAUTION
- Before disassembling or reassembling parts, always disconnect the
battery ground cable from battery.
When replacing the audio, control module and other parts provided with memory functions, record the memory contents before disconnecting the battery ground cable. Otherwise, the memory is cleared.
- Reassemble the parts in the reverse order of disassembly procedure unless otherwise indicated.
- Use gloves to avoid damage and getting fingerprints on the glass surface and meter surfaces.
- Do not apply an excessive force on the printed circuit.
- Do not drop or otherwise apply impact.
- Connect the connectors securely during reassembly.
- After reassembly, make sure that the functional parts operate normally.
- When the combination meter of model with immobilizer or with keyless access has been replaced, be sure to perform the registration of immobilizer.
C: PREPARATION TOOL
1. SPECIAL TOOL

2. GENERAL TOOL

Relay and Fuse
A: LOCATION
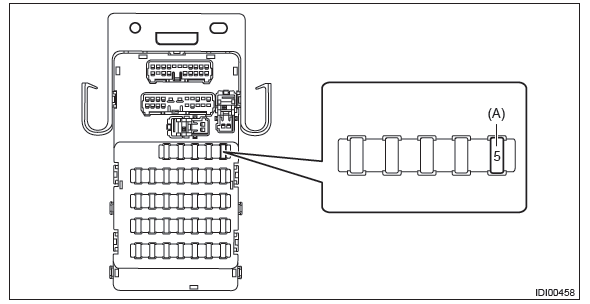

NOTE: For other related fuses, refer to the wiring diagram. <Ref. to WI-15, Power Supply Circuit.>
B: INSPECTION
1. CHECK FUSE.
1) Remove the fuse and inspect visually.
2) If the fuse is blown out, replace the fuse.
NOTE: If the fuse is blown again, check the system wiring harness.
Combination Meter System
A: WIRING DIAGRAM
Refer to "Combination Meter System" in the wiring diagram. <Ref. to WI-98, WIRING DIAGRAM, Combination Meter System.>
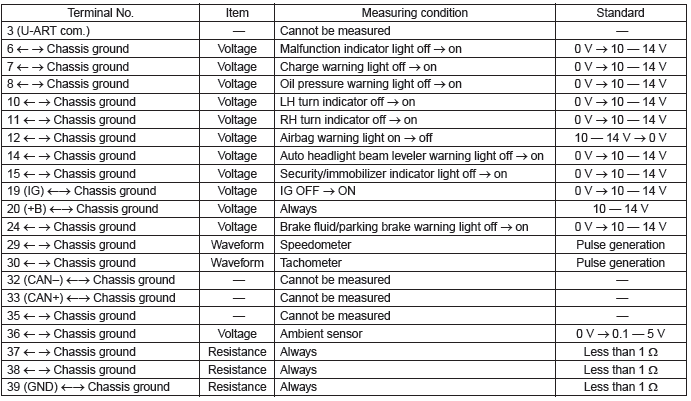
B: ELECTRICAL SPECIFICATION
1. COMBINATION METER TERMINAL ARRANGEMENT
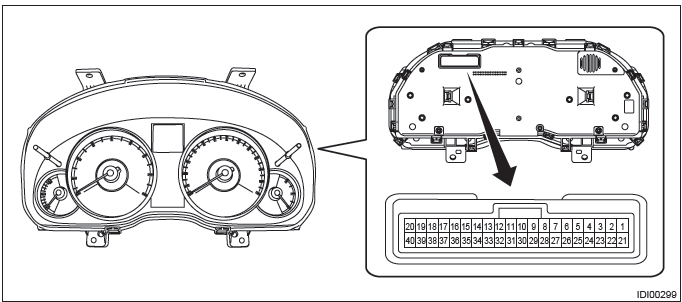
Connector
C: OPERATION
1. SELF-DIAGNOSIS DISPLAY MODE
The self-diagnosis (checking of each meter, warning light, indicator light, illumination, LCD) of combination meter can be performed in the following procedure.
CAUTION: Perform the steps described in 1) through 4) within 10 seconds.
1) Within 3 seconds after turning the ignition switch to ON, set the lighting switch to tail light or headlight position.
2) Press the trip meter knob three times.
3) Turn the lighting switch to OFF, and press the trip meter knob three times.
4) Set the lighting switch to tail light or headlight position again, and press the trip meter knob three times.
NOTE:
- When pressing the trip meter knob four times, the display changes to DTC display mode. <Ref. to IDI-9, DTC DISPLAY MODE, OPERATION, Combination Meter System.>
- When pressing the trip meter knob five times, the display changes to dealer customize mode. <Ref. to IDI- 10, DEALER CUSTOMIZE MODE, OPERATION, Combination Meter System.>
- When the self-diagnosis function operates, the warning light, indicator light, and LCD display checks are performed. After this, the buzzer will sound for 0.5 seconds every time the trip meter knob is pressed, and operation checks are performed in the order of meter indicator needle operation, meter indicator needle indication, and LCD. Turn the ignition switch to OFF to cancel the self-diagnosis function.
- When the engine starts during diagnosis, the self-diagnosis function is not cancelled, however, once the vehicle starts driving, the self-diagnosis function is deactivated automatically.
5) Go to "Check meter indicator operation".
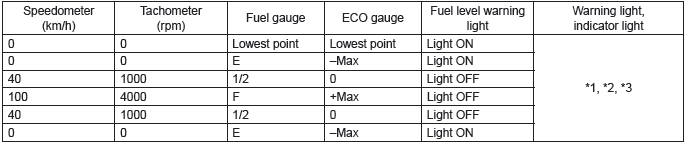
Check meter operation, warning light, indicator light, illumination and LCD.
NOTE:
- After "_S_1" is displayed on the LCD, the meter indicator operation check mode is initiated.
- Each of the meter indicator operation display and LCD display switches every 6 seconds.

*1: Warning lights and indicator lights controlled by the meter drive circuit
are illuminated. <Ref. to IDI-2,
SPECIFICATION, General Description.>
*2: Warning lights and indicator lights controlled by other module are turned
on/off according to the module
control. <Ref. to IDI-2, SPECIFICATION, General Description.>
*3: Engine coolant temperature warning light illuminates in red.
*4: Display for one second for each level
6) Press the trip meter knob once.
7) Go to "Meter Indicator Needle Indication Check".
Check meter operation, warning light, indicator light, and LCD.
NOTE:
- Meter indicator switches every 1.5 seconds for each indication.
- ILL indication illuminates at the same brightness as when entering "Meter Indicator Needle Indication Check".
- During operation, "_S_2" is displayed on the LCD.
*1: Warning lights and indicator lights controlled by the meter drive circuit
turn off. <Ref. to IDI-2, SPECIFICATION,
General Description.>
*2: Warning lights and indicator lights controlled by other module are turned
on/off according to the module
control. <Ref. to IDI-2, SPECIFICATION, General Description.>
*3: Engine coolant temperature indicator light illuminates in blue.
8) Press the trip meter knob once.
9) Go to "Check LCD display".
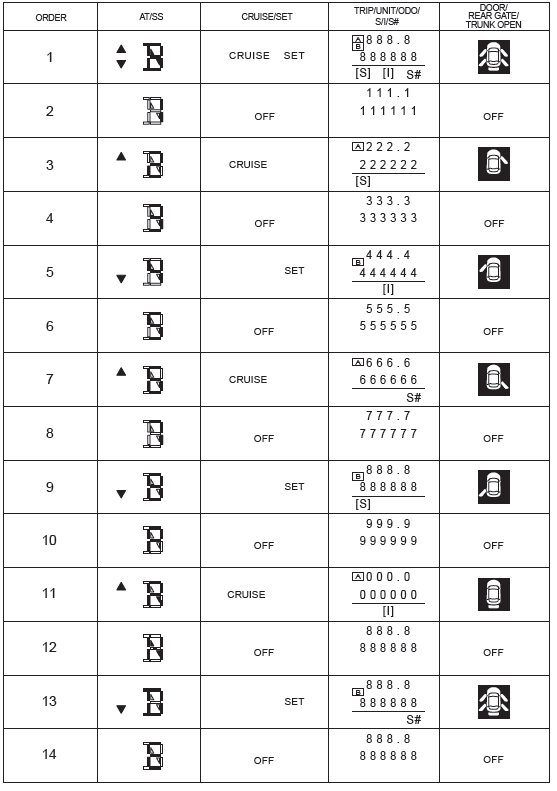
Check the LCD display.
NOTE:
- After "_S_3" is displayed on the LCD, the LCD display check mode is initiated.
- LCD display switches every 1 second.
- Warning lights and indicator lights controlled by the meter drive circuit turn off. <Ref. to IDI-2, SPECIFICATION, General Description.>
- Warning lights and indicator lights controlled by other module are turned on/off according to the module control. <Ref. to IDI-2, SPECIFICATION, General Description.>
- The meter indication remains at the same level as "Meter Indicator Needle Indication Check".
- ILL indication illuminates at ILL6 level (max. brightness).
- After No. 14 is displayed in the illumination order, display is repeated from No. 1 again.
2. DTC DISPLAY MODE
The combination meter DTC can be displayed according to the following procedure.
CAUTION: Perform the steps described in 1) through 4) within 10 seconds.
1) Within 3 seconds after turning the ignition switch to ON, set the lighting switch to tail light or headlight position.
2) Press the trip meter knob four times.
3) Turn the lighting switch to OFF, and press the trip meter knob four times.
4) Set the lighting switch to tail light or headlight position again, and press the trip meter knob four times.
5) Go to "DTC display mode".
NOTE:
- If a diagnostic trouble code (DTC) is detected, an input error to meters exists. Check the harness on the body side and related parts.
- Detected diagnostic trouble code (DTC) cannot be cleared.
- When the engine starts during diagnosis, the self-diagnosis function is not cancelled, however, once ignition switch is turned OFF or the vehicle is driven, the DTC display mode is cancelled automatically.
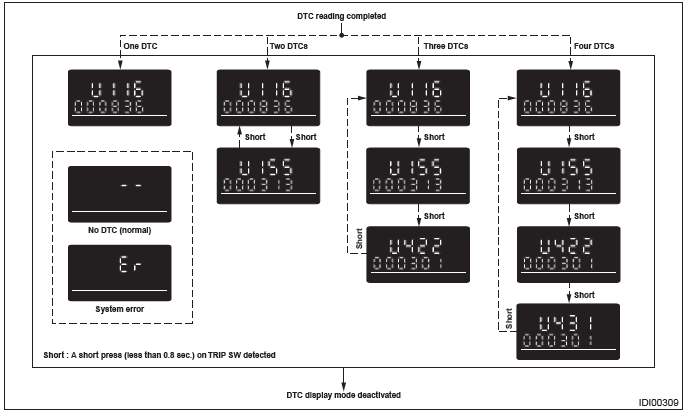
- When the DTC display mode operates, the LCD displays whether diagnostic trouble code (DTC) exists.
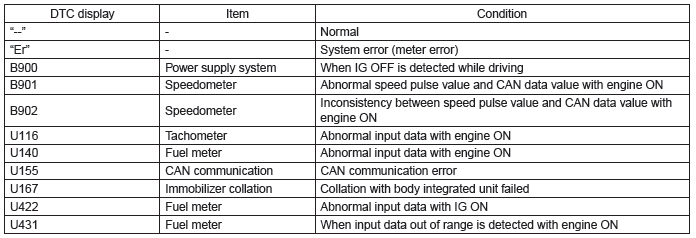
- If the diagnostic trouble code (DTC) is stored, ODO value at occurrence of trouble is displayed.
NOTE:
- Diagnostic trouble code (DTC) is stored for up to four cases. If diagnostic trouble code (DTC) is input exceeding four cases, the code is deleted in order starting with the oldest one.
- When there are more than one diagnostic trouble code (DTC), the code is displayed according to the following conditions and switches every time when the trip meter knob is pressed.
1. Displayed in the descending order of ODO value.
2. If the ODO value is the same, displayed in the ascending order of diagnostic trouble code (DTC) value.
3. DEALER CUSTOMIZE MODE
The combination meter can be customized with dealer customize according to the following procedure.
CAUTION: Perform the steps described in 1) through 4) within 10 seconds.
1) Within 3 seconds after turning the ignition switch to ON, set the lighting switch to tail light or headlight position.
2) Press the trip meter knob five times.
3) Turn the lighting switch to OFF, and press the trip meter knob five times.
4) Set the lighting switch to tail light or headlight position again, and press the trip meter knob five times.
5) Move on to the "DEALER CUSTOMIZE MODE".
- When the dealer customize
- The dealer customize mode consists of three setting screens. {Avg.F/E Correction Screen}, {Ambient Temp. Correction Screen} and {Clock Adjust. Screen} is displayed cyclically in this order every time the trip meter knob is tapped.
- Holding down the trip meter knob while each setting screen is displayed can change the se
- mode operates, the LCD displays each adjustment screen.tting value.
NOTE: When ignition switch is turned OFF or the vehicle is driven, the customize mode is cancelled automatically.

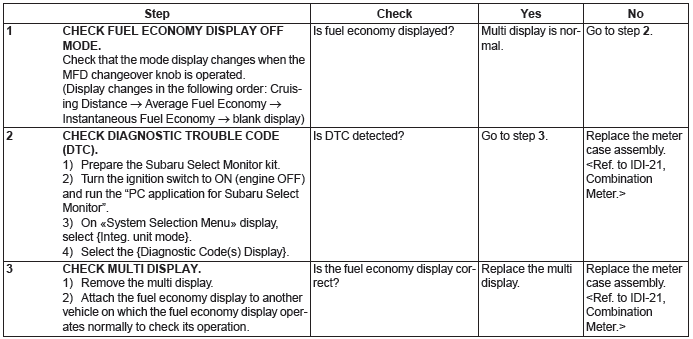
D: INSPECTION
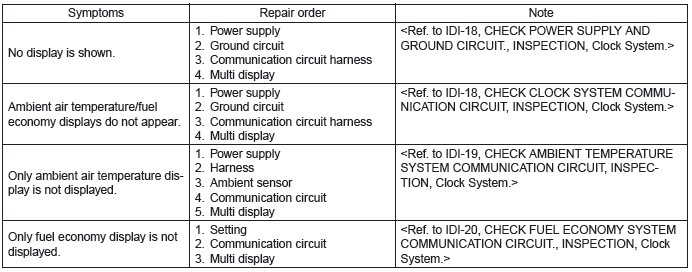
1. SYMPTOM CHART
CAUTION: When measuring the voltage and resistance of each control module or sensor, use a tapered pin with a diameter of less than 0.64 mm (0.03 in) in order to avoid poor contact. Do not insert the pin more than 2 mm (0.08 in).
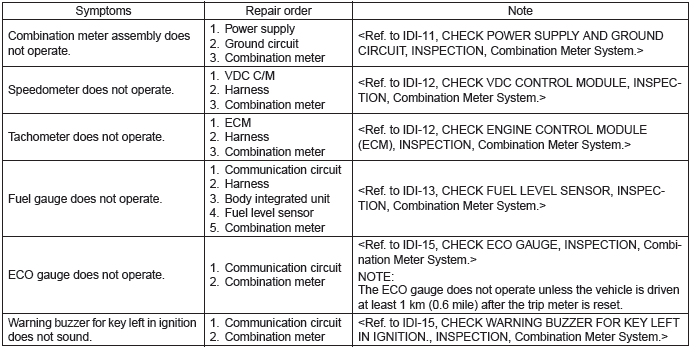
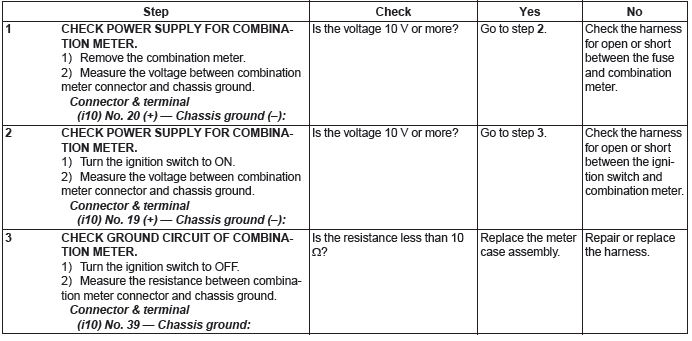
2. CHECK POWER SUPPLY AND GROUND CIRCUIT
3. CHECK VDC CONTROL MODULE

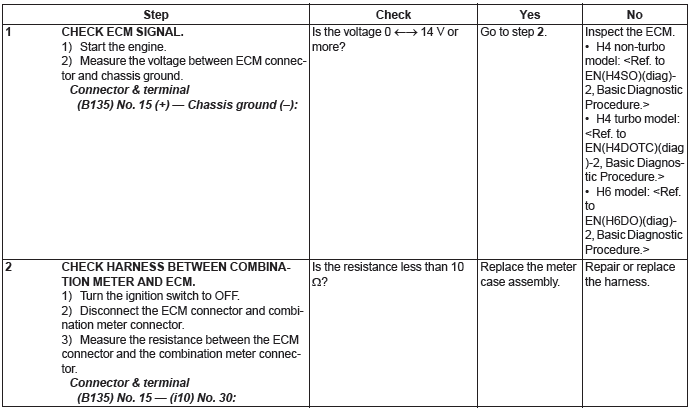
4. CHECK ENGINE CONTROL MODULE (ECM)
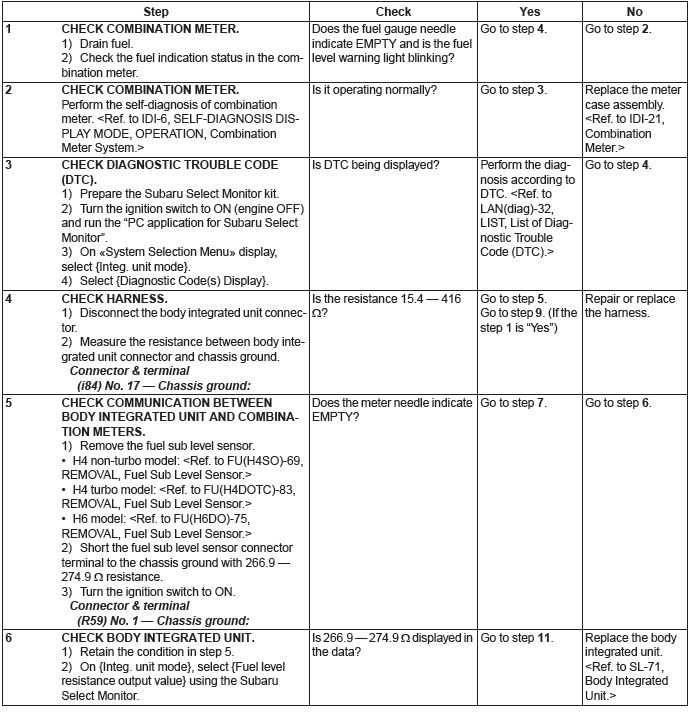
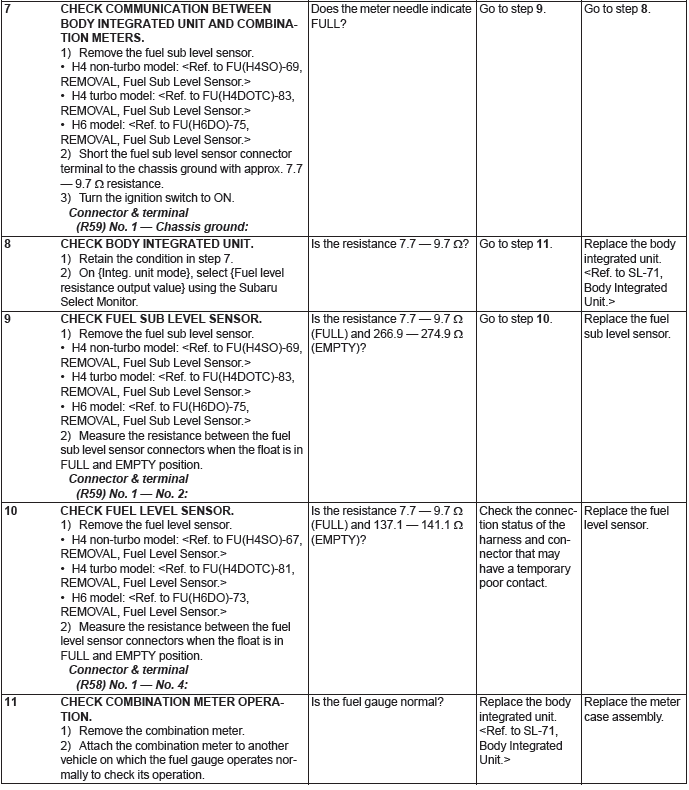
5. CHECK FUEL LEVEL SENSOR
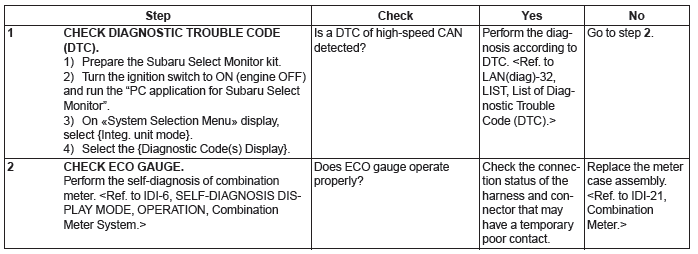
6. CHECK ECO GAUGE
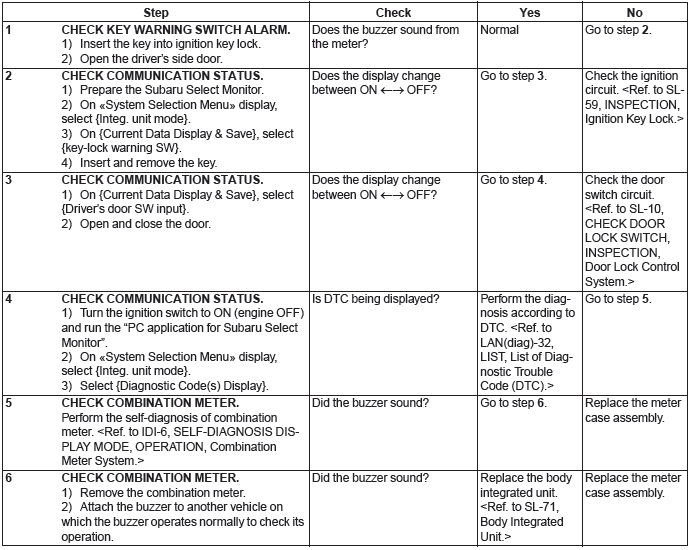
7. CHECK WARNING BUZZER FOR KEY LEFT IN IGNITION
E: NOTE
For operation procedures of each component of the combination meter system, refer to the respective section.
- Combination meter: <Ref. to IDI-21, Combination Meter.>
- Speedometer: <Ref. to IDI-27, Speedometer.>
- Tachometer: <Ref. to IDI-28, Tachometer.>
- Fuel gauge: <Ref. to IDI-29, Fuel Gauge.>
- ECO gauge: <Ref. to IDI-30, ECO Gauge.>
Clock System
A: WIRING DIAGRAM
Refer to "Clock System" in the wiring diagram. <Ref. to WI-96, WIRING DIAGRAM, Clock System.>
B: ELECTRICAL SPECIFICATION
1. MULTI DISPLAY TERMINAL ARRANGEMENT
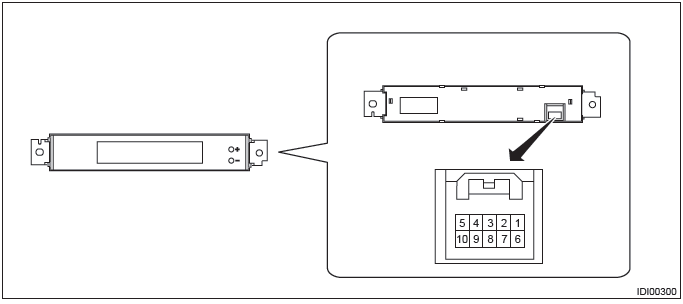
Connector

C: INSPECTION
1. SYMPTOM CHART
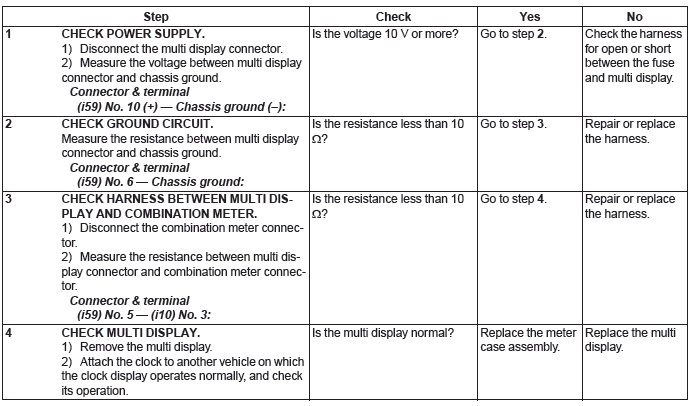
2. CHECK POWER SUPPLY AND GROUND CIRCUIT
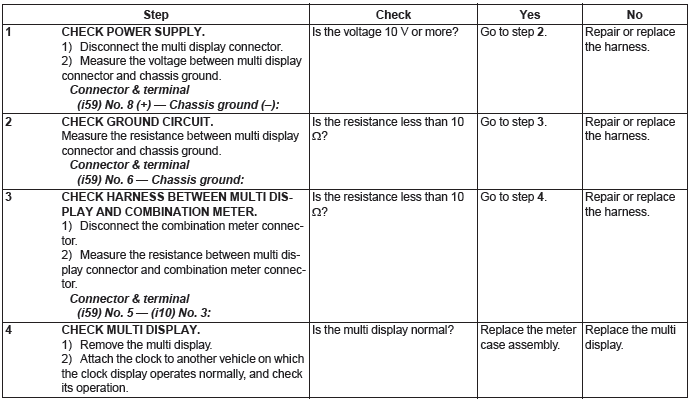
3. CHECK CLOCK SYSTEM COMMUNICATION CIRCUIT
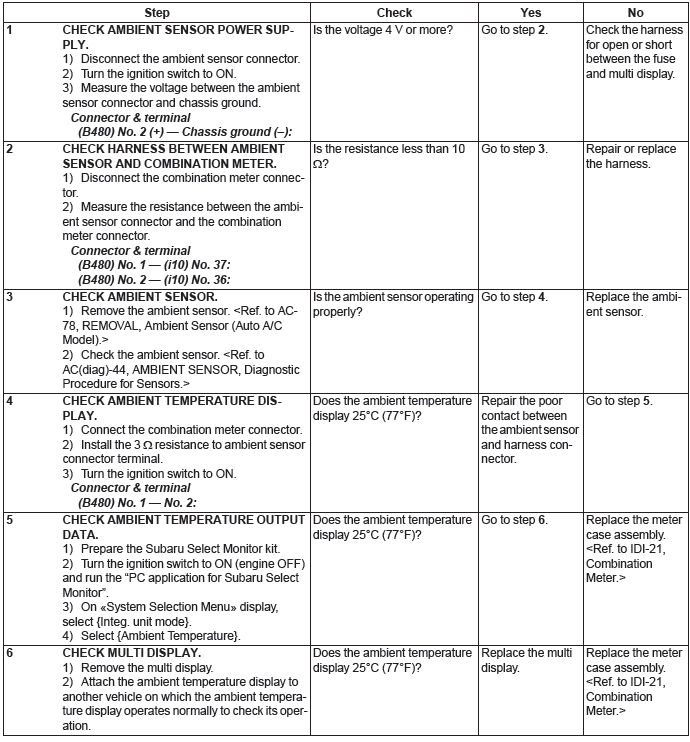
4. CHECK AMBIENT TEMPERATURE SYSTEM COMMUNICATION CIRCUIT
5. CHECK FUEL ECONOMY SYSTEM COMMUNICATION CIRCUIT
D: NOTE
For operation procedures of each component of the clock system, refer to the following section:
- Multi display: <Ref. to IDI-31, Multi Display.>
Combination Meter
A: REMOVAL
1) Disconnect the ground cable from battery.
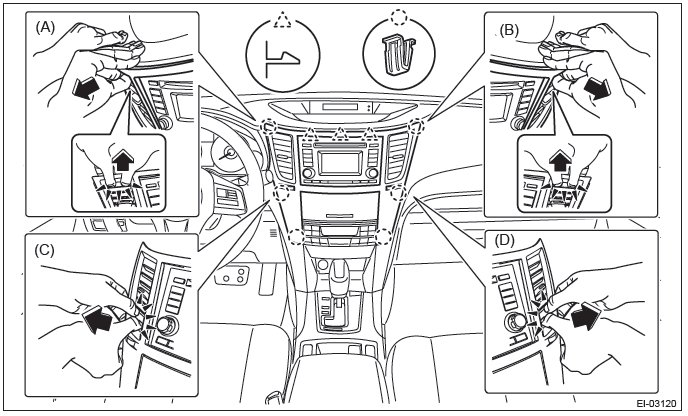
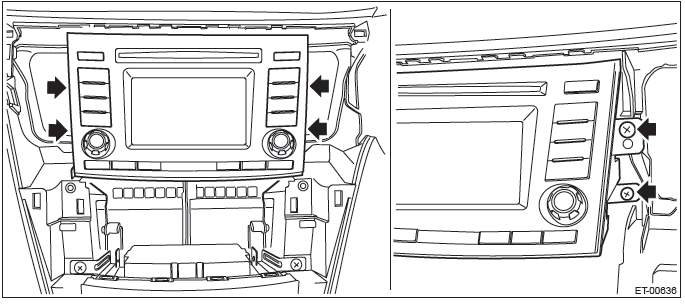
2) Remove the center panel assembly.
CAUTION: Do not put your finger on the fin of the air vent grille. Doing so may damage the fin.
- Attach the protective tape (a) to the meter visor.
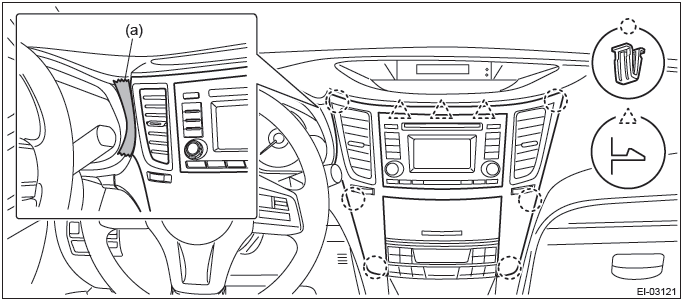
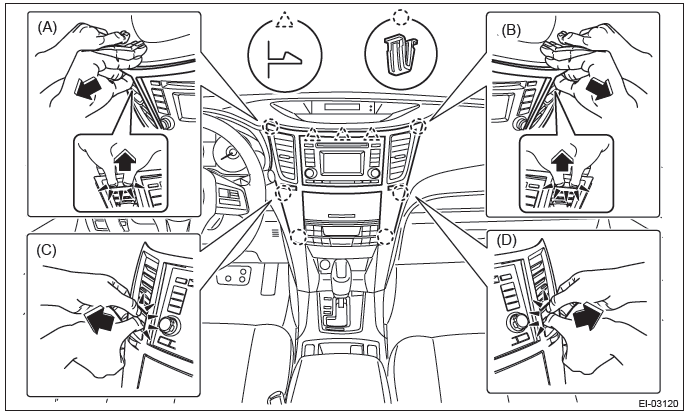
- Insert a finger into the air vent grille and release the left and right
clips at the top of the center panel.
(A), (B)
- Insert a finger into the air vent grille and release the left and right
clips at the center of the center panel.
(C), (D)
- Release the clips at the bottom of the center panel and remove the center panel assembly.
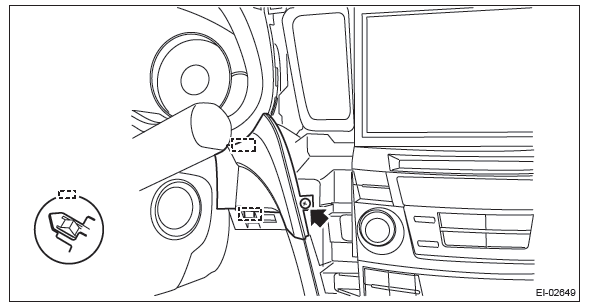
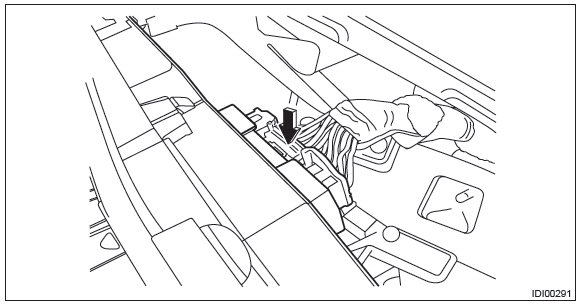
3) Remove the screws and release the claws, then detach the starter cover assembly.
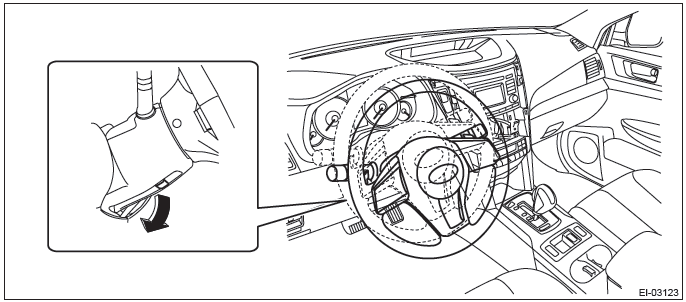
4) Release the lock, tilt the steering column to the lowest end and fully extend the column by the telescopic system.
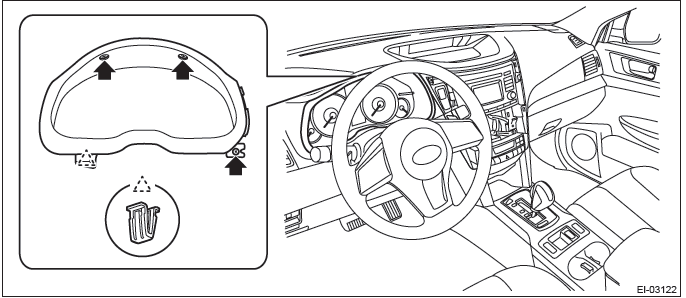
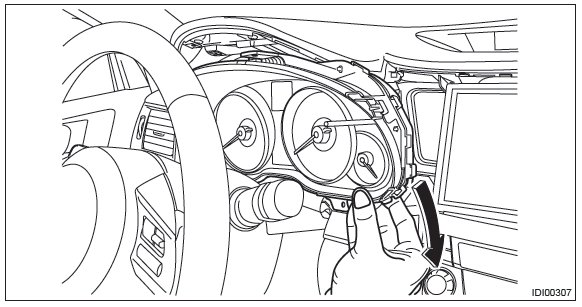
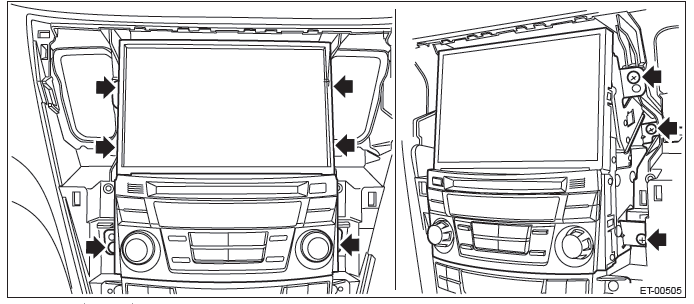
5) Release the screws and clips, then detach the meter visor assembly.
6) Remove the combination meter assembly.
CAUTION:
- Be careful not to damage the meter or instrument panel.
- Pay particular attention to avoid damaging the meter glass.
- Remove the screws and move the steering COMPL upper cover toward you.
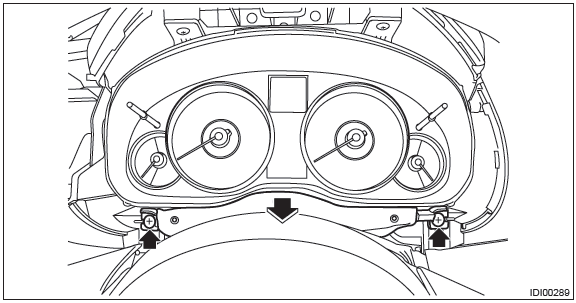
- Remove the screws.
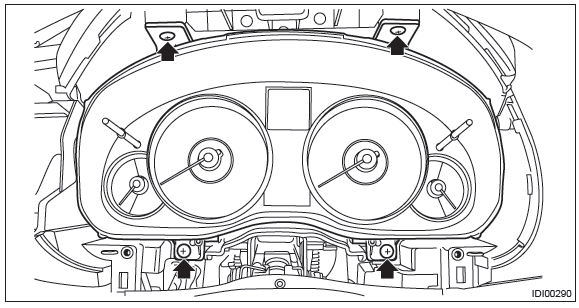
- Pull the combination meter toward you and disconnect the connector.
- Remove the combination meter assembly as shown in the figure.
B: INSTALLATION
CAUTION:
- Make sure the electrical connector is connected securely.
- Make sure that each meter operates normally.
- When the combination meter of model with immobilizer has been replaced, be sure to perform the registration of immobilizer.
Install each part in the reverse order of removal.
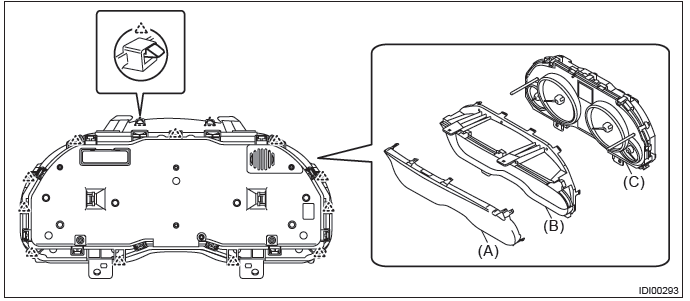
C: DISASSEMBLY
1. DISASSEMBLY OF COMBINATION METER ASSEMBLY
CAUTION:
- Use gloves to avoid damage and getting fingerprints on the glass surface and meter surfaces.
- Be careful not to apply excessive force to the trip knob.
- Be sure not to touch the meter indicator needle.
Disengage the claw, and remove the meter glass (A) and meter visor (B) from the meter case assembly (C).
2. BULB REPLACEMENT
LEDs are used for all of warning lights and indicator lights of combination meters, replace the meter case assembly if faulty.
D: ASSEMBLY
Assemble each part in the reverse order of disassembly.
Speedometer
A: SPECIFICATION
Since the meter case assembly cannot be disassembled, do not remove or inspect the speedometer alone.
(Do not remove the cover on the back surface.)
Tachometer
A: SPECIFICATION
Since the meter case assembly cannot be disassembled, do not remove or inspect the tachometer alone.
(Do not remove the cover on the back surface.)
Fuel Gauge
A: SPECIFICATION
Since the meter case assembly cannot be disassembled, do not remove or inspect the fuel gauge alone. (Do not remove the cover on the back surface.)
ECO Gauge
A: SPECIFICATION
Since the meter case assembly cannot be disassembled, do not remove or inspect the ECO gauge alone.
(Do not remove the cover on the back surface.)
Multi Display
A: REMOVAL
1) Disconnect the ground cable from battery.
2) Remove the center panel assembly.
CAUTION: Do not put your finger on the fin of the air vent grille. Doing so may damage the fin.
- Attach the protective tape (a) to the meter visor.

- Insert a finger into the air vent grille and release the left and right
clips at the top of the center panel.
(A), (B)
- Insert a finger into the air vent grille and release the left and right
clips at the center of the center panel.
(C), (D)
- Release the clips at the bottom of the center panel and remove the center panel assembly.
3) Remove the audio assembly.
- Remove the left and right screws, and partially pull the audio out from center console.
- Disconnect the connectors, and remove the audio assembly.
4) Remove the navigation assembly. (model with navigation)
- Remove the left and right screws.
- Disconnect the connectors, and remove the navigation assembly.
5) Remove the center speaker cover.
- Push up the center speaker cover from the audio space.
- Disconnect the claws and hooks and remove the center speaker cover.

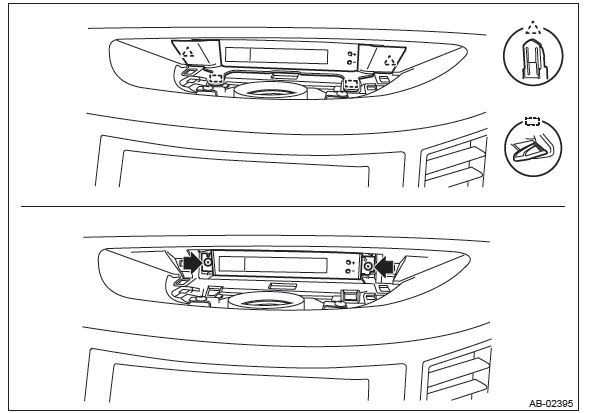
6) Remove the multi display.
CAUTION: Be careful not to damage the multi display or instrument panel.
- Release the clips and claws, detach the multi display panel LWR.
- Remove the screws and pull out the multi display toward you to disconnect the connectors.
B: INSTALLATION
CAUTION:
- Make sure the electrical connector is connected securely.
- Make sure that the multi display operates normally.
Install each part in the reverse order of removal.
READ NEXT:
 General Description of the Seats
A: COMPONENT
1. FRONT SEAT
Manual seat LH
Backrest heater ASSY
Backrest pad
Backrest cover
Backrest frame ASSY
Backrest back cover
Headrest bushing
Hea
Front Seat
A: REMOVAL
CAUTION:
The airbag system is fitted with a backup power supply. After disconnecting the
battery ground cable,
the airbag may operate if you do not wait for 60 seconds before starting the
SEE MORE:
Driving with pets
Unrestrained pets can interfere with your driving and distract your attention
from driving. In a collision or sudden stop, unrestrained pets or cages can be thrown
around inside the vehicle and hurt you or your passengers. Besides, the pets can
be hurt under these situations. It is also for th
P (Park)
This position is for parking the vehicle and starting the engine.
In this position, the transmission is mechanically locked to prevent the vehicle
from rolling freely.
When you park the vehicle, first apply the parking brake, then shift into the
“P” position. Do not hold the vehicle with o
