Subaru Outback (BR): Oil Temperature Sensor
A: REMOVAL
1) Disconnect the ground cable from battery.
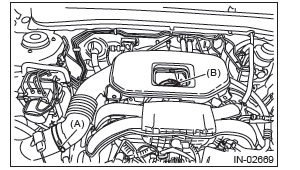
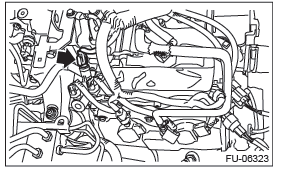
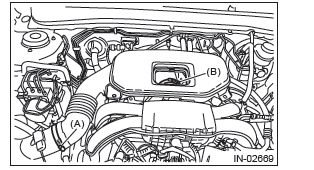
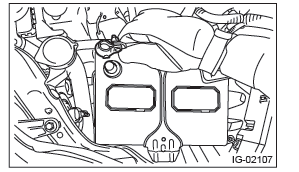
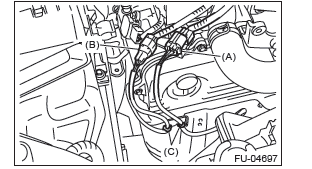
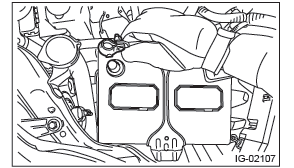
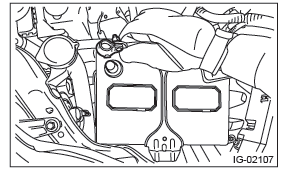
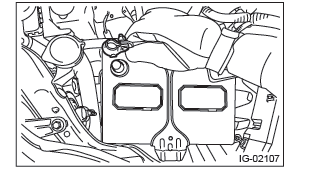
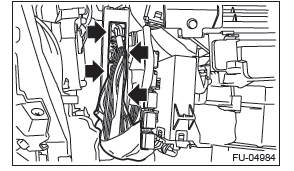
2) Remove the cover (A) and clip (B) from air intake boot assembly.
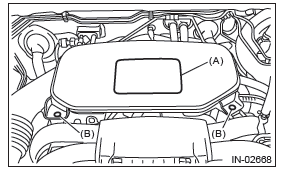
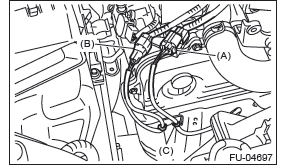
3) Loosen the clamp (A) which connects the air intake boot assembly and air cleaner case.
4) Loosen the clamp (B) which connects the air intake boot assembly and throttle body.
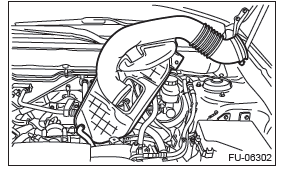
5) Remove the air intake boot from the throttle body, and move it to the left side wheel apron.
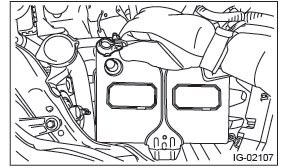
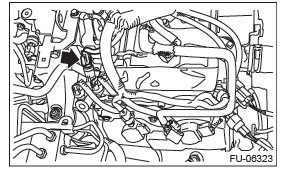
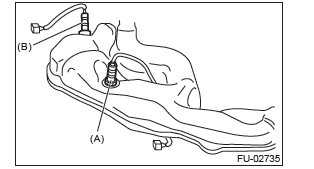
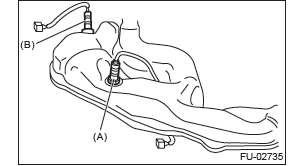
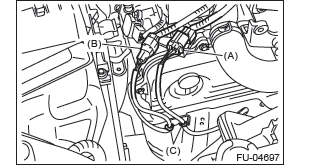
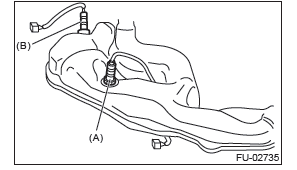
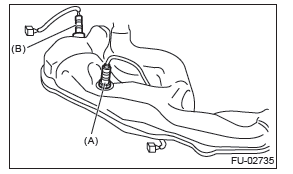
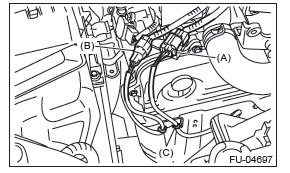
6) Disconnect the connector from oil temperature sensor.
7) Remove the oil temperature sensor.
B: INSTALLATION
Install in the reverse order of removal.
NOTE: Apply liquid gasket to the oil temperature sensor threads.
Liquid gasket: THREE BOND 1324 (Part No. 004403042) or equivalent
Tightening torque: 18 N*m (1.8 kgf-m, 13.3 ft-lb)
NOTE: Align the clamp hole with the protrusion of the air intake boot assembly.
Tightening torque:
Clamp (A), (B)
3 N*m (0.3 kgf-m, 2.2 ft-lb)
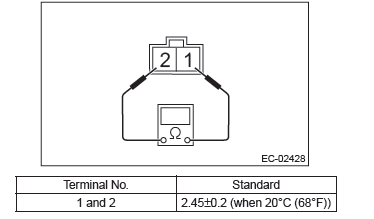
C: INSPECTION
1) Check that the oil temperature sensor has no deformation, cracks or other damages.
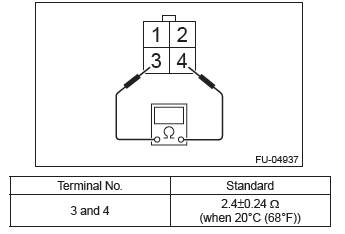
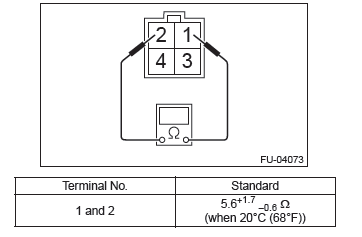
2) Check the resistance between the oil temperature sensor terminals.
Front Oxygen (A/F) Sensor
A: REMOVAL
1) Disconnect the ground cable from battery.
2) Remove the air intake duct.
3) Disconnect the front oxygen (A/F) sensor connector, and remove the clip holding the front oxygen (A/F) sensor harness.
- Front oxygen (A/F) sensor connector
- Rear oxygen sensor connector
- Clip
4) Lift up the vehicle.
5) Remove the under cover.
6) Apply spray-type lubricant to the threaded portion of front oxygen (A/F) sensor, and leave it for one minute or more.
7) Remove the front oxygen (A/F) sensor.
CAUTION: When removing the front oxygen (A/F) sensor, wait until exhaust pipe cools, otherwise it will damage the exhaust pipe.
- Front oxygen (A/F) sensor
- Rear oxygen sensor
B: INSTALLATION
CAUTION: If lubricant is spilt onto the exhaust pipe, wipe it off completely with cloth to avoid emission of smoke or causing a fire.
1) Before installing front oxygen (A/F) sensor, apply anti-seize compound only to the threaded portion of front oxygen (A/F) sensor to make the next removal easier.
CAUTION: Never apply anti-seize compound to the protector of front oxygen (A/F) sensor.
Anti-seize compound: NEVER-SEEZ NSN, JET LUBE SS-30 or equivalent
2) Install the front oxygen (A/F) sensor.
Tightening torque: 21 N*m (2.1 kgf-m, 15.5 ft-lb)
- Front oxygen (A/F) sensor
- Rear oxygen sensor
3) Install the under cover.
4) Lower the vehicle.
5) Connect the front oxygen (A/F) sensor connector, and secure the front oxygen (A/F) sensor harness by using the clip.
- Front oxygen (A/F) sensor connector
- Rear oxygen sensor connector
- Clip
6) Install the air intake duct.
7) Connect the battery ground terminal.
C: INSPECTION
1) Check that the front oxygen (A/F) sensor has no deformation, cracks or other damages.
2) Measure the resistance between front oxygen (A/F) sensor terminals.
Rear Oxygen Sensor
A: REMOVAL
1) Disconnect the ground cable from battery.
2) Remove the air intake duct.
3) Disconnect the rear oxygen sensor connector, and remove the clip holding the rear oxygen sensor harness.
- Front oxygen (A/F) sensor connector
- Rear oxygen sensor connector
- Clip
4) Lift up the vehicle.
5) Remove the under cover.
6) Apply spray-type lubricant to the threaded portion of rear oxygen sensor, and leave it for one minute or more.
7) Remove the rear oxygen sensor.
CAUTION: When removing the rear oxygen sensor, wait until exhaust pipe cools, otherwise it will damage the exhaust pipe.
- Front oxygen (A/F) sensor
- Rear oxygen sensor
B: INSTALLATION
CAUTION: If lubricant is spilt onto the exhaust pipe, wipe it off completely with cloth to avoid emission of smoke or causing a fire.
1) Before installing rear oxygen sensor, apply the anti-seize compound only to the threaded portion of rear oxygen sensor to make the next removal easier.
CAUTION: Never apply anti-seize compound to the protector of rear oxygen sensor.
Anti-seize compound: NEVER-SEEZ NSN, JET LUBE SS-30 or equivalent
2) Install the rear oxygen sensor.
Tightening torque: 21 N*m (2.1 kgf-m, 15.5 ft-lb)
- Front oxygen (A/F) sensor
- Rear oxygen sensor
3) Install the under cover.
4) Lower the vehicle.
5) Connect the rear oxygen sensor connector, and hold the rear oxygen sensor harness with the clip.
- Front oxygen (A/F) sensor connector
- Rear oxygen sensor connector
- Clip
6) Install the air intake duct.
7) Connect the battery ground terminal.
C: INSPECTION
1) Check that the rear oxygen sensor has no deformation, cracks or other damages.
2) Measure the resistance between rear oxygen sensor terminals.
Engine Control Module (ECM)
A: REMOVAL
1) Disconnect the ground cable from battery.
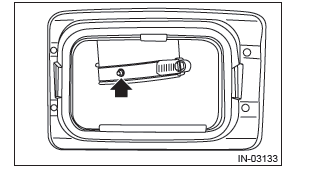
2) Remove the glove box lid assembly.
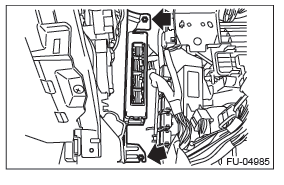
3) Remove the connectors from ECM.
4) Remove the ECM from vehicle.
B: INSTALLATION
Install in the reverse order of removal.
CAUTION:
- When the ECM of model with immobilizer has been replaced, be sure to perform the registration of immobilizer system. (Refer to "PC application help for Subaru Select Monitor".)
- If replacing ECM or the bracket, replace both parts with new parts at a time.
- After installing the bracket to ECM, do not separate the bracket.
- If the bracket has been installed to ECM in the wrong direction, replace both parts to new parts.
NOTE: When replacing the ECM, be careful not to use the wrong spec. ECM to avoid any damage on the fuel injection system.
Tightening torque: 7.5 N*m (0.8 kgf-m, 5.5 ft-lb)
C: INSPECTION
Check that the ECM has no deformation, cracks or other damages.
READ NEXT:
 Main Relay
A: REMOVAL
1) Disconnect the ground cable from battery.
2) Remove the glove box lid assembly.
3) Remove the main relay from the relay holder.
B: INSTALLATION
Install in the reverse order of removal
Fuel (tank, pump, sensors)
A: PROCEDURE
1. RELEASING OF FUEL PRESSURE
WARNING: Place "NO OPEN FLAMES" signs near the working area.
CAUTION: Be careful not to spill fuel.
1) Remove the fuse of fuel pump from main f
Emission Control (Aux. Emission Control Devices)
General Description
A: CAUTION
Wear appropriate work clothing, including a cap, protective goggles and
protective shoes when performing
any work.
Remove contamination including dirt and corrosio
SEE MORE:
Understanding the ABS Warning Light in Your Subaru Outback (BR)
ABS warning light serves as an essential indicator of the Anti-Lock Braking System's operational status in your Subaru Outback (BR). When you turn the ignition switch to the “ON” position, the ABS warning light illuminates briefly for approximately 2 seconds, demonstrating that
Front Grille
A: REMOVAL
1) Remove the front bumper face assembly.
Remove the clips, turn over the front mud guard, and disconnect the fog
light connector. (Model with
fog light)
Remove the clips at the upper side of the bumper.
Remove the clips from the fender.
Remove the clips at the lower side of bu
