Subaru Outback (BR): Towing and tie-down hooks/holes
The towing hooks should be used only in an emergency (e.g., to free a stuck vehicle from mud, sand or snow).
CAUTION
● Use only the specified towing hooks and tie-down hooks/holes. Never use suspension parts or other parts of the body for towing or tie-down purposes.
● Never use the tie-down hole closest to the muffler under the vehicle for towing purposes.
● To prevent deformation to the bumper and the towing hook, do not apply excessive lateral load to the towing hooks.
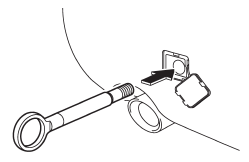
Front towing hook:
1. Take out the towing hook and screwdriver from the on board tool bucket. Take out the jack handle from the trunk (Legacy) or cargo area (Outback).
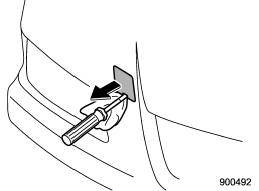
2. Pry off the cover on the front bumper using a screwdriver, and you will find a threaded hole for attaching the towing hook.
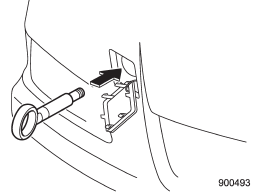
3. Screw the towing hook into the threaded hole until the threads can no longer be seen.
4. Tighten the towing hook securely using the jack handle.
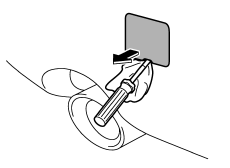
After towing, remove the towing hook from the vehicle and stow it in the tool bucket. Fit the towing hook cover on the bumper.
WARNING
● Do not use the towing hook except when towing your vehicle.
● Be sure to remove the towing hook after towing. Leaving the towing hook mounted on the vehicle could interfere with proper operation of the SRS airbag system in a frontal collision.
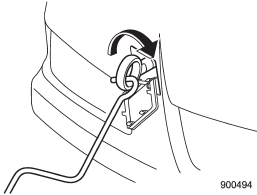
Rear towing hook:
1. Take the towing hook out of the tool bucket and take the screwdriver out of the tool bucket. Take the jack handle out of the trunk (Legacy) or cargo area (Outback).
2. Pry off the cover on the rear bumper using a screwdriver, and you will find a threaded hole for attaching the towing hook.
3. Screw the towing hook into the threaded hole until its thread can no longer be seen.
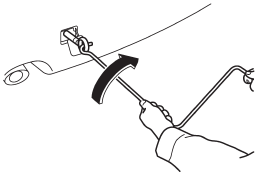
4. Tighten the towing hook securely using the jack handle.
After towing, remove the towing hook from the vehicle and stow it in the tool bucket. Fit the towing hook cover on the bumper.
WARNING
Do not use the towing hook except when towing your vehicle.
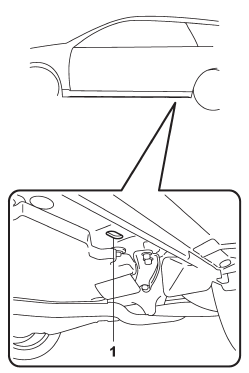
Front tie-down hooks:
The front tie-down hooks are located between each of the front tires and the front bumper.
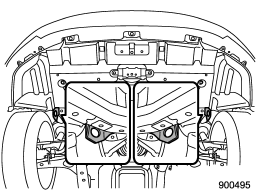
Rear tie-down holes:
1) Rear tie-down hole
The rear tie-down holes are located near each of the jack-up reinforcements.
WARNING
Use the rear tie-down holes only for downward anchoring. If they are used to anchor the vehicle in any other direction, cables may slip out of the holes, possibly causing a dangerous situation.
READ NEXT:
 Using a flat-bed truck
This is the best way to transport your vehicle. Use the following procedures
to ensure safe transportation.
1. Shift the select lever into the “P” position for AT and CVT models or the
shif
Towing with all wheels on the ground
WARNING
● Never turn the ignition switch to the “LOCK” position while the vehicle is
being towed because the steering wheel and the direction of the wheels will be locked.
● Reme
Electronic parking brake – if the electronic parking brake cannot be released
WARNING
● When the electronic parking brake cannot be released, the electronic parking
brake system may malfunction. Driving in such conditions may cause an unexpected
accident. Contact you
SEE MORE:
Rear view image display
When the ignition switch is in the “ON” position and the transmission is in the
“R” (reverse) position, the rear view camera automatically displays the rear view
image behind the vehicle on the inside mirror. Also, the following help lines are
indicated as a guide to help you realize t
Main Relay
A: REMOVAL
1) Disconnect the ground cable from battery.
2) Remove the glove box lid assembly.
3) Remove the main relay from the relay holder.
B: INSTALLATION
Install in the reverse order of removal.
C: INSPECTION
1) Check that the main relay has no deformation,
cracks or other damages.
2) Measur
