
Subaru Outback (BR): Type B inside mirror (if equipped)
Subaru Outback (BR) 2010-2015 Owners Manual / Instruments and controls / Mirrors / Type B inside mirror (if equipped)
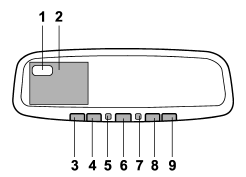
1) Electronic compass display
2) Rear view image display
3) HomeLink® button 1
4) HomeLink® button 2
5) Function indicator
6) HomeLink® button 3
7) Photosensor
8) Power button
9) Compass button
The mirror has the following features.
● Auto-dimming function for anti-glare capability ● Rear view image display ● Electronic compass display ● HomeLink® Wireless Control System
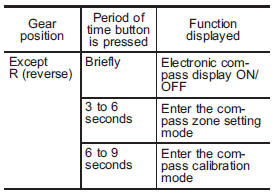
Using the power button and compass button, you can display the various functions of the rear view image display and the electronic compass display based on how long you press the buttons.
Power button
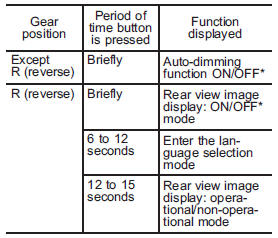
*: The setting returns to “ON” as a default setting every time the ignition switch is turned to the “OFF” position.
Compass button
- Auto-dimming function
- Rear view image display
- Electronic compass display
- HomeLink® Wireless Control System
READ NEXT:
 Auto-dimming function
The auto-dimming function is an anti-glare capability which automatically reduces
glare coming from headlights of vehicles behind you.
By pressing the power button, the autodimming function is togg
Rear view image display
When the ignition switch is in the “ON” position and the transmission is in the
“R” (reverse) position, the rear view camera automatically displays the rear view
image behind the vehicle o
Electronic compass display
By briefly pressing the compass button, the compass display is toggled on or
off. When the compass display is on, an illuminated compass reading will appear
on the mirror.
Using the electronic co
SEE MORE:
Vehicle Dynamics Control operation indicator light
The indicator light flashes during activation of the skid suppression function
and during activation of the traction control function.
NOTE
● The light may remain illuminated for a short period of time after the engine
has been started, especially in cold weather. This does not indicate
Basic Diagnostic Procedure of HVAC System
A: PROCEDURE
NOTE: When the sunload sensor check is performed indoors or in the shade, it could be diagnosed as sensor having an open circuit. Always perform the inspection in direct sunlight.
General Description
A: CAUTION
1) Never connect the battery in reverse polarity.
Doing so may
© 2010-2026 Copyright www.suoutback.com
