Subaru Outback (BR): HomeLink® Wireless Control System
The HomeLink® Wireless Control System can be used to activate remote control devices such as gate operators, garage door openers, door locks, home lighting and security systems.
There are three HomeLink® buttons on the mirror, each of which can be programmed for operation of one desired device. For details on the device types which can be operated by this system, consult the HomeLink® website at:
www.homelink.com or call 1-800-355- 3515.
Note the following information about this system.
If your vehicle is equipped with the HomeLink® Wireless Control System, it complies with Part 15 of the Federal Communications Commission Rules in the U.S. and the RSS-210 of Industry Canada in Canada. Its operation is subject to the following two conditions: (1) this device may not cause harmful interference, and (2) this device must accept any interference received, including interference that may cause undesired operation.
Changes and modifications to this system by anyone other than an authorized service facility could void authorization to use this equipment.
HomeLink® and the HomeLink® house are registered trademarks of Johnson Controls, Inc.
WARNING
● When p r o gramming the HomeLink® Wireless Control System, you may be operating a garage door opener or other device. Make sure that people and objects are out of the way of the garage door or other device to prevent potential harm or damage.
● Do not use the HomeLink® Wireless Control System with a garage door opener that lacks the safety stop and reverse feature as required by applicable safety standards. A garage door opener which cannot detect an object, signaling the door to stop and reverse, does not meet these safety standards. Using a garage door opener without these features increases risk of serious injury or death. For more information, consult the HomeLink® website at www.homelink.com or call 1-800-355-3515.
CAUTION
When programming the HomeLink® Wireless Control System to operate a garage door opener or an entrance gate, unplug the device’s motor from the outlet during programming to prevent motor burnout.
NOTE
● After programming your HomeLink® Wireless Control System for the desired devices, retain the hand-held transmitters for further programming or device testing in the event of a problem.
● It is recommended that you insert a new battery in the hand-held transmitter of a device to ensure correct programming.
Garage door opener programming in the U.S.A.
NOTE
When programming the HomeLink® Wireless Control System for a garage door opener, it is suggested that you park the vehicle outside the garage. 1. Unplug the motor of the garage door opener from the outlet.
NOTE
If any of the HomeLink® buttons are already programmed for other devices, skip step 2 because it clears the memory of all three buttons.

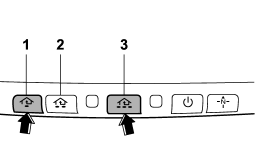
1) HomeLink® button 1
2) HomeLink® button 2
3) HomeLink® button 3
2. Press and hold the two outer HomeLink® buttons (button 1 and button 3) until the indicator light begins to flash (after approximately 20 seconds). Then release both buttons.
3. Hold the end of the garage door opener’s hand-held transmitter between 1 and 3 inches (25 and 76 mm) away from the HomeLink® button you wish to program.
4. Simultaneously press and hold both the hand-held transmitter button and the desired HomeLink® button. DO NOT release the buttons until step 5 has been completed.
NOTE
Some gate operators and garage door openers may require you to replace this programming step 4 with procedures in “Programming for entrance gates and garage door openers in Canada” F3-42.
5. Hold down both buttons until the HomeLink® indicator light flashes, first slowly then rapidly. When the indicator light flashes rapidly, both buttons may be released. (The rapidly flashing light indicates successful programming of the new frequency signal.)
6. Press and hold the programmed button and check the HomeLink® indicator light. If the indicator light stays on continuously, your garage door should activate and the programming is completed.
If the indicator light flashes rapidly for 2 seconds and then stays on continuously, your garage door opener may be protected by a rolling code feature. In this case you need to perform the additional steps that are described in “Programming rolling-code-protected garage door openers in the U.S.A.” F3-42.
Programming rolling-code-protected garage door openers in the U.S.A.
If your garage door opener has a rolling code feature, program the HomeLink® Wireless Control System for it by following steps 1 through 5 in “Garage door opener programming in the U.S.A.” F3-40. Then continue with the following steps.
NOTE
The assistance of a second person may make the programming quicker and easier.
1. Locate the training button on the garage door opener motor head unit. The exact location and color of the button may vary by brand of garage door opener. If it is difficult to locate the training button, refer to your garage door opener’s instruction manual.
1) Training button
2. Press the training button on the garage door opener motor head unit (which activates the “training light” on the unit). Proceed to step 3 within 30 seconds.
3. Inside the vehicle, firmly press, hold for 2 seconds and release the HomeLink® button that was programmed in the previous section. Press and release the button a second time to complete the programming procedure.
NOTE
Some garage door openers may require you to do the above press-holdrelease sequence a third time to complete the programming.
4. The garage door opener should now recognize the HomeLink® Wireless Control System and your garage door opener should activate when the HomeLink® button is pressed.
Programming for entrance gates and garage door openers in Canada
1. Unplug the motor of the entrance gate or garage door opener from the outlet.
NOTE
If any of the HomeLink® buttons are already programmed for other devices, skip step 2 because it clears the memory of all three buttons.

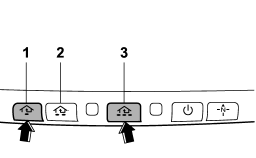
1) HomeLink® button 1
2) HomeLink® button 2
3) HomeLink® button 3
2. Press and hold the two outer HomeLink® buttons (button 1 and button 3) until the HomeLink® indicator light begins to flash (after approximately 20 seconds). Then release both buttons.
3. Hold the end of the entrance gate’s/ garage door opener’s hand-held transmitter between 1 and 3 inches (25 and 76 mm) away from the HomeLink® button you wish to program.
4. Press and hold the desired HomeLink® button.
5. Press and release (“cycle”) the handheld transmitter button every 2 seconds until step 6 is complete.
6. When the indicator light flashes slowly and then rapidly after several seconds, release both buttons.
7. Plug the motor of the entrance gate/ garage door opener to the outlet.
8. Test your entrance gate/garage door opener by pressing the programmed HomeLink® button.
Operating the HomeLink® Wireless Control System
Once programmed, the HomeLink® Wireless Control System can be used to remote-control the devices to which its buttons are programmed. To activate a device, simply press the appropriate button. The indicator light illuminates, indicating that the signal is being transmitted.
Programming other devices
To program other devices such as door locks, home lighting and security systems, contact HomeLink® at www.homelink.com or call 1-800-355-3515.
Reprogramming a single HomeLink® button
1. Press and hold the HomeLink® button you wish to reprogram. DO NOT release the button until step 4 has been completed.
2. When the HomeLink® indicator light begins to flash slowly (after approximately 20 seconds), position the hand-held transmitter of the device between 1 to 3 inches (25 to 76 mm) away from the HomeLink® button you wish to program.
3. Press and hold the hand-held transmitter button. The HomeLink® indicator light will flash, first slowly and then rapidly.
4. When the indicator light begins to flash rapidly, release both buttons.
The programming for the previous device is now erased and the new device can be operated by pressing the HomeLink® button.
Erasing HomeLink® button memory
NOTE
● Performing this procedure erases the memory of all the preprogrammed buttons simultaneously. The memory of individual buttons cannot be erased.
● It is recommended that upon the sale of the vehicle, the memory of all programmed HomeLink® buttons be erased for security purposes.

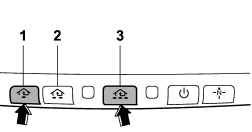
1) HomeLink® button 1
2) HomeLink® button 2
3) HomeLink® button 3
1. Press and hold the two outer buttons (button 1 and button 3) until the indicator light begins to flash (after approximately 20 seconds).
2. Release both buttons.
In case a problem occurs
If you cannot activate a device using the corresponding HomeLink® button after programming, contact HomeLink® at www.homelink.com or call 1-800-355- 3515 for assistance.

