
Subaru Outback (BR): Auto-dimming function
The auto-dimming function is an anti-glare capability which automatically reduces glare coming from headlights of vehicles behind you.
By pressing the power button, the autodimming function is toggled on or off.
When the auto-dimming function is on, the function indicator will illuminate in green. Even with the mirror in anti-glare mode, the mirror surface turns bright if the transmission is shifted into the “R” (reverse) position. This is to ensure good rearward visibility during reversing.
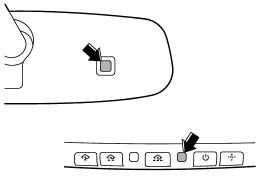
The mirror has a photosensor attached on both the front and back sides. During nighttime driving, these sensors detect distracting glare from vehicle headlights behind you and automatically dim the mirror to eliminate glare and preserve your vision. For this reason, use care not to cover the sensors with stickers, or other similar items. Periodically wipe the sensors clean using a piece of dry soft cotton cloth or an applicator.
NOTE
When cleaning the mirror, use a paper towel or similar item dampened with glass cleaner. Do not spray glass cleaner directly on the mirror surface. By doing so, the sprayed glass cleaner could enter the inside of the mirror housing. That may cause a malfunction in the mirror.
READ NEXT:
 Rear view image display
When the ignition switch is in the “ON” position and the transmission is in the
“R” (reverse) position, the rear view camera automatically displays the rear view
image behind the vehicle o
Electronic compass display
By briefly pressing the compass button, the compass display is toggled on or
off. When the compass display is on, an illuminated compass reading will appear
on the mirror.
Using the electronic co
HomeLink® Wireless Control System
The HomeLink® Wireless Control System can be used to activate remote control
devices such as gate operators, garage door openers, door locks, home lighting and
security systems.
There are three
SEE MORE:
General Description of Automatic Transmission
A: SPECIFICATION
1. TORQUE CONVERTER CLUTCH
2. OIL PUMP
3. TRANSMISSION CONTROL ELEMENT
4. TRANSMISSION GEAR RATIO
5. PLANETARY GEAR AND PLATE
6. SELECTOR POSITION
7. HYDRAULIC CONTROL AND LUBRICATION
8. COOLING AND HARNESS
9. TRANSFER
10.FINAL REDUCTION GEAR
11.RECOMM
Examples of the types of accidents in which the driver’s/driver’s and front
passenger’s SRS frontal airbag(s) will basically not deploy.
The driver’s and front passenger’s SRS frontal airbags are designed basically
not to deploy if the vehicle is struck from the side or from behind, or if it rolls
onto its side or roof, or if it is involved in a lowspeed frontal collision.
1) First impact
2) Second impact
In an acciden
