Subaru Outback (BR): Brake Booster
A: REMOVAL
CAUTION: Do not allow brake fluid to come in contact with the painted surface of the vehicle body. If it does, wash off with water and wipe away completely.
1) Disconnect the ground cable from battery.
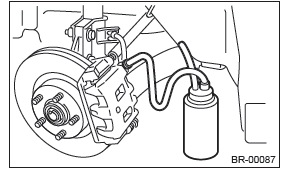
2) Drain brake fluid from the reservoir tank completely.
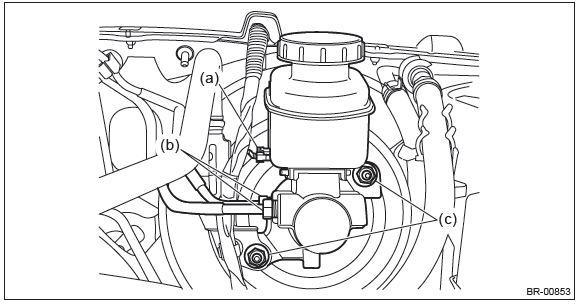
3) Remove the master cylinder assembly.
CAUTION: In order to prevent the contact of the bracket and check valve, be sure to loosen the master cylinder mounting nut while holding the bracket with hand. Otherwise it may deform the bracket.
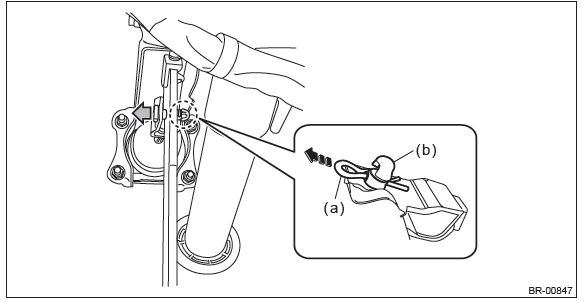
- Disconnect the fluid level gauge connector (a).
- Disconnect the brake pipe (b).
- Remove the nut (c), and slowly remove the master cylinder from the brake booster.
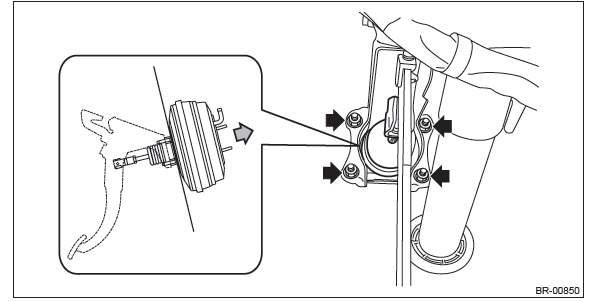
4) Remove the brake booster.
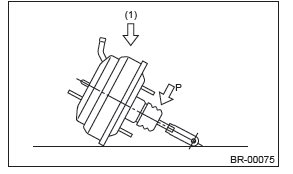
CAUTION:
- Do not disassemble the brake booster.
- If external force (1) is applied from above when brake booster is placed in this position, the resin portion as indicated by "P" may become damaged.
- Remove the clamp and remove the vacuum hose.
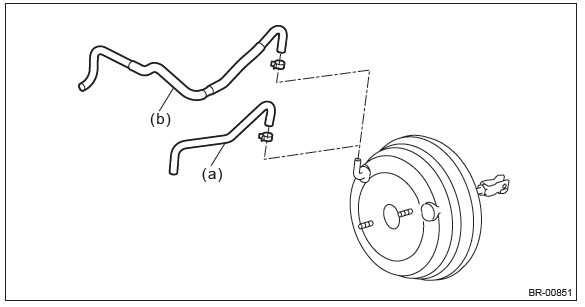
- Non-turbo model
- Turbo model
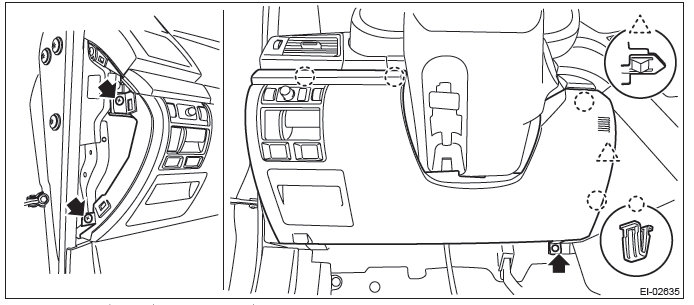
- Remove the clips, and remove the instrument panel side cover LH.
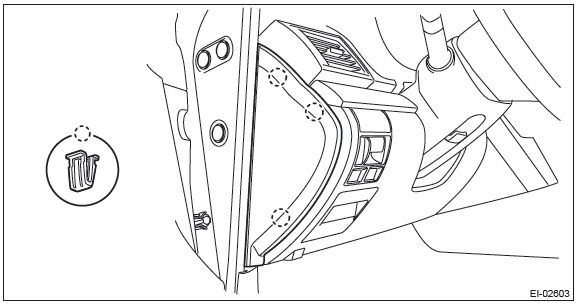
- Remove the clips and data link connector, and remove the instrument panel lower cover under.
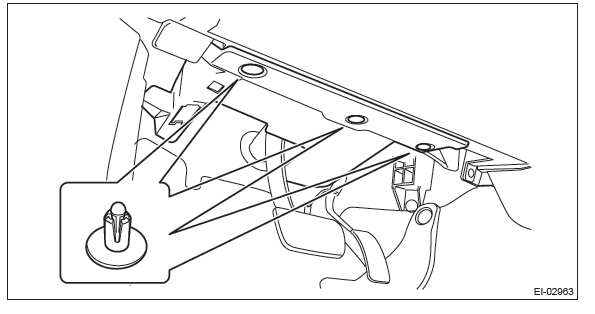
- Remove the screws and clips and release the claws, and remove the instrument panel lower cover while disconnecting the harness connectors.
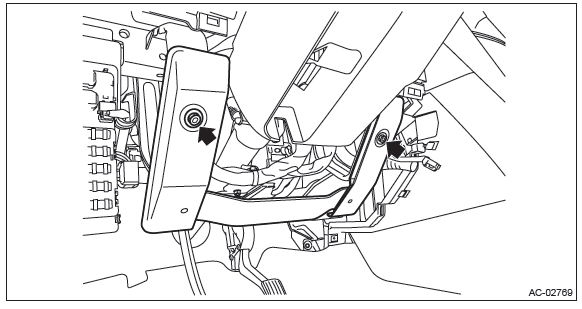
- Remove the bolts, and remove the knee guard panel.
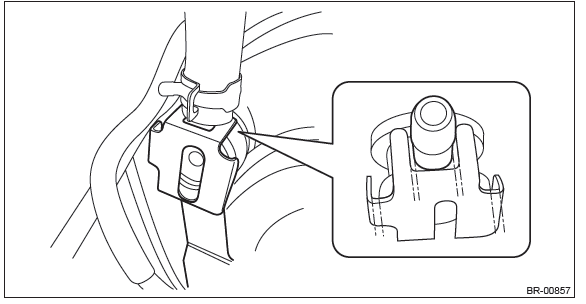
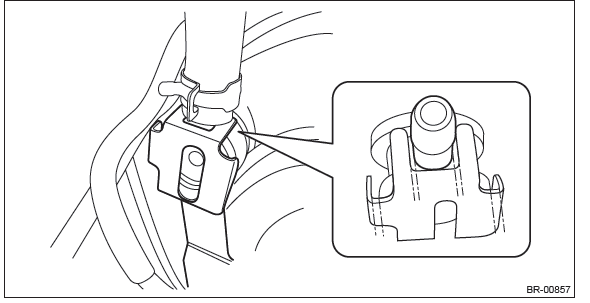
- Remove the snap pin (a) and clevis pin (b), and remove the operating rod from the brake pedal.
NOTE:
- Use special care when handling the operating rod. If excessive force is applied to the operating rod, the angle may change by +-3º, and it may result in damage to power piston cylinder.
- Do not change the push rod length.
- Remove the nut and remove the brake booster.
NOTE:
- Make sure that the booster shell and vacuum pipe are not subject to strong impacts.
- Be careful not to drop the brake booster. If the brake booster is dropped accidentally, replace it.
- Be careful when placing the brake booster on floor.
B: INSTALLATION
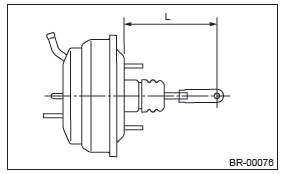
1) Check and adjust the operating rod of the brake booster.
- Measure the length between the brake booster mounting surface and clevis pin hole.
- If it is not within specification, loosen the lock nut, rotate the brake booster operating rod to adjust the rod length.
Specification L: 136.5 mm (5.37 in)
2) Install each part in the reverse order of removal.
CAUTION:
- Apply grease to the snap pin to prevent the operating rod from wear.
- Replace the clevis pin with new parts, and apply thin coat of NIGTIGHT LYW No. 2 grease to the clevis pin.
- When installing the master cylinder assembly, replace the seal sub assembly with a new part, and install it to the brake booster.
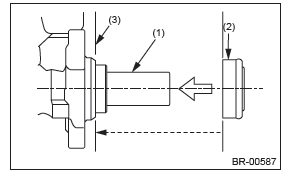
- Primary piston
- Seal sub ASSY
- Install the seal sub assembly to this surface.
- Install the bracket at the position with sufficient clearance that it does not contact with the check valve.
- Be sure to loosen the master cylinder mounting nut while holding the bracket with hand. Otherwise the bracket may deform.
Tightening torque:
Brake booster: 18 N*m (1.84 kgf-m, 13.3 ft-lb)
Master cylinder: 13 N*m (1.33 kgf-m, 9.6 ft-lb)
Brake pipe flare nut: 19 N*m (1.94 kgf-m, 14.0 ft-lb)
Operating lock nut: 22 N*m (2.24 kgf-m, 16.2 ft-lb)
3) Bleed air from the brake system. <Ref. to BR-54, PROCEDURE, Air Bleeding.>
4) Perform a road test to make sure the brakes do not drag.
C: INSPECTION
1. OPERATION CHECK (WITHOUT GAUGES)
CAUTION: When checking operation, be sure to apply the parking brake securely.
- Check without gauges
This method can not determine exactly what part is defective. But it is possible to identify the outline of the defect by performing the check according to the following procedures.
- Air tightness check
Start the engine, and idle it for 1 to 2 minutes, then turn it OFF. Depress the brake pedal several times applying the normal pedal force. The pedal stroke should be the longest at the 1st depression, and it should become shorter at each successive depression. If no change occurs in the pedal height when pressed, the brake booster is faulty.
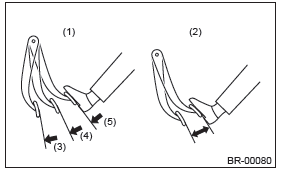
- Normal
- Not OK
- 1st
- 2nd
- 3rd
NOTE:
- In case of defective operation, inspect the condition of the check valve and vacuum hose as well.
- Replace them if faulty, and perform the test again.
- If no improvement is observed, check precisely with gauges.
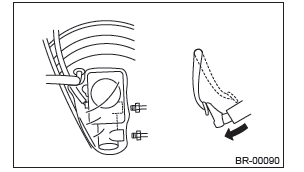
- Check operation
1) While the engine is OFF, depress the brake pedal several times applying the same pedal force, to check for a change in pedal height.
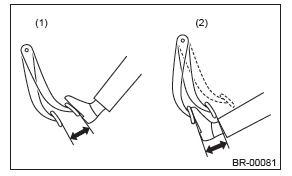
- When engine is stopped
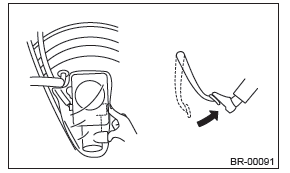
- When engine is started
2) With the brake pedal depressed, start the engine.
3) As the engine starts, the brake pedal should move slowly toward the floor. If the pedal height does not change, the brake booster is faulty.
NOTE: If faulty, check precisely with gauges.
- Loaded air tightness check
Depress the brake pedal while the engine is running, and turn the engine to OFF while the pedal is depressed.
Keep the pedal depressed for 30 seconds. If the pedal height does not change, the function of brake booster is normal. If the pedal height increases, it is faulty.
NOTE: If faulty, check precisely with gauges.
2. OPERATION CHECK (WITH GAUGES)
CAUTION: When checking operation, be sure to apply the parking brake securely.
- Check with gauge
Connect the gauge as shown in the figure. After bleeding air from the pressure gauge, perform each check.
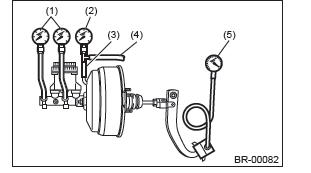
- Pressure gauge
- Vacuum gauge
- Adapter hose
- Vacuum hose
- Pedal force gauge
Air tightness check
1) Start the engine and keep it running until vacuum pressure indicates point A of the vacuum gauge = 66.7 kPa (500 mmHg, 19.69 inHg). Do not depress the brake pedal at this time.
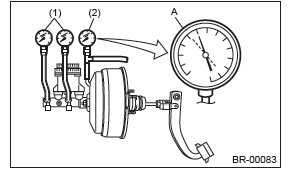
- Pressure gauge
- Vacuum gauge
2) Stop the engine and check the gauge. If the vacuum pressure drop within 15 seconds after stopping the engine is 3.3 kPa (25 mmHg, 0.98 inHg) or less, the function of brake booster is normal.
If faulty, the cause may be one of the following.
- Check valve malfunction
- Leak from vacuum hose
- Leak from shell joint section or stud bolt welded section
- Damaged diaphragm
- Leak from valve body seal and bearing section
- Leak from plate and seal assembly section
- Leak from poppet valve assembly section
- Loaded air tightness check
1) Start the engine and depress the brake pedal with a pedal force of 196 N (20 kgf, 44 lbf). Keep the engine running and keep the pedal pressed until a vacuum of point B = 66.7 kPa (500 mmHg, 19.69 inHg) is indicated on the vacuum gauge.
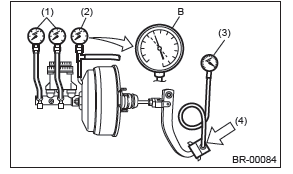
- Pressure gauge
- Vacuum gauge
- Pedal force gauge
- Depressed
2) Stop the engine and check the vacuum gauge.
If the vacuum pressure drop within 15 seconds after stopping the engine is 3.3 kPa (25 mmHg, 0.98 inHg) or less, the function of brake booster is normal.
If defective, refer to "AIR TIGHTNESS CHECK".
<Ref. to BR-49, INSPECTION, Brake Booster.>
3) If the brake booster is faulty, replace it with a new part.
- Lack of boost action check
Turn the engine OFF, and set the value of the vacuum gauge to "0". Then, check the fluid pressure when the brake pedal is depressed. The pressure must be greater than the specification listed.

- Boosting action check
Set the vacuum gauge reading to 66.7 kPa (500 mmHg, 19.69 inHg) with the engine running. Then, check the fluid pressure when the brake pedal is depressed. The pressure must be greater than the specification listed.

Brake Fluid
A: INSPECTION
1) Check that the amount of brake fluid is between the lines of "MIN" and "MAX". If out of the specified range, refill or drain the fluid. If the fluid level is close to "MIN", check the brake pad for wear and refill the fluid.
2) Check the fluid for discoloration. If the fluid is extremely discolored, replace with the new fluid.
B: REPLACEMENT
CAUTION:
- Do not let brake fluid come into contact with the painted surface of the vehicle body. Wash away with water immediately and wipe off if it is spilled by accident.
- Avoid mixing brake fluid of different brands to prevent fluid performance from degrading.
- Be careful not to allow dirt or dust to enter the reservoir tank.
NOTE:
- During the operation, keep the reservoir tank filled with brake fluid to prevent entry of air.
- Operate the brake pedal slowly.
- For convenience and safety, perform the work with 2 people.
- The required amount of brake fluid is approximately 500 m2 (16.9 US fl oz, 17.6 Imp fl oz) for the entire brake system.
1) Lift up the vehicle and set rigid racks at the specified locations, or keep the vehicle lifted.
2) Remove both the front and rear wheels.
3) Drain brake fluid from the reservoir tank.
4) Refill the reservoir tank with recommended brake fluid.
Recommended brake fluid: FMVSS No. 116, DOT3, or DOT4
Perform the same procedure as for bleeding the brake line, until new brake fluid comes out from vinyl tube.
<Ref. to BR-54, PROCEDURE, Air Bleeding.>
Air Bleeding
A: PROCEDURE
CAUTION:
- Do not let brake fluid come into contact with the painted surface of the vehicle body. Wash away with water immediately and wipe off if it is spilled by accident.
- Avoid mixing brake fluid of different brands to prevent fluid performance from degrading.
- Be careful not to allow dirt or dust to enter the reservoir tank.
1. MASTER CYLINDER
NOTE:
- When the master cylinder is replaced or the reservoir tank is empty, bleed the master cylinder.
- If bleeding of the master cylinder is not necessary, omit the following procedures, and perform bleeding of the brake line. <Ref. to BR-54, BRAKE LINE, PROCEDURE, Air Bleeding.>
1) Fill the reservoir tank of the master cylinder with brake fluid.
NOTE: While bleeding air, keep the reservoir tank filled with brake fluid to prevent entry of air.
2) Disconnect the brake line at primary and secondary sides.
3) Wrap the master cylinder with a plastic bag.
4) Depress the brake pedal slowly and hold it.
5) Plug the outlet plug with your finger, and then release the brake pedal.
6) Repeat the step 4) and 5) several times.
7) Remove the plastic bag.
8) Install the brake pipe to the master cylinder.
Tightening torque: Brake pipe flare nut: 19 N*m (1.94 kgf-m, 14.0 ft-lb)
9) Bleed air from the brake line. <Ref. to BR-54, BRAKE LINE, PROCEDURE, Air Bleeding.>
2. BRAKE LINE
1) When the master cylinder is replaced or the reservoir tank is empty, bleed the master cylinder before bleeding the brake line. <Ref. to BR-54, MASTER CYLINDER, PROCEDURE, Air Bleeding.>
2) Fill the reservoir tank of the master cylinder with brake fluid.
NOTE: While bleeding air, keep the reservoir tank filled with brake fluid to prevent entry of air.
3) Attach one end of the vinyl tube to the air bleeder and the other end to the brake fluid container.
4) Depress the brake pedal several times, and hold it.
5) Loosen the air bleeder screw to drain brake fluid. Tighten the air bleeder quickly, and release the brake pedal.
6) Repeat the steps 4) to 5) until there are no more air bubbles in the vinyl tube.
7) Repeat the steps from 2) to 6) above to bleed air from each wheel.
NOTE: Perform air bleed starting in the order from the farthest wheel cylinder from the master cylinder.
8) Securely tighten the air bleeder screws.
Tightening torque: Air bleeder screw: 8 N*m (0.82 kgf-m, 5.9 ft-lb)
9) Check that there are no brake fluid leaks in the entire brake system.
10) Check the pedal stroke.
Run the engine at idle after warming up the engine, and depress the brake pedal with a force of 500 N (51 kgf, 112 lbf). Measure the distance between the brake pedal and steering wheel. Release the pedal, and measure the distance between pedal and steering wheel again.

- Steering wheel
- Toe board
Specification of pedal stroke:
When depressing the pedal with a force of 500 N (51 kgf, 112 lbf).
110 mm (4.33 in) or less
11) If the distance is more than specification, there is a possibility of air being caught in the brake line. Bleed the brake line of all air until the pedal stroke meets the specification.
12) Operate the hydraulic control unit in the sequence control mode. <Ref. to VDC-17, ABS Sequence Control.>
13) Check the pedal stroke again.
14) If the distance is more than specification, there is a possibility of air being caught in the hydraulic unit. Repeat above steps 2) to 9) until the pedal stroke meets the specification.
15) Fill the reservoir tank with brake fluid up to the "MAX" level.
16) Perform a road test and ensure that the brakes operate normally.
READ NEXT:
 Brake Hose
A: REMOVAL
1. FRONT BRAKE HOSE
1) Separate the brake pipe (b) from brake hose (a) using a flare nut wrench.
2) Remove the clamp, strut mounting bolt and union bolt, and remove the front
brake hose.
Stop Light Switch
A: REMOVAL
1) Disconnect the ground cable from battery.
2) Remove the instrument panel lower cover.
Remove the clips, and remove the instrument panel side cover LH.
Remove the clips and data li
Parking Brake
General Description
A: SPECIFICATION
B: COMPONENT
1. PARKING BRAKE (REAR DISC BRAKE)
Back plate
Retainer
Lever
Parking brake shoe (Primary)
Parking brake shoe (Secondary)
Strut spring
Strut
SEE MORE:
P (Park)
This position is for parking the vehicle and starting the engine.
In this position, the transmission is mechanically locked to prevent the vehicle
from rolling freely.
When you park the vehicle, first apply the parking brake, then shift into the
“P” position. Do not hold the vehicle with o
Sun visor extension plate
With the sun visor positioned over the side window, you can use the sun visor
extension plate to prevent glare through the gap between the sun visor and center
pillar. To use the extension plate, pull it toward the rear of the vehicle. When
you have finished using it, stow it by pushing it t
