Subaru Outback (BR): Parking Brake
General Description
A: SPECIFICATION

B: COMPONENT
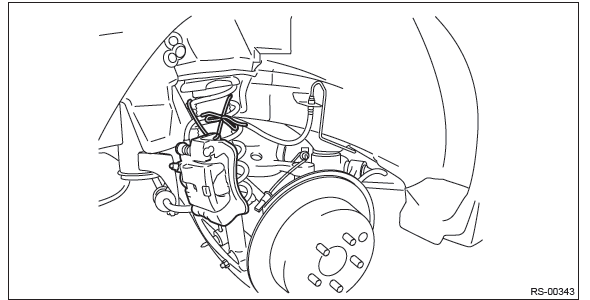
1. PARKING BRAKE (REAR DISC BRAKE)
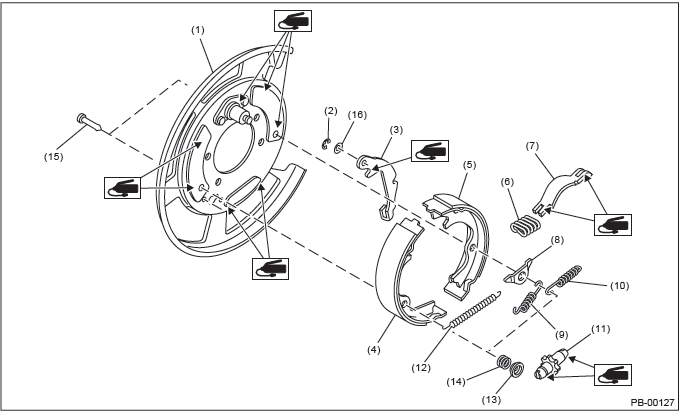
- Back plate
- Retainer
- Lever
- Parking brake shoe (Primary)
- Parking brake shoe (Secondary)
- Strut spring
- Strut
- Shoe guide plate
- Primary return spring
- Secondary return spring
- Adjusting screw
- Adjusting spring
- Shoe hold-down cup
- Shoe hold-down spring
- Shoe hold-down pin
- Wave washer
2. PARKING BRAKE ACTUATOR
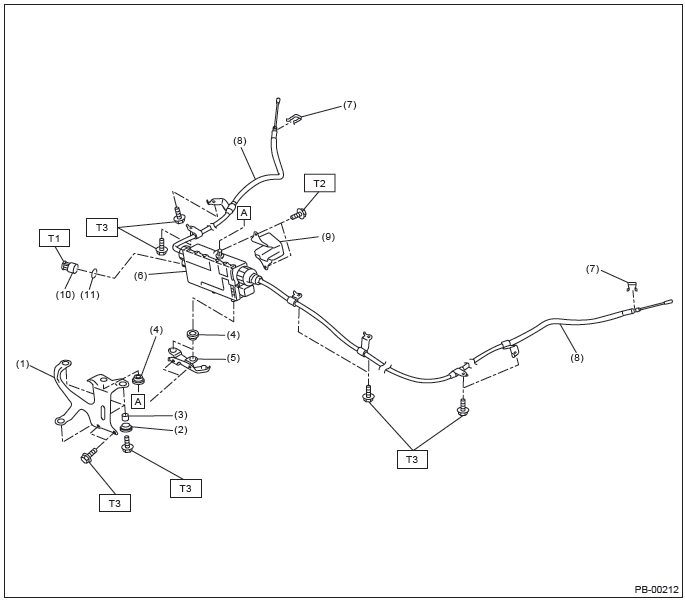
- Upper bracket
- Bushing
- Spacer
- Bushing
- Bracket
- Brake actuator
- Clamp
- Parking brake cable
- Tank bracket
- Cap
- O-ring
Tightening torque:N*m (kgf-m, ft-lb)
T1: 3 (0.31, 2.2)
T2: 7.5 (0.76, 5.5)
T3: 18 (1.84, 13.3)
C: CAUTION
- Wear appropriate work clothing, including a helmet, protective goggles and protective shoes when performing any work.
- Before removal, installation or disassembly, be sure to clarify the failure. Avoid unnecessary removal, installation, disassembly and replacement.
- Vehicle components are extremely hot after driving. Be wary of receiving burns from heated parts.
- Use SUBARU genuine grease etc. or equivalent. Do not mix grease etc. of different grades or manufacturers.
- Be sure to tighten fasteners including bolts and nuts to the specified torque.
- Place shop jacks or rigid racks at the specified points.
- Make sure grease does not come into contact with the parking shoes.
D: PREPARATION TOOL
1. SPECIAL TOOL
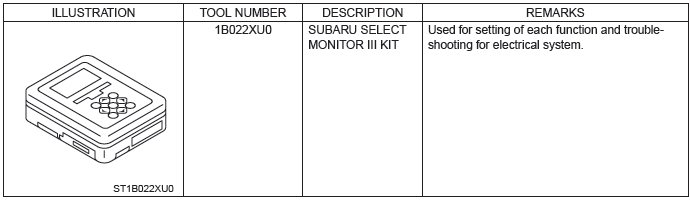
2. GENERAL TOOL

Parking Brake System
A: WIRING DIAGRAM
Refer to "Parking Brake / Brake Fluid Level Warning Light System" in the wiring diagram. <Ref. to WI-194, WIRING DIAGRAM, Parking Brake / Brake Fluid Level Warning Light System.>
B: ELECTRICAL SPECIFICATION
Refer to "Control Module I/O Signal" of "PARKING BRAKE (DIAGNOSTICS)". <Ref. to PB(diag)-12, ELECTRICAL SPECIFICATION, Control Module I/O Signal.>
C: INSPECTION
Refer to "PARKING BRAKE (DIAGNOSTICS)". <Ref. to PB(diag)-2, Basic Diagnostic Procedure.>
D: NOTE
For procedure of each component in the parking brake system, refer to the respective section.
- Parking brake actuator: <Ref. to PB-6, Parking Brake Actuator.>
- Parking brake assembly (rear disc brake): <Ref. to PB-10, Parking Brake Assembly (Rear Disc Brake).>
- Parking brake switch: <Ref. to PB-16, Parking Brake Switch.>
- Emergency release of electronic parking brake: <Ref. to PB-19, Emergency Release of Electronic Parking Brake.>
Parking Brake Actuator
A: REMOVAL
CAUTION: Since the parking brake actuator and parking brake cable are integrated as a unit, do not disassemble them.
1) Lift up the vehicle, and then remove the rear wheels.
2) Perform "Parking Brake Removal Mode" after connecting the Subaru Select Monitor. <Ref. to PB(diag)- 18, PARKING BRAKE REMOVAL MODE, OPERATION, Subaru Select Monitor.>
CAUTION: Be sure to lift up the vehicle before performing the "Parking Brake Removal Mode".
3) Disconnect the ground cable from battery.
4) Remove the fuel tank protector.
- Remove the bolts, and remove the fuel tank protector.
- Remove the clips.
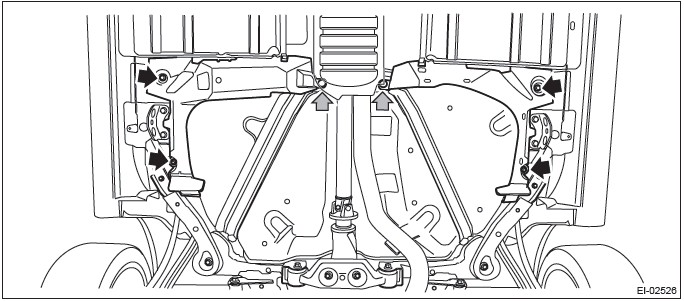
5) Remove the parking brake actuator.
- Remove the parking brake cable from parking brake assembly. <Ref. to PB-10, REMOVAL, Parking Brake Assembly (Rear Disc Brake).>
- Remove the bolt and detach the cable clamp.
NOTE: Make a line marking to confirm the twist of parking cable, and then perform the following procedures:
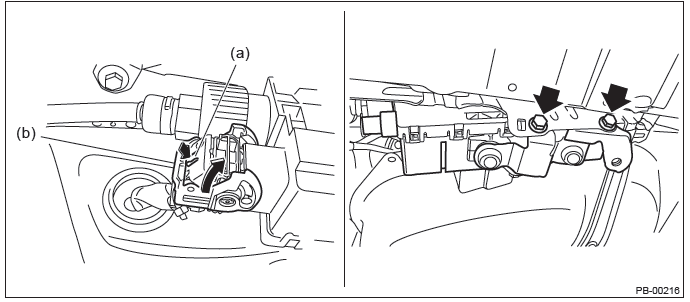
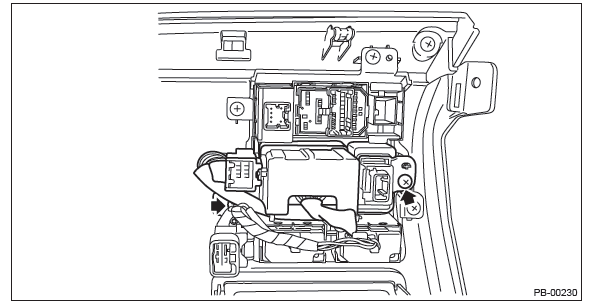
- Push the lock (a), and pull up the lock lever (b).
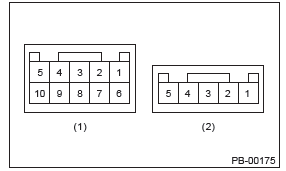
- With the lock lever pulled up, disconnect the parking brake actuator connector.
- Remove the bolts and remove the parking brake actuator.
B: INSTALLATION
1) Install the parking brake actuator assembly.
- Connect the parking brake actuator connector.
CAUTION: Securely lock the locking connector (a).
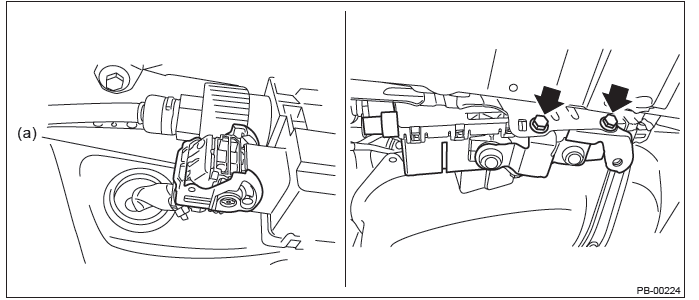
- Install the parking brake actuator.
Tightening torque: 18 N*m (1.84 kgf-m, 13.3 ft-lb)
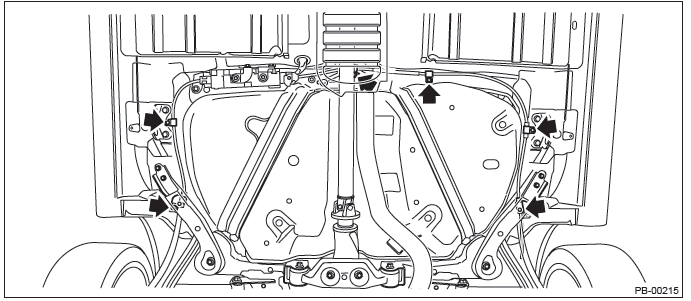
- Check that the parking brake cable is not twisted, and install the cable clamps in the order of (a) to (f).
CAUTION:
- Perform the installation with the line marking of the parking brake cable facing downward.
- Pay special attention to the cable clamps (d) and (f) because the cable is easy to be twisted due to these clamps.
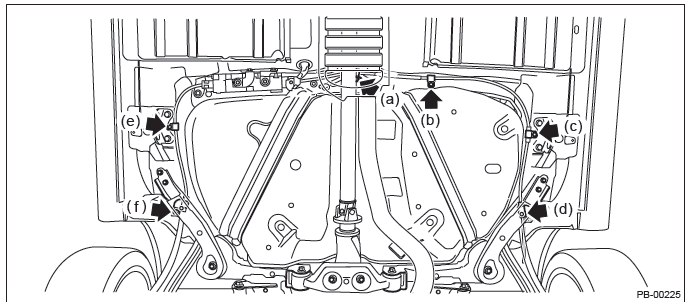
Tightening torque: 18 N*m (1.84 kgf-m, 13.3 ft-lb)
2) Install each part in the reverse order of removal.
3) Park the vehicle on a level ground with the four wheels on the ground.
4) Connect the Subaru Select Monitor to perform the following operations.
- "Force Sensor Calibration Mode": <Ref. to PB(diag)-18, FORCE SENSOR CALIBRATION MODE, OPERATION, Subaru Select Monitor.>
- "Clutch Sensor Calibration Mode" (MT model only): <Ref. to PB(diag)-20, CLUTCH SENSOR CALIBRATION MODE, OPERATION, Subaru Select Monitor.>
Parking Brake Assembly (Rear Disc Brake)
A: REMOVAL
1) Lift up the vehicle, and then remove the rear wheels.
2) Perform "Parking Brake Removal Mode" after connecting the Subaru Select Monitor. <Ref. to PB(diag)- 18, PARKING BRAKE REMOVAL MODE, OPERATION, Subaru Select Monitor.>
CAUTION: Be sure to lift up the vehicle before performing the "Parking Brake Removal Mode".
3) Disconnect the ground cable from battery.
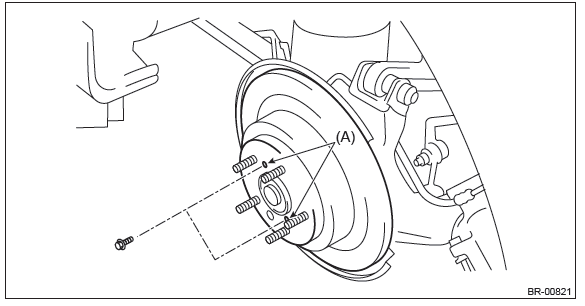
4) Remove the rear disc brake caliper from the rear axle housing.
- Remove the bolt from the brake hose bracket.
- Remove the mounting bolts, and then remove the rear disc brake caliper.

- Prepare wiring harnesses etc. to be discarded, and suspend the rear disc brake caliper from the shock absorber with the harnesses.
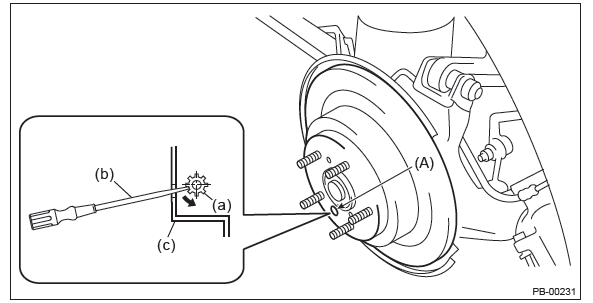
5) Remove the rear disc brake rotor.
NOTE: If the disc rotor is difficult to remove, try the following two methods in order.
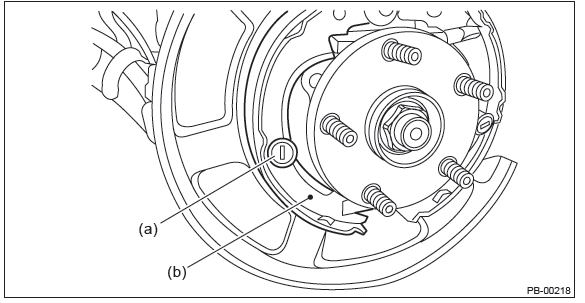
- Insert the flat tip screwdriver (b) into the brake adjustment hole (A), and rotate the adjusting screw (a) until the brake shoe moves far enough to remove the disc rotor (c).
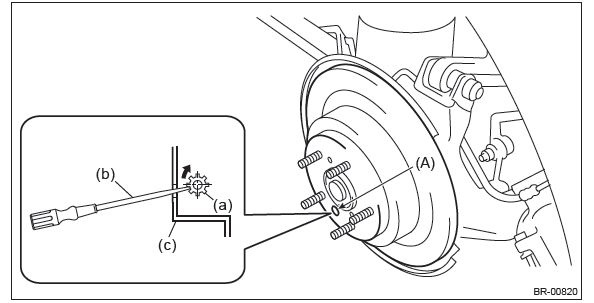
- When the disc rotor is difficult to be removed from the rear hub unit bearing, screw in 8 mm (0.31 in) bolt to the threaded part of the disc rotor (A), and remove the disc rotor.
6) Remove the parking brake shoe (primary).
- Remove the primary and secondary return springs.
- Remove the shoe guide plate.
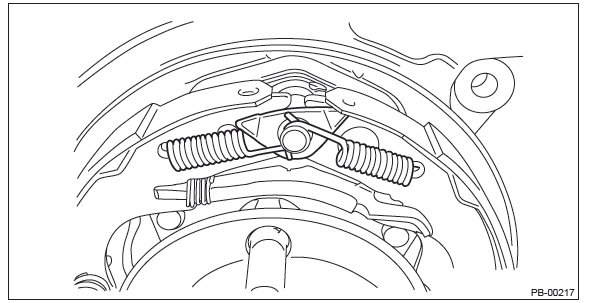
- Remove the shoe hold-down cup (a), and remove the shoe hold-down spring.
- Remove the parking brake shoe (primary) (b).
7) Remove the parking brake shoe (secondary).
- Remove the strut (a), strut spring (b), and adjusting screw (c).
- Remove the shoe hold-down cup (d), and remove the shoe hold-down spring (e).
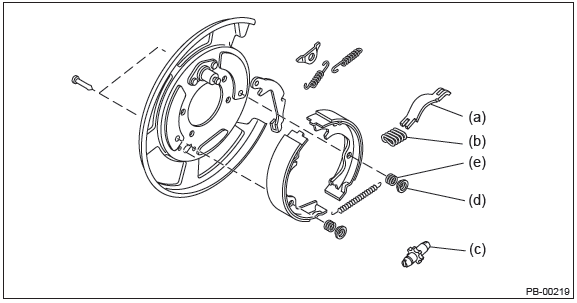
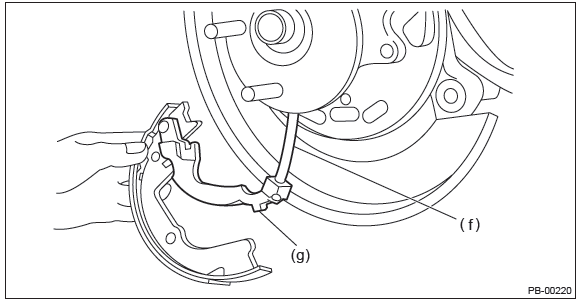
- Remove the parking brake cable (f) from lever (g).
- Remove a retainer from the secondary side brake shoe.
- Remove the lever from the brake shoe.
- Remove the clamp, and remove the parking brake cable from the back plate.
B: INSTALLATION
1) Before assembly, check the brake disc rotor and brake shoe. <Ref. to PB-15, INSPECTION, Parking Brake Assembly (Rear Disc Brake).>
2) Install the parking brake cable to the back plate, and secure it with the clamp.
CAUTION: Be sure the lining surface is free from brake fluid and grease.
3) Apply brake grease to the following locations.
Brake grease: Brake Grease (Part No. 003602002)
- Six contact surfaces of the brake shoe rim and back plate gasket
- Contact surface of the brake shoe and the anchor pin
- Contact surface of the parking brake lever and strut
- Contact surface of the brake shoe and adjusting screw
- Contact surface of the brake shoe and strut
- Contact surface of the lever and brake shoe
4) Install the wave washer and lever to the secondary side brake shoe pin, and lock the retainer securely.
5) Install the parking brake cable to the lever.
6) Install the adjusting screw and adjusting spring to the brake shoe.
NOTE: Install the adjusting screw with the screw section facing toward the direction shown in the figure below.
- Left wheel: front side of vehicle, right wheel: rear side of vehicle
7) Check that the parking brake cable does not fall from the cable guide.
8) Install the brake shoes to the back plate with shoe hold-down pins, shoe hold-down springs, and shoe hold-down cups.
9) Install the strut and strut spring to the brake shoes.
NOTE: Install the strut springs on front side of the vehicle.
10) Install the return springs on the primary side first, and then the secondary side.
11) Install the brake disc rotor and brake caliper.
12) Install the brake hose bracket.
Tightening torque: Refer to "COMPONENT" of "General Description". <Ref. to BR-4, COMPONENT, General Description.>
13) Adjust the parking brake. <Ref. to PB-15, ADJUSTMENT, Parking Brake Assembly (Rear Disc Brake).>
14) When replacing with the new brake shoe, connect the Subaru Select Monitor and perform the "Break-in Parking Brake Drive Mode". <Ref. to PB(diag)-19, BREAK-IN PARKING BRAKE DRIVE MODE, OPERATION, Subaru Select Monitor.>
15) After breaking-in, re-adjust the parking brakes. <Ref. to PB-15, ADJUSTMENT, Parking Brake Assembly (Rear Disc Brake).>
C: INSPECTION
1) Measure the inner diameter of the brake disc rotor.
If scoring or worn is found on the disk, replace the brake disc rotor.
Disc rotor inner diameter:
Specification: 190 mm (7.48 in)
Service limit: 191 mm (7.52 in)
2) Measure the lining thickness. If it exceeds the limit, replace the brake shoe.
Lining thickness:
Specification: 2.8 mm (0.11 in)
Service limit: 1.5 mm (0.059 in)
NOTE: Replace the right and left brake shoe as a set.
D: ADJUSTMENT
1. SHOE CLEARANCE
1) Lift up the vehicle, and then remove the rear wheels.
2) Remove the adjusting hole cover from the disc rotor.
3) Insert the flat tip screwdriver (b) into the brake adjustment hole (A), and rotate the adjusting screw (a) until the brake shoe contacts the disc rotor (c)
4) Loosen the adjusting screw by 5 notches to opposite direction of arrow.
CAUTION:
- After operating the parking brake several times, check that there is no brake drag.
- If the amount that the adjusting screw is turned back is little, securely loosen it by 5 notches to avoid dragging.
5) Install the adjusting hole cover to the disc rotor.
6) Install the rear wheels and lower the vehicle.
7) Park the vehicle on a level ground with the four wheels on the ground.
8) Connect the Subaru Select Monitor to perform the "Force Sensor Calibration Mode". <Ref. to PB(diag)-18, FORCE SENSOR CALIBRATION MODE, OPERATION, Subaru Select Monitor.>
Parking Brake Switch
A: REMOVAL
1) Disconnect the ground cable from battery.
2) Remove the instrument panel lower cover.
- Remove the clips, and remove the instrument panel side cover LH.
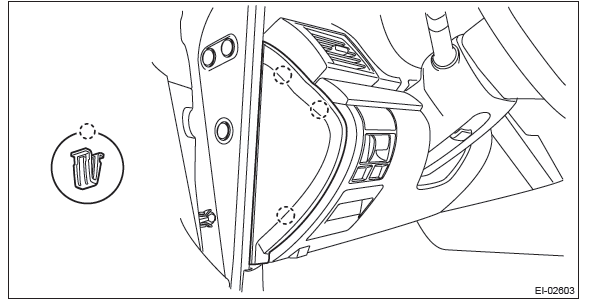
- Remove the clips and data link connector, and remove the instrument panel lower cover under.
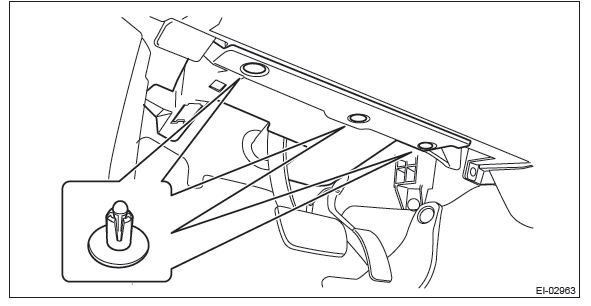
- Remove the screws and clips and release the claws, and remove the instrument panel lower cover while disconnecting the harness connectors.
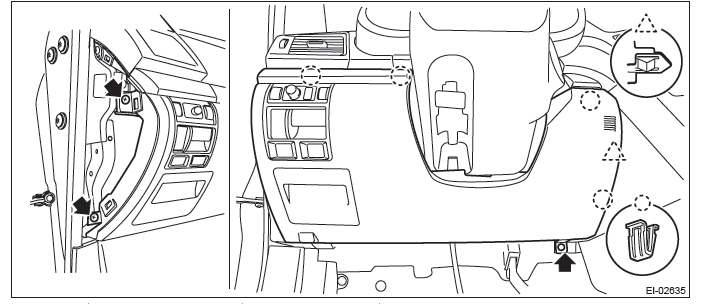
3) Remove the screws and remove the parking brake switch.
B: INSTALLATION
Install each part in the reverse order of removal.
C: INSPECTION
1. PARKING BRAKE CONTROL SWITCH
Check the resistance between parking brake control switch terminals.

- Parking brake control switch
- Hill hold switch
NOTE: Replace the switch if the inspection result is not within the standard value.
2. HILL HOLD SWITCH
Check the resistance between hill hold switch terminals.

- Parking brake control switch
- Hill hold switch
NOTE: Replace the switch if the inspection result is not within the standard value.
Emergency Release of Electronic Parking Brake
A: OPERATION
CAUTION:
- Perform this operation only when the parking brake must be released in emergency situation such as a system malfunction.
- When the operation is performed on a slope or any uneven road, the vehicle may start to move and cause a serious accident; Be sure to fully confirm safety in the nearby area.
1) Shift the select lever to "P" range (AT or CVT model), or set the shift lever to "1st " or "R" position (MT model).
2) Stop the engine.
3) Set the wheel stoppers to tires.
4) Take out the electronic parking brake release tool from the vehicle service tools.
5) Insert the release tool to the parking brake actuator cap (a), and remove the cap by rotating it counterclockwise.

6) Insert the release tool through the film into the parking brake actuator, and rotate the tool clockwise 200 to 250 turns.
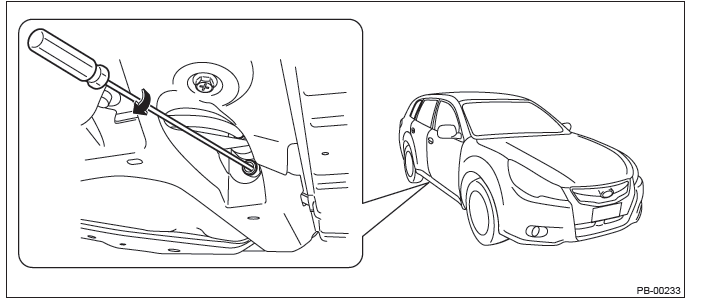
7) Install the cap removed in step 5).
Tightening torque: 3 N*m (0.31 kgf-m, 2.2 ft-lb)
8) When the emergency release of electronic parking brake was performed, be sure to perform the inspection related to the emergency release of electronic parking brake, regardless of whether the vehicle was running or not. <Ref. to PB-20, INSPECTION, Emergency Release of Electronic Parking Brake.>
B: INSPECTION
When the emergency release of electronic parking brake was performed, check the following points regardless of whether the vehicle was running or not.
- Check the operation of parking brake actuator when the parking brake switch is operated.
NOTE: The actuator operates from lock to lock when recovering from the emergency release mode, and therefore it may take more than ten seconds to finish the operation.
- Check the illumination of brake warning light when the parking brake is operated. <Ref. to PB(diag)-26, Warning Light Illumination Pattern.>
- Check the noise when the parking brake is operated.
- Visually check the parking brake shoe. <Ref. to PB-10, Parking Brake Assembly (Rear Disc Brake).>
- Check the brake dragging when the parking brake is released. <Ref. to PB-15, ADJUSTMENT, Parking Brake Assembly (Rear Disc Brake).>
General Diagnostic Table
A: INSPECTION

READ NEXT:
 Basic Diagnostic Procedure of Parking Brake
A: PROCEDURE
CAUTION: When removing or installing, remove all foreign matter (dust, water, and oil) from the electronic parking brake control module connectors.
NOTE:
To check the harness fo
How to use Subaru Select Monitor, data, modes
A: OPERATION
1. HOW TO USE SUBARU SELECT MONITOR
NOTE:
For detailed operation procedures, refer to "PC application help for Subaru Select Monitor".
If communication is not pos
SEE MORE:
Remote transmitter program
New transmitters can be programmed to the remote engine start system in the event
that a transmitter is lost, stolen, damaged or additional transmitters are desired
(the system will accept up to eight transmitters). New remote engine start transmitters
can be programmed according to the follow
Rear gate (Outback)
The rear gate can be locked and unlocked using any of the following systems.
● Power door locking switch: Refer to “Power door locking switches” F2-7.
● Remote keyless entry system: Refer to “Remote keyless entry system” F2-8.
To open:
First unlock the rear gate lock then p
