Subaru Outback manuals

Subaru Outback: Checking the coolant level

Check the coolant level at each fuel stop.


Check the coolant level at each fuel stop.

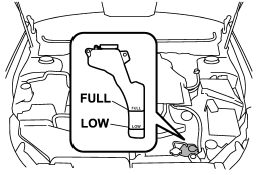
1. Check the coolant level on the outside of the reservoir while the engine is cool.

2. If the level is close to or lower than the “LOW” level mark, add coolant up to the “FULL” level mark. If the reserve tank is empty, remove the radiator cap and refill as required.

3. After refilling the reserve tank and the radiator, reinstall the caps and check that the rubber gaskets inside the radiator cap are in the proper position.

CAUTION

● Be careful not to spill engine coolant when adding it. If coolant touches the exhaust pipe, it may cause a bad smell, smoke, and/or a fire. If engine coolant gets on the exhaust pipe, be sure to wipe it off.

● Do not splash the engine coolant over painted parts. The alcohol contained in the engine coolant may damage the paint surface.

READ NEXT:

 Changing the coolant

WARNING Never attempt to remove the radiator cap until the engine has been shut off and has cooled down completely. Since the coolant is under pressure, you may suffer serious burns from a spray

 Air cleaner element

WARNING Do not operate the engine with the air cleaner element removed. The air cleaner element not only filters intake air but also stops flames if the engine backfires. If the air cleaner eleme

 Replacing the air cleaner element

Replace the air cleaner element according to the maintenance schedule in the “Warranty and Maintenance Booklet”. Under extremely dusty conditions, replace it more frequently. It is recommended

SEE MORE:

 Front Hood

A: REMOVAL 1. FRONT HOOD INSULATOR Release the clips to remove the front hood insulator. CAUTION: Do not reuse any clips damaged during removal. The damaged clip cannot fix the insulator securely. Therefore, always replace with a new part. 2. FRONT HOOD SEAL Remove the clip, and remove the seal.

 Cylinder Head

A: REMOVAL NOTE: When replacing a single part, perform the work with the engine assembly installed to body. Refer to "Valve Clearance" for preparation procedures. <Ref. to ME(H4SO)-29, Valve Clearance.> When performing the work with the engine installed to body, the following parts must

© 2010-2023 Copyright www.suoutback.com