Subaru Outback (BR): Exhaust
General Description
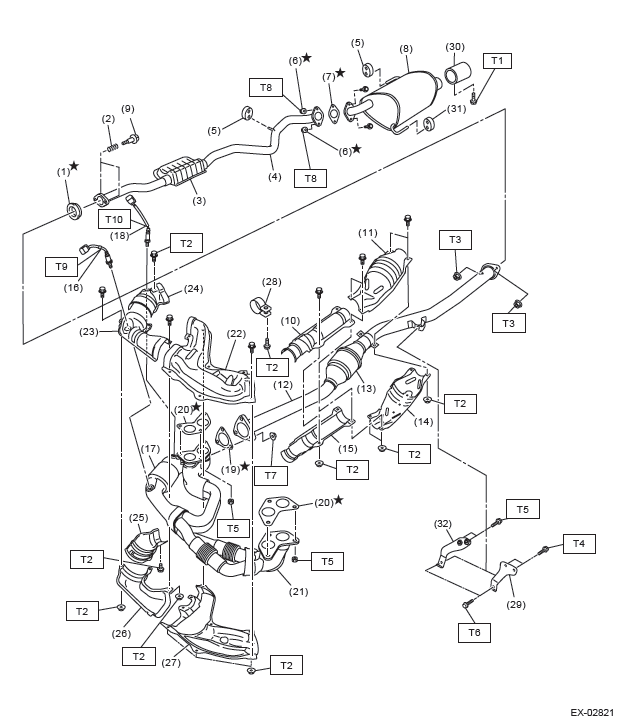
A: COMPONENT
- Models other than C6 model
- C6 model
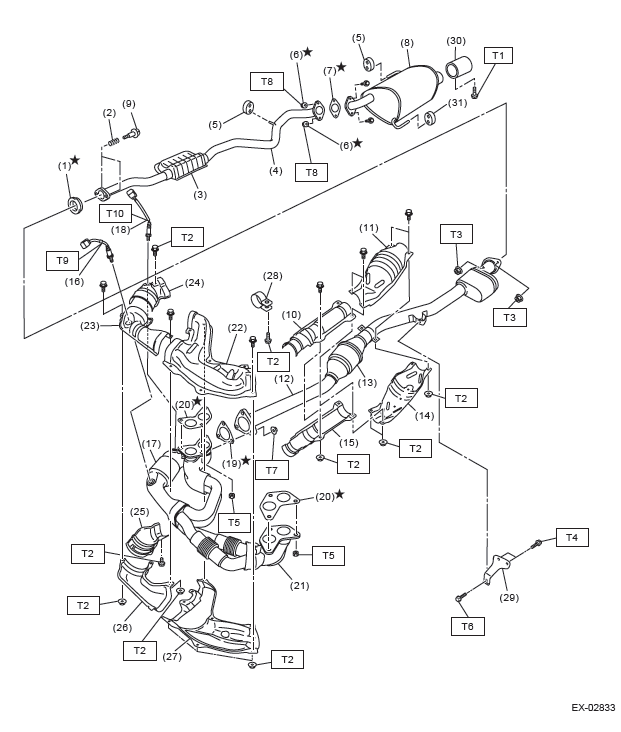
- Gasket
- Spring
- Chamber
- Rear exhaust pipe
- Cushion rubber (without protrusion)
- Self-locking nut
- Gasket
- Muffler
- Bolt
- Center exhaust pipe front upper cover
- Rear catalytic converter upper cover
- Center exhaust pipe
- Rear catalytic converter
- Rear catalytic converter lower cover
- Center exhaust pipe front lower cover
- Front oxygen (A/F) sensor
- Front catalytic converter
- Rear oxygen sensor
- Gasket
- Gasket
- Front exhaust pipe
- Front exhaust pipe upper cover LH
- Front exhaust pipe upper cover RH
- Front catalytic converter upper cover
- Front catalytic converter lower cover
- Front exhaust pipe lower cover RH
- Front exhaust pipe lower cover LH
- Band
- Hanger bracket (CVT model)
- Muffler cutter (models with muffler cutter)
- Cushion rubber (with protrusion)
- Hanger bracket (MT model)
Tightening torque: N*m (kgf-m, ft-lb)
T1: 7.5 (0.8, 5.5)
T2: 13 (1.3, 9.6)
T3: 18 (1.8, 13.3)
T4: 23 (2.3, 17.0)
T5: 30 (3.1, 22.1)
T6: 35 (3.6, 25.8)
T7: 40 (4.1, 29.5)
T8: 48 (4.9, 35.4)
T9: <Ref. to FU(H4SO)-42, INSTALLATION,
Front Oxygen (A/F)
Sensor.>
T10: <Ref. to FU(H4SO)-44, INSTALLATION,
Rear Oxygen Sensor.>
B: CAUTION
- Wear appropriate work clothing, including a cap, protective goggles and protective shoes when performing any work.
- Remove contamination including dirt and corrosion before removal, installation or disassembly.
- Keep the disassembled parts in order and protect them from dust and dirt.
- Before removal, installation or disassembly, be sure to clarify the failure. Avoid unnecessary removal, installation, disassembly and replacement.
- Vehicle components are extremely hot after driving.
Be wary of receiving burns from heated parts.
- Be sure to tighten fasteners including bolts and nuts to the specified torque.
- Place shop jacks or rigid racks at the specified points.
- Before disconnecting connectors of sensors or units, be sure to disconnect the ground cable from the battery.
- If any fat adheres to the exhaust pipe, wipe it off.
Otherwise a fire may happen.
Front Exhaust Pipe
A: REMOVAL
CAUTION: Vehicle components are extremely hot after driving. Be wary of receiving burns from heated parts.
1) Remove the air intake duct. <Ref. to IN(H4SO)- 9, REMOVAL, Air Intake Duct.>
2) Disconnect the ground cable from battery.
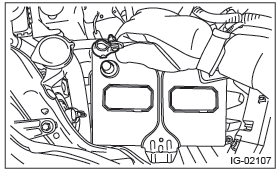
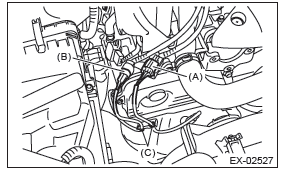
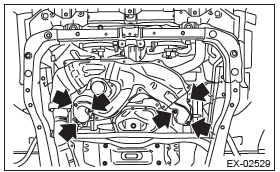
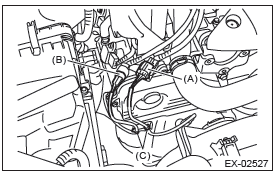
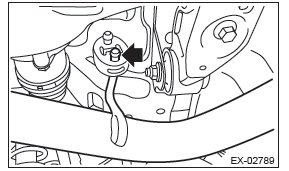
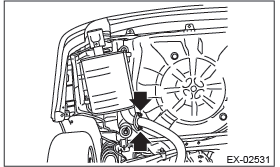
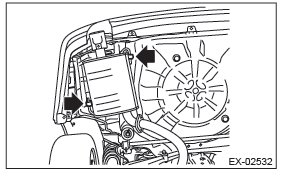
3) Disconnect the front oxygen (A/F) sensor connector (A) and rear oxygen sensor connector (B) and remove the clip (C) fastening the harness.
4) Lift up the vehicle.
5) Remove the under cover. <Ref. to EI-35, REMOVAL, Front Under Cover.>
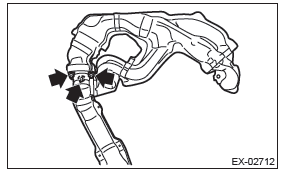
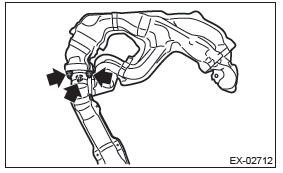
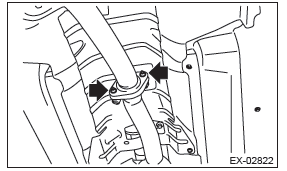
6) Remove the rear exhaust pipe from center exhaust pipe.
- Models other than C6 model

- C6 model
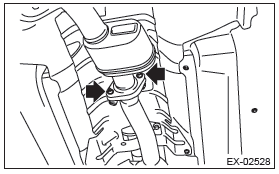
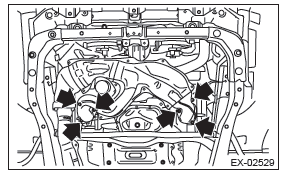
7) Remove the nuts which hold front exhaust pipe onto cylinder heads.
CAUTION: Be careful not to drop the front exhaust pipe and center exhaust pipe assembly.
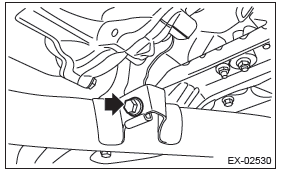
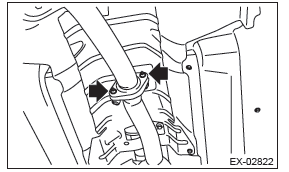
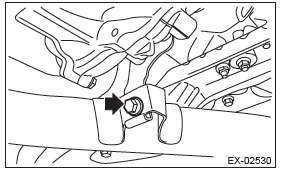
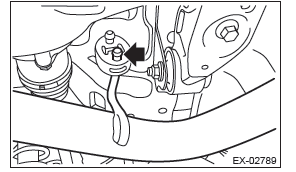
8) Remove the bolt which holds center exhaust pipe to hanger bracket.
9) Remove the front exhaust pipe and center exhaust pipe from vehicle as a unit.
CAUTION:
- The front exhaust pipe and center exhaust pipe assembly are very heavy. Be careful not to drop the exhaust pipes when removing.
- After removing the front exhaust pipe and center exhaust pipe assembly, do not pull the rear exhaust pipe with excessive force.
10) Remove the center exhaust pipe from the front exhaust pipe.
11) Remove the front oxygen (A/F) sensor and rear oxygen sensor from front exhaust pipe. <Ref. to FU(H4SO)-42, REMOVAL, Front Oxygen (A/F) Sensor.> <Ref. to FU(H4SO)-44, REMOVAL, Rear Oxygen Sensor.>
B: INSTALLATION
1) Install the front oxygen (A/F) sensor and rear oxygen sensor to the front exhaust pipe. <Ref. to FU(H4SO)-42, INSTALLATION, Front Oxygen (A/ F) Sensor.> <Ref. to FU(H4SO)-44, INSTALLATION, Rear Oxygen Sensor.>
2) Install the center exhaust pipe to front exhaust pipe.
NOTE: Use a new gasket.
Tightening torque: 40 N*m (4.1 kgf-m, 29.5 ft-lb)
3) Install the front exhaust pipe and center exhaust pipe as a unit to the vehicle.
NOTE: Use a new gasket.
4) Temporarily tighten the nuts which hold front exhaust pipe to cylinder heads.
5) Install the rear exhaust pipe to center exhaust pipe.
NOTE: Use a new gasket.
Tightening torque: 18 N*m (1.8 kgf-m, 13.3 ft-lb)
- Models other than C6 model
- C6 model
6) Tighten the bolts which secure the center exhaust pipe to the hanger bracket.
Tightening torque: 35 N*m (3.6 kgf-m, 25.8 ft-lb)
7) Tighten the nuts which hold front exhaust pipe to cylinder heads.
Tightening torque: 30 N*m (3.1 kgf-m, 22.1 ft-lb)
8) Install the under cover. <Ref. to EI-35, INSTALLATION, Front Under Cover.>
9) Lower the vehicle.
10) Connect the front oxygen (A/F) sensor connector (A) and rear oxygen sensor connector (B), and fasten the harness with the clip (C).
11) Connect the battery ground terminal.
12) Install the air intake duct. <Ref. to IN(H4SO)-9, INSTALLATION, Air Intake Duct.>
C: INSPECTION
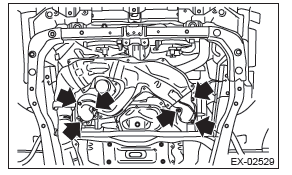
1) Check the connections and welds for exhaust leaks.
2) Make sure there are no holes or rusting.
Center Exhaust Pipe
A: REMOVAL
After removing the center exhaust pipe and front exhaust pipe as a unit, separate them. Refer to "Front Exhaust Pipe" for the removal procedure.
<Ref. to EX(H4SO)-5, REMOVAL, Front Exhaust Pipe.>
B: INSTALLATION
Install the center exhaust pipe and front exhaust pipe as a unit. Refer to "Front Exhaust Pipe" for the installation procedure. <Ref. to EX(H4SO)-6, INSTALLATION, Front Exhaust Pipe.>
C: INSPECTION
1) Check the connections and welds for exhaust leaks.
2) Make sure there are no holes or rusting.
Rear Exhaust Pipe
A: REMOVAL
CAUTION: Vehicle components are extremely hot after driving. Be wary of receiving burns from heated parts.
1) Lift up the vehicle.
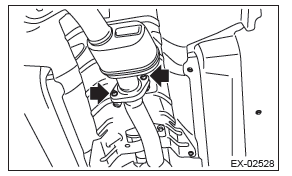
2) Remove the center exhaust pipe from rear exhaust pipe.
- Models other than C6 model
- C6 model
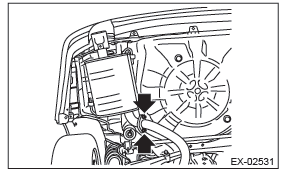
3) Remove the muffler from rear exhaust pipe.
CAUTION: Be careful not to drop the rear exhaust pipe.
4) Apply a coat of spray type lubricant to the mating area of cushion rubber.
5) Remove the rear exhaust pipe from the cushion rubber.
CAUTION: Be careful not to let the muffler contact the rear bumper.
B: INSTALLATION
1) Apply a coat of spray type lubricant to the mating area of cushion rubber.
2) Install the rear exhaust pipe to cushion rubber.
NOTE: After assembling, degrease the lubricant which was applied to the cushion rubber while removing/ installing.
3) Install the rear exhaust pipe to the muffler.
NOTE: Use a new gasket and self-locking nut.
Tightening torque: 48 N*m (4.9 kgf-m, 35.4 ft-lb)
4) Install the center exhaust pipe to rear exhaust pipe.
NOTE: Use a new gasket.
Tightening torque: 18 N*m (1.8 kgf-m, 13.3 ft-lb)
- Models other than C6 model
- C6 model
5) Lower the vehicle.
C: INSPECTION
1) Check the connections and welds for exhaust leaks.
2) Make sure there are no holes or rusting.
3) Check the cushion rubber for wear or crack.
Muffler
A: REMOVAL
CAUTION: Vehicle components are extremely hot after driving. Be wary of receiving burns from heated parts.
1) Lift up the vehicle.
2) Remove the rear exhaust pipe from the muffler.
3) Apply a coat of spray type lubricant to the mating area of cushion rubber.
4) Remove the muffler from the cushion rubber.
CAUTION: Be careful not to drop the muffler during removal.
B: INSTALLATION
Install in the reverse order of removal.
NOTE:
- Use a new gasket and self-locking nut.
- After assembling, degrease the lubricant which was applied to the cushion rubber while removing/ installing.
Tightening torque: 48 N*m (4.9 kgf-m, 35.4 ft-lb)
C: INSPECTION
1) Check the connections and welds for exhaust leaks.
2) Make sure there are no holes or rusting.
3) Check the cushion rubber for wear or crack.
READ NEXT:
 Cooling
General Description
A: SPECIFICATION
B: COMPONENT
1. WATER PUMP
Water pump ASSY
Gasket
Heater by-pass hose
Thermostat
Gasket
Thermostat cover
Clip
Tightening torque: N*m (kgf-m, ft-lb)
T1:
General Description of Lubrication
A: SPECIFICATION
Non-turbo model
Recommended oil:
CAUTION: It is acceptable to fill an engine with oil of another brand when replacing the oil, but make sure to use the following engine
SEE MORE:
Bi-level heating
This setting allows you to direct air of different temperatures from the instrument
panel and foot outlets. The air from the foot outlets is slightly warmer than from
the instrument panel outlets.
1. Set the air inlet selection button to the OFF position.
2. Press the “” button.
3. Set th
Cylinder Head
A: REMOVAL
NOTE:
When replacing a single part, perform the work
with the engine assembly installed to body. Refer to
"Valve Clearance" for preparation procedures.
<Ref. to ME(H4SO)-29, Valve Clearance.>
When performing the work with the engine installed
to body, the following parts must
