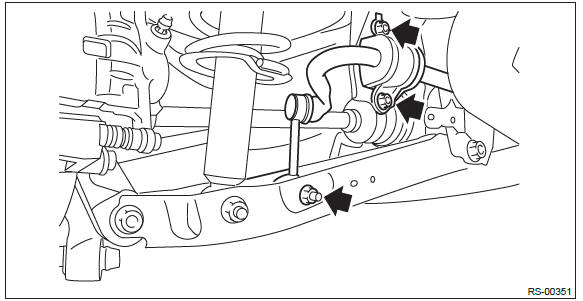
Subaru Outback (BR): Rear Stabilizer
A: REMOVAL
1) Lift up the vehicle, and then remove the rear wheels.
2) Remove the rear stabilizer.
- Remove left and right stabilizer links.
- Detach the stabilizer clamp and remove the rear stabilizer.
B: INSTALLATION
CAUTION:
- Be sure to use a new flange nut and self-locking nut.
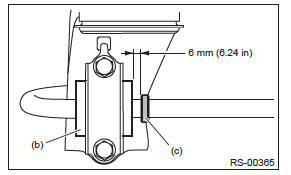
- Always tighten the bushing in the state where the vehicle is at curb weight and the wheels are in full contact with the ground.
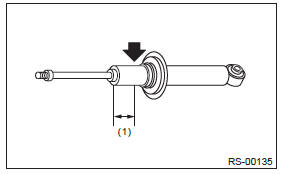
- Perform installation with Anti-Walk Ring (c) and stabilizer bushing (b) fitted 6 mm (6.24 in) apart.
1) Before installation, inspect the following items and replace any faulty part with a new one.
- Check the bushing for abnormal cracks, fatigue or damage.
- Check the stabilizer link for damage.
2) Install each part in the reverse order of removal.
Tightening torque:
Stabilizer link: 33 N*m (3.36 kgf-m, 24.3 ft-lb)
Stabilizer clamp: 38 N*m (3.87 kgf-m, 28.0 ft-lb)
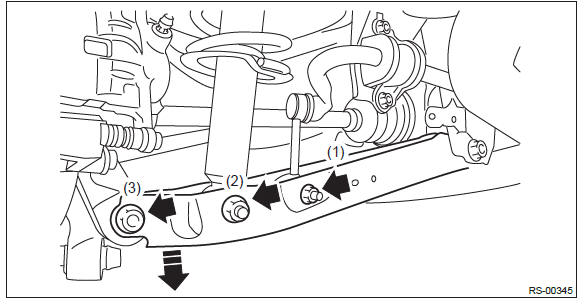
Rear Trailing Link
A: REMOVAL
1) Lift up the vehicle, and then remove the rear wheels.
2) Remove the trailing link.
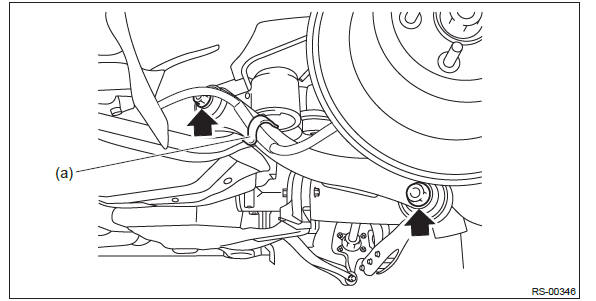
- Remove the bracket, and remove the parking brake cable from the guide (a).
- Remove the bolts and nuts, and then remove the trailing link.
B: INSTALLATION
CAUTION:
- Be sure to use a new self-locking nut.
- Always tighten the bushing in the state where the vehicle is at curb weight and the wheels are in full contact with the ground.
Install each part in the reverse order of removal.
Tightening torque:
Trailing link - rear sub frame: 120 N*m (12.24 kgf-m, 88.5 ft-lb)
Trailing link - rear axle housing: 80 N*m (8.16 kgf-m, 59 ft-lb)
C: DISASSEMBLY
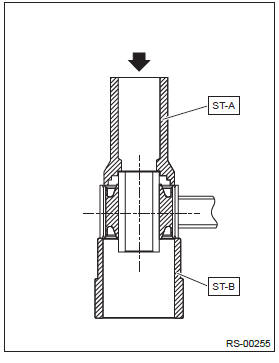
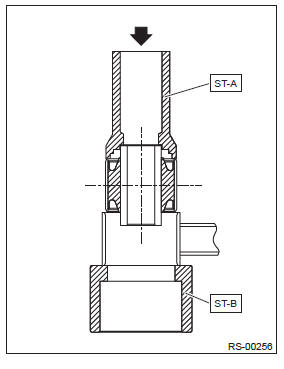
1. TRAILING LINK BUSHING
Using the ST, push out the bushing.
PREPARATION TOOL:
ST-A: INSTALLER (899874100)
ST-B: PRESS (499755602)
2. REAR AXLE HOUSING BUSHING
1) Remove the rear axle housing. <Ref. to DS-30, REMOVAL, Rear Axle.>
2) Using the ST and a hydraulic press, push out the bushing.
PREPARATION TOOL:
ST1: BUSHING REMOVER (20099FG000)
ST2: INSTALLER & REMOVER (BASE) (20099PA010)
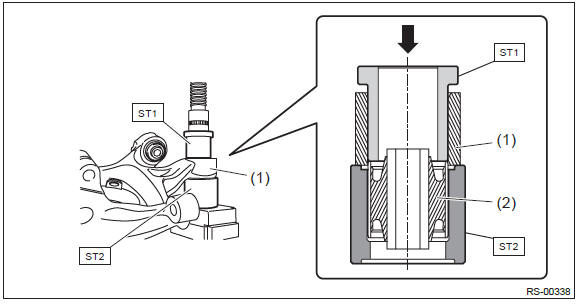
- Rear axle housing
- Bushing
D: ASSEMBLY
1. TRAILING LINK BUSHING
1) Before assembly, inspect the following items and replace any faulty part with a new one.
- Perform visual check for damage or bend on the trailing link.
- Visually check the bushing for abnormal cracks, fatigue or damage.
2) Using the ST-A and ST-B, press-fit the bushing.
CAUTION: Make sure to press the bushing straight in.
PREPARATION TOOL:
ST-A: INSTALLER (899874100)
ST-B: PRESS (499755602)
2. REAR AXLE HOUSING BUSHING
1) Before assembly, inspect the following items and replace any faulty part with a new one.
- Perform visual check for damage or bend on the trailing link.
- Visually check the bushing for abnormal cracks, fatigue or damage.
2) Press-fit the bushing using ST and the hydraulic press.
CAUTION: Make sure to press the bushing straight in.
PREPARATION TOOL:
ST1: BUSHING REMOVER (20099FG000)
ST2: INSTALLER & REMOVER (BASE) (20099PA010)
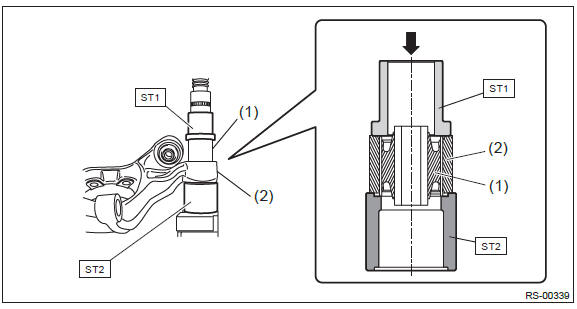
- Bushing
- Rear axle housing
Rear Sub Frame
A: REMOVAL
1) Disconnect the ground cable from battery.
2) Lift up the vehicle, and then remove the rear wheels.
3) Remove the propeller shaft. <Ref. to DS-10, REMOVAL, Propeller Shaft.>
4) Remove the rear disc brake caliper from the rear axle housing.
- Remove the bolt from the brake hose bracket.
- Remove the mounting bolts, and then remove the rear disc brake caliper.
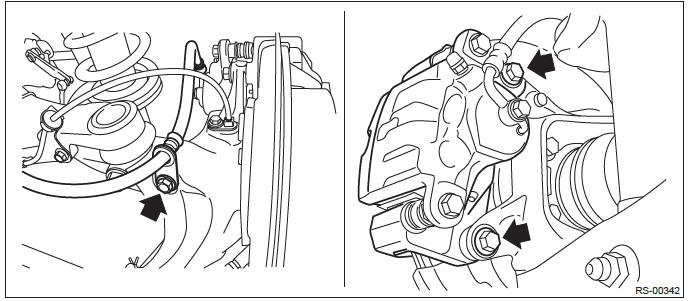
- Prepare wiring harnesses etc. to be discarded, and suspend the rear disc brake caliper from the shock absorber with the harnesses.
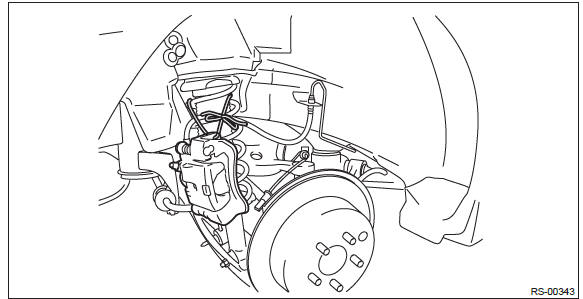
5) Remove the rear parking brake cable from the parking brake assembly. <Ref. to PB-10, REMOVAL, Parking Brake Assembly (Rear Disc Brake).>
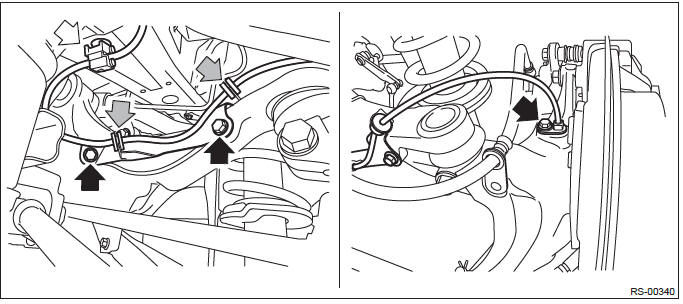
6) Remove the rear ABS wheel speed sensor from the rear axle housing.
CAUTION:
- Be careful not to damage the sensor.
- Do not apply excessive force to the sensor harness.
- Leave the sensor harness clamp (white arrow) on the vehicle side.
- Remove the bolts, and remove the rear ABS wheel speed sensor.
- Remove the rear ABS wheel speed sensor bracket from the upper arm.
7) Remove the rear sub frame assembly.
- Remove the shock absorber lower bolt.
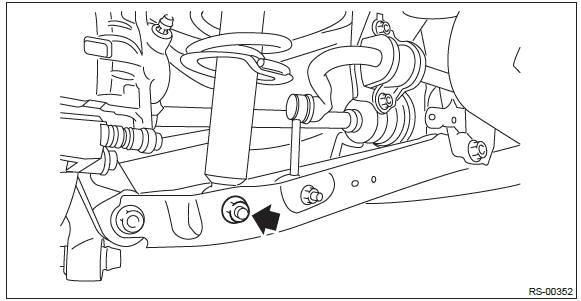
- Support the sub frame assembly using a transmission jack.
- Remove the bolts, then remove the rear sub frame assembly.
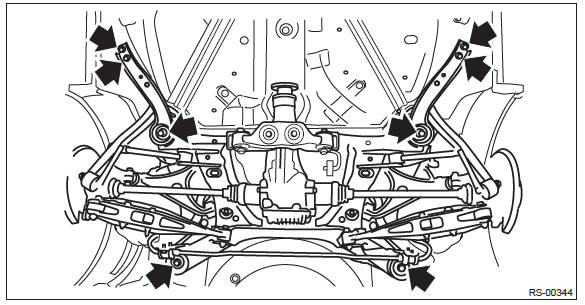
8) As necessary, remove each part from the rear sub frame assembly.
B: INSTALLATION
CAUTION:
- Be sure to use a new self-locking nut.
- Always tighten the bushing in the state where the vehicle is at curb weight and the wheels are in full contact with the ground.
1) Check the removed parts for wear, damage and crack, and repair or replace them if faulty.
2) Install each part in the reverse order of removal.
Tightening torque: Refer to "COMPONENT" of "General Description" for the tightening torque. <Ref. to RS-3, COMPONENT, General Description.>
3) Bleed air from brake system.
4) Inspect the wheel alignment and adjust if necessary. <Ref. to FS-9, INSPECTION, Wheel Alignment.>
C: INSPECTION
Check the removed parts for wear, damage and crack, and repair or replace them if faulty.
Upper Arm
A: REMOVAL
1) Remove the rear sub frame assembly. <Ref. to RS-16, REMOVAL, Rear Sub Frame.>
2) Remove the bolts, then remove the upper arm from the rear sub frame assembly.
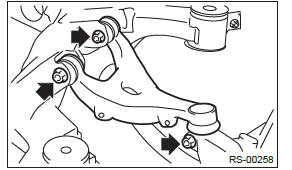
B: INSTALLATION
CAUTION:
- Use a new self-locking nut.
- Always tighten the bushing when the arm is positioned in the state where the vehicle is at curb weight and the wheels are in full contact with the ground.
1) Before installation, inspect the following items and replace any faulty part with a new one.
- Visually check the upper arm for damage and deformation.
- Visually check the bushing for abnormal cracks, fatigue or damage.
- Visually check the dust cover on the ball joint for abnormal cracks, fatigue or damage.
2) Install each part in the reverse order of removal.
3) Inspect the wheel alignment and adjust if necessary. <Ref. to FS-9, INSPECTION, Wheel Alignment.>
Tightening torque:
Upper arm - rear sub frame: 80 N*m (8.16 kgf-m, 59.0 ft-lb)
Upper arm - rear housing: 80 N*m (8.16 kgf-m, 59.0 ft-lb)
Rear ABS vehicle speed sensor bracket: 7.5 N*m (0.76 kgf-m, 5.5 ft-lb)
Rear Shock Absorber
A: REMOVAL
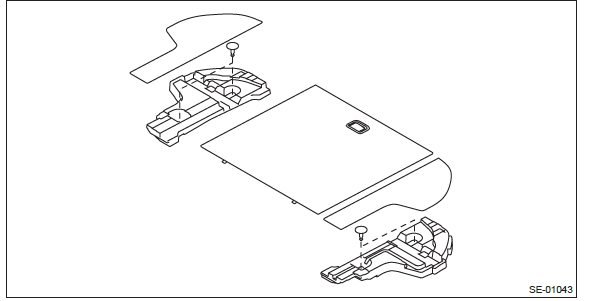
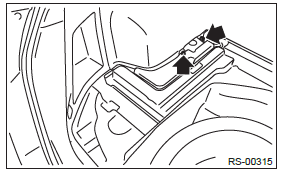
1) Remove the trunk trim panel assembly-side (sedan model) or rear floor mat (OUTBACK model).
- Sedan model: <Ref. to EI-127, TRUNK ROOM TRIM, REMOVAL, Trunk Room Trim.>
- OUTBACK model
2) Lift up the vehicle, and then remove the rear wheels.
3) Remove the bolts and nuts and lower the rear lateral link.
- Remove the nut and disconnect the rear stabilizer link.
- Remove the shock absorber lower bolt.
- Disconnect the rear lateral link.
4) Remove the shock absorber mount nut.
5) Remove the shock absorber.
B: INSTALLATION
CAUTION:
- Be sure to use a new self-locking nut.
- Always tighten the bushing in the state where the vehicle is at curb weight and the wheels are in full contact with the ground.
1) Install each part in the reverse order of removal.
Tightening torque: Refer to "COMPONENT" of "General Description" for the tightening torque. <Ref. to RS-3, COMPONENT, General Description.>
2) Check the wheel alignment and adjust it if necessary. <Ref. to FS-9, INSPECTION, Wheel Alignment.>
C: DISASSEMBLY
Refer to "Front Strut" for disassembly procedure. <Ref. to FS-42, DISASSEMBLY, Front Strut.>
D: ASSEMBLY
Refer to "Front Strut" for assembly procedures. <Ref. to FS-43, ASSEMBLY, Front Strut.>
E: INSPECTION
Refer to "Front Strut" for inspection procedures. <Ref. to FS-45, INSPECTION, Front Strut.>
F: DISPOSAL
CAUTION:
- Before handling the shock absorber, be sure to wear goggles to protect eyes from gas, oil and cutting powder.
- Do not disassemble the shock absorber or place it into a fire.
- Drill a hole into shock absorbers in case of discarding shock absorbers filled with gas.
1) Place the shock absorber on a level surface with the piston rod fully expanded.
2) Make a hole into the specified position 30 mm (1.18 in) deep using a drill with 2 - 3 mm (0.08 - 0.12 in) diameter.
- 40 mm (1.57 in)
READ NEXT:
 Front Lateral Link
A: REMOVAL
1) Lift up the vehicle, and then remove the rear wheels.
2) Remove the trailing link.
Remove the bracket, and remove the parking brake cable from the guide
(a).
Remove the bolts and n
Wheel and Tire System
General Description
A: SPECIFICATION
Offset
P.C.D.
NOTE:
Size and inflation pressure of the standard equipment tire and spare tire for
emergency are described on the "Tire inflation pressure" l
Tire Pressure Monitoring System (Diagnostics)
Basic Diagnostic Procedure
A: PROCEDURE
CAUTION:
Before removal or installation, be sure to remove any foreign matter (dust,
moisture, oil, etc.) from
the TPMS & keyless entry control module conn
SEE MORE:
Adverse safety consequences of overloading on handling and stopping and on tires
Overloading could affect vehicle handling, stopping distance, vehicle and tire
as shown in the following. This could lead to an accident and possibly result in
severe personal injury.
● Vehicle stability will deteriorate.
● Heavy and/or high-mounted loads could increase the risk of
Tripped sensor identification
The security indicator light flashes when the alarm system has been triggered.
Also, the number of flashes indicates the location of unauthorized intrusion or
the severity of impact on the vehicle.
When the ignition switch is turned to the “ON” position, the indicator light
will illuminat
