Subaru Outback (BR): Front Reduction Driven Gear
A: REMOVAL
NOTE: For removal of front reduction driven gear, refer to the "Front Reduction Drive Gear". <Ref. to CVT-297, REMOVAL, Front Reduction Drive Gear.>
B: INSTALLATION
NOTE: For installation of front reduction driven gear, refer to the "Front Reduction Drive Gear". <Ref. to CVT-298, INSTALLATION, Front Reduction Drive Gear.>
C: DISASSEMBLY
1) Using the ST, remove the ball bearing, front reduction driven gear and front reduction driven shaft.
ST1 899864100 REMOVER
ST2 18767AA000 BEARING REMOVER

2) Remove the snap ring.
3) Remove the retaining plate, drive plate, driven plate and dish plate.
4) Remove the seal ring from front reduction driven shaft.
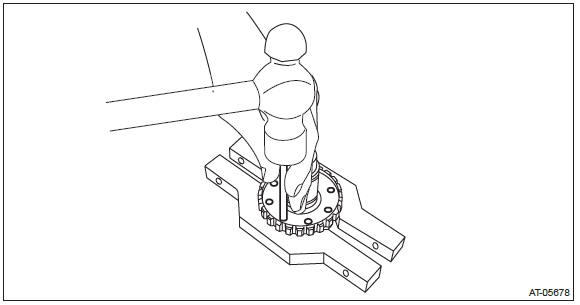
5) Using the round bar with diameter of 7 mm (0.28 in), tap the entire circumference around the ball bearing outer race a little at a time through the front reduction driven shaft hole, to remove the ball bearing.
D: ASSEMBLY
1) Place the dish plate, driven plate, drive plate and retaining plate neatly in this order on surface table.
NOTE: Make sure of the direction of dish plate.
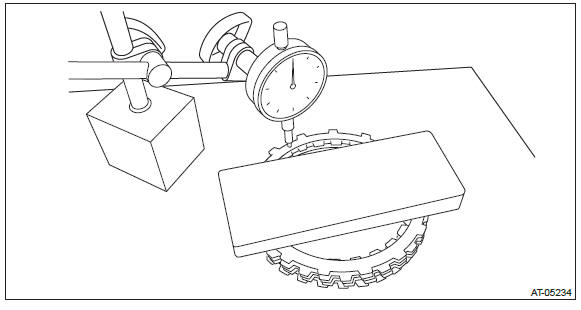
2) Set the dial gauge to retaining plate, and read its scale.
NOTE: The value, which is read in the gauge at this time, is zero point.
3) Scale and record the weight "Z" of a flat board which will be put on retaining plate.
NOTE:
- Use a stiff board which does not bend against load as a flat board to be put on retaining plate.
- Use a flat board weighing less than 130 N (13.3 kgf, 29.2 lb).
4) Put the flat board on retaining plate.
5) Using the following formula, calculate load "N", a force of pressing with push/pull gauge.
N = 130 N (13.3 kgf, 29.2 lb) - Z
130 N (13.3 kgf, 29.2 lb) : Load applied to clutch plate
Z: Flat board weight
6) Press the center of retaining plate by applying a force of "N" using push/pull gauge, and then measure and record the compression amount "A".
NOTE: Measure at four points with a 90º interval and calculate the average.
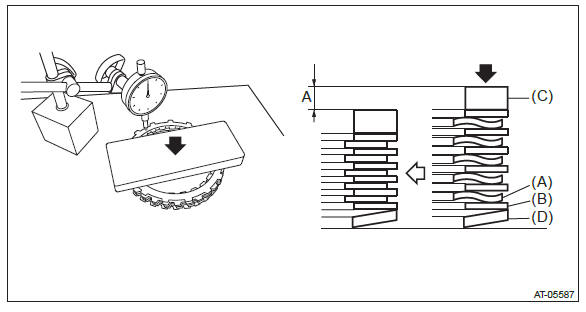
- Drive plate
- Driven plate
- Retaining plate
- Dish plate
7) Install the dish plate, driven plate, drive plate, retaining plate and snap ring.
NOTE: Make sure of the direction of dish plate.
8) Measure and record the clearance "B" between the retaining plate and snap ring.
NOTE: Before measuring, press down the whole circumference of retaining plate using your finger.
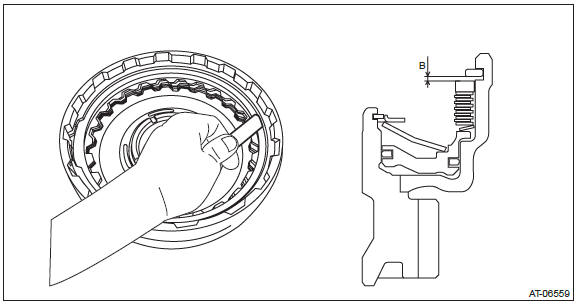
9) Piston stroke calculation Calculate with A and B dimensions recorded before.
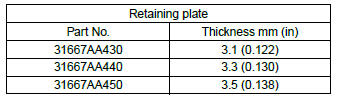
If out of standard, replace with a new drive plate and adjust it within standard.
S mm (in) = A + B
S: Piston stroke
A: Compression amount of drive plate and dish plate
B: Clearance between retaining plate and snap ring
Specification: 2.4 - 2.8 mm (0.094 - 0.11 in)
10) Press-fit the ball bearing into front driven shaft.
NOTE: Use a new ball bearing.
11) Install the seal ring to the front driven shaft.
NOTE:
- Install a new seal ring.
- Apply CVTF to the seal rings.
12) Install the front driven shaft to front driven gear.
13) Using the ST, install the ball bearing.
NOTE: Use a new ball bearing.
ST 18651AA000 INSTALLER
14) Install the front reduction driven gear assembly to converter case cover.
15) Apply compressed air intermittently to check the piston operation.
NOTE: Hold the arrowed area with a finger.
E: INSPECTION
- Check the drive plate for wear and damage.
- Check the driven plate for discoloration (burnt color).
- Check for worn snap ring, fatigue or damaged return spring or deformed piston retainer.
- Replace if its tooth surfaces are broken, damaged or excessively worn.
- Check the bearing for seizure or wear.
- Apply CVTF to bearing and rotate the bearing to check for noise or dragging etc.
F: ADJUSTMENT
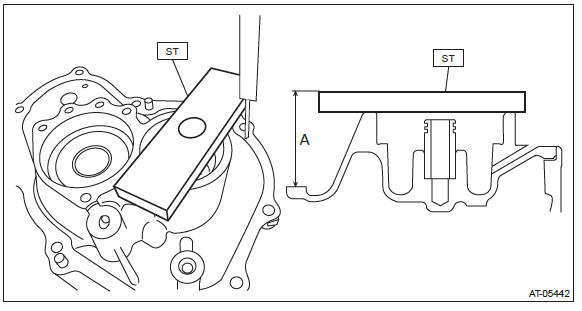
1) Using the ST, measure height "A" from the ST upper face to the mating surface of the case.
ST 398643600 GAUGE
2) Measure depth "B" from the converter case cover upper face to the bearing catch surface.

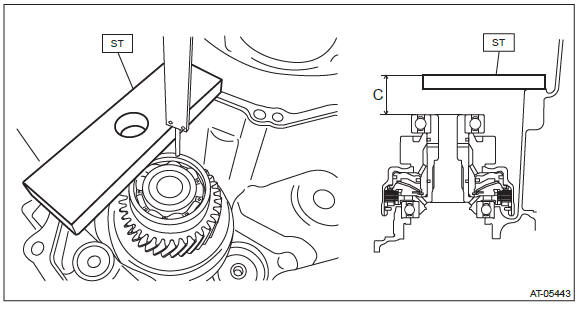
3) Measure depth "C" from the ST upper face to the bearing end face using the ST.
ST 398643600 GAUGE
4) Using the following formula, calculate clearance "T" to select a shim.
Formula: T mm = (C - 15) - ( (A - 15) - B)
[T in = (C - 0.591) - ( (A - 0.591) - B) ]
T: Clearance
A: Height from the ST upper face to the converter case mating surface
B: Depth from the converter case cover upper face to the bearing catch surface
C: Depth from the ST upper face to the bearing end face
15 mm (0.591 in): Thickness of ST
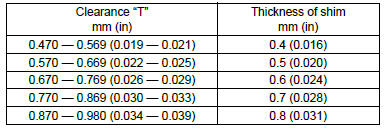
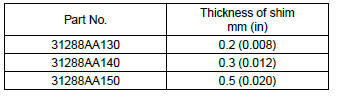
5) Select one to two shims so that the total thickness meets the value obtained from above.
READ NEXT:
 Converter Case
A: REMOVAL
1) Remove the transmission assembly from the vehicle. <Ref. to CVT-55,
REMOVAL, Automatic Transmission
Assembly.>
2) Remove the air breather hose. <Ref. to CVT-132, REMOVAL, Air
Basic Diagnostic Procedure of Continuously Variable Transmission
A: PROCEDURE
Check List for Interview
A: CHECK
Check the following items when a problem has occurred.
NOTE: Use copies of this page for interviewing customers.
General Description
A: CAUTI
SEE MORE:
Rear Bumper
A: REMOVAL
1) Remove the rear combination light assembly.
Sedan model
1. Remove the trunk room trim. <Ref. to EI-127, REMOVAL, Trunk Room Trim.>
2. Disconnect the connector.
3. Release the nuts and clips, then remove the rear combination light assembly.
CAUTION:
Be careful not to damage t
Instrument Panel Lower Cover
A: REMOVAL
1) Disconnect the ground cable from battery.
2) Remove the clips, and remove the instrument panel side cover LH.
3) Remove the instrument panel lower cover.
Remove the clips and data link connector, and remove the instrument
panel lower cover under.
Remove the screws and clips a
