Subaru Outback (BR): Converter Case
A: REMOVAL
1) Remove the transmission assembly from the vehicle. <Ref. to CVT-55, REMOVAL, Automatic Transmission Assembly.>
2) Remove the air breather hose. <Ref. to CVT-132, REMOVAL, Air Breather Hose.>
3) Remove the oil pan and control valve body. <Ref. to CVT-111, REMOVAL, Control Valve Body.>
4) Remove the transmission harness. <Ref. to CVT-121, REMOVAL, Transmission Harness.>
5) Remove the secondary pressure sensor. <Ref. to CVT-109, REMOVAL, Secondary Pressure Sensor.>
6) Remove the primary speed sensor. <Ref. to CVT-105, REMOVAL, Primary Speed Sensor.>
7) Remove the extension case. <Ref. to CVT-138, REMOVAL, Extension Case.>
8) Remove the rear drive shaft. <Ref. to CVT-141, REMOVAL, Rear Drive Shaft.>
9) Remove the transfer clutch assembly. <Ref. to CVT-146, REMOVAL, Transfer Clutch.>
10) Remove the transfer reduction driven gear assembly. <Ref. to CVT-158, REMOVAL, Transfer Reduction Driven Gear.>
11) Remove the intermediate case. <Ref. to CVT-165, REMOVAL, Intermediate Case.>
12) Remove the forward clutch assembly. <Ref. to CVT-180, REMOVAL, Forward Clutch Assembly.>
13) Remove the transmission case. <Ref. to CVT-211, REMOVAL, Transmission Case.>
14) Remove the primary pulley, secondary pulley and variator chain. <Ref. to CVT-226, REMOVAL, Primary Pulley and Secondary Pulley.>
15) Remove the drive pinion shaft assembly. <Ref. to CVT-242, REMOVAL, Drive Pinion Shaft Assembly.>
16) Remove the front differential assembly. <Ref. to CVT-263, REMOVAL, Front Differential Assembly.>
17) Remove the converter case cover. <Ref. to CVT-289, REMOVAL, Converter Case Cover.>
18) Remove the front reduction drive gear and front reduction driven gear. <Ref. to CVT-297, REMOVAL, Front Reduction Drive Gear.>
B: INSTALLATION
1) Install the front reduction drive gear and front reduction driven gear. <Ref. to CVT-298, INSTALLATION, Front Reduction Drive Gear.>
2) Install the converter case cover. <Ref. to CVT-291, INSTALLATION, Converter Case Cover.>
3) Install the front differential assembly. <Ref. to CVT-264, INSTALLATION, Front Differential Assembly.>
4) Install the drive pinion shaft assembly. <Ref. to CVT-244, INSTALLATION, Drive Pinion Shaft Assembly.>
5) Install the primary pulley, secondary pulley and steel chain. <Ref. to CVT-230, INSTALLATION, Primary Pulley and Secondary Pulley.>
6) Install the transmission case. <Ref. to CVT-213, INSTALLATION, Transmission Case.>
7) Install the forward clutch assembly. <Ref. to CVT-181, INSTALLATION, Forward Clutch Assembly.>
8) Install the intermediate case. <Ref. to CVT-166, INSTALLATION, Intermediate Case.>
9) Install the transfer reduction driven gear. <Ref. to CVT-158, INSTALLATION, Transfer Reduction Driven Gear.>
10) Install the transfer clutch assembly. <Ref. to CVT-147, INSTALLATION, Transfer Clutch.>
11) Install the rear drive shaft. <Ref. to CVT-141, INSTALLATION, Rear Drive Shaft.>
12) Install the extension case. <Ref. to CVT-138, INSTALLATION, Extension Case.>
13) Install the primary speed sensor. <Ref. to CVT-105, INSTALLATION, Primary Speed Sensor.>
14) Install the secondary pressure sensor. <Ref. to CVT-109, INSTALLATION, Secondary Pressure Sensor.>
15) Install the transmission harness. <Ref. to CVT-123, INSTALLATION, Transmission Harness.>
16) Install the control valve body and oil pan. <Ref. to CVT-115, INSTALLATION, Control Valve Body.>
17) Install the air breather hose. <Ref. to CVT-132, INSTALLATION, Air Breather Hose.>
18) Install the transmission assembly to the vehicle. <Ref. to CVT-70, INSTALLATION, Automatic Transmission Assembly.>
C: DISASSEMBLY
1) Remove the transmission hanger and transmission radio ground cord.
2) Remove the oil drain plug and overflow drain plug. <Ref. to CVT-42, REPLACEMENT, Differential Gear Oil.>
3) Remove all plugs.
D: ASSEMBLY
1) Install the oil drain plug and overflow drain plug.
NOTE: Overflow plug of differential gear oil is temporarily attached.
2) Install all plugs.
NOTE: Use new O-rings.
Tightening torque: 25 N*m (2.5 kgf-m, 18.4 ft-lb)

3) Install the transmission hanger and transmission radio ground cord.
Tightening torque: 41 N*m (4.2 kgf-m, 30.2 ft-lb)
- Install within the range of 30º approximately.
E: INSPECTION
- Check for leakage of CVTF from the connection between converter case and transmission case.
- Check there is no damage or cracks on the converter case.
F: ADJUSTMENT
When replacing the converter case cover, select the following shims.
- Select the shim for front reduction drive gear. <Ref. to CVT-302, ADJUSTMENT, Front Reduction Drive Gear.>
- Select the shim for front reduction driven gear. <Ref. to CVT-311, ADJUSTMENT, Front Reduction Driven Gear.>
- Select shims for primary pulley. <Ref. to CVT-236, ADJUSTMENT, Primary Pulley and Secondary Pulley.>
Diagnostics with Phenomenon
A: INSPECTION
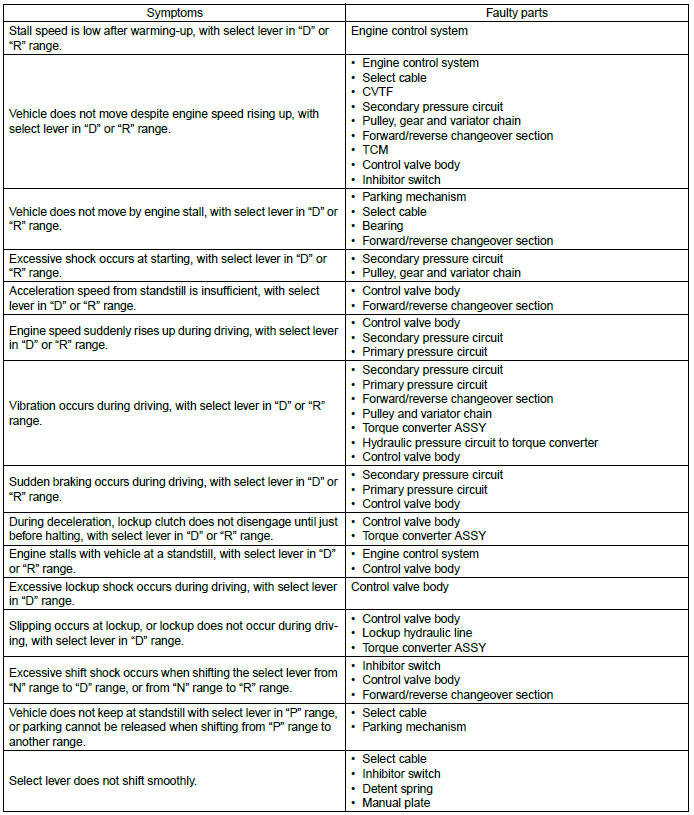
READ NEXT:
 Basic Diagnostic Procedure of Continuously Variable Transmission
A: PROCEDURE
Check List for Interview
A: CHECK
Check the following items when a problem has occurred.
NOTE: Use copies of this page for interviewing customers.
General Description
A: CAUTI
Continuously Variable Transmission - List of Diagnostic Trouble Code (DTC)
A: LIST
Diagnostic Procedure with Diagnostic Trouble Code (DTC)
A: DTC P0705 TRANSMISSION RANGE SENSOR CIRCUIT (PRNDL INPUT)
DTC DETECTING CONDITION:
Inhibitor switch is faulty.
A
SEE MORE:
Emergency brake
CAUTION
Use the emergency brake only in case of an emergency. If the emergency brake
is excessively used, the brake parts will wear down faster or the brake may not
work sufficiently due to rear wheel brake overheating.
NOTE
While using the emergency brake, the brake system warning light and
Understanding the ABS Warning Light in Your Subaru Outback (BR)
ABS warning light serves as an essential indicator of the Anti-Lock Braking System's operational status in your Subaru Outback (BR). When you turn the ignition switch to the “ON” position, the ABS warning light illuminates briefly for approximately 2 seconds, demonstrating that
