Subaru Outback (BR): Rear window wiper blade rubber (Outback)
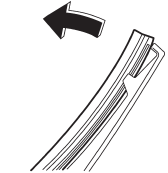
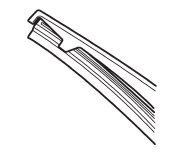
1. Pull out the end of the blade rubber assembly to unlock it from the plastic support.
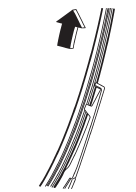
2. Pull the blade rubber assembly out of the plastic support.
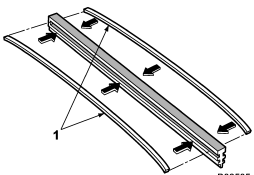
1) Metal spines
3. If the new blade rubber is not provided with two metal spines, remove the metal spines from the old blade rubber and install them in the new blade rubber.
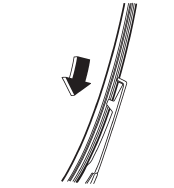
4. Align the claws of the plastic support with the grooves in the blade rubber assembly, then slide the blade rubber assembly into place.
Securely retain both ends of the rubber with the stoppers on the plastic support ends. If the rubber is not retained properly, the wiper may scratch the rear window glass.
5. Install the wiper blade assembly to the wiper arm. Make sure that it locks in place.
6. Hold the wiper arm by hand and slowly lower it in position.
READ NEXT:
 Battery charging, fluid level
Before starting any work near a battery, it's crucial to ensure that all sources of ignition, such as cigarettes, matches, and lighters, are completely extinguished. This precaution is vital because b
Fuses
CAUTION
Never replace a fuse with one having a higher rating or with material other than
a fuse because serious damage or a fire could result.
The fuses are designed to melt during an overload to
Main fuse
Main fuse box
The main fuses are designed to melt during an overload to prevent damage to the
wiring harness and electrical equipment. Check the main fuses if any electrical
component fails to
SEE MORE:
Headlight Bulb
A: REMOVAL
1. HIGH BEAM
CAUTION:
Because the halogen bulb operates at a high temperature, dirt and oil
on the bulb surface reduces
the bulb's service life. Hold the flange portion when replacing the bulb.
Never touch the glass portion.
Do not leave the headlight without a bulb for a long tim
Headlight Assembly
A: REMOVAL
CAUTION:
Do not perform work with wet hands.
1) Disconnect the ground cable from battery.
2) Remove the clips and remove the air intake duct. (When removing the headlight
RH)
3) Remove the front bumper face assembly. <Ref. to EI-39, REMOVAL, Front
Bumper.>
4) Remove the fender
