Subaru Outback (BR): Instrument Panel Assembly
A: REMOVAL
CAUTION: Be careful not to damage the airbag system harness when servicing the instrument panel. Damage may cause the system to malfunction.
1) Disconnect the ground cable from battery.
2) Remove the console front cover assembly.
- MT model
1. Remove the shift knob.
2. Release the clips and claws, then pull up the console front cover assembly.
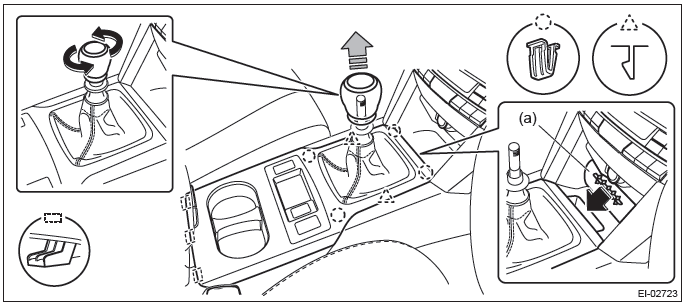
NOTE: Turn over the front center pocket mat (a) and pull up the console front cover from the slit.
3. Disconnect the harness connector and remove the console front cover assembly.
- AT model
1. Remove the select lever knob.
- Lower the cover grip AT.
- Remove the clamp grip pin, then remove the select lever knob.
2. Release the clips and claws, then pull up the console front cover assembly.
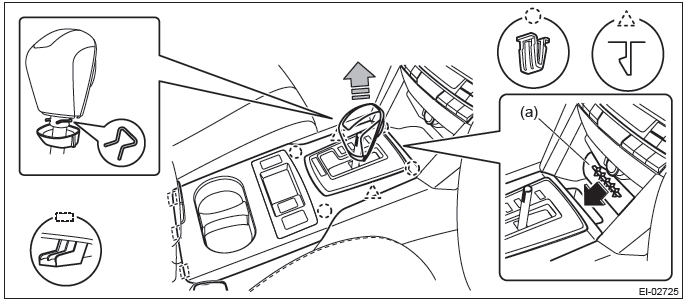
NOTE: Turn over the front center pocket mat (a) and pull up the console front cover from the slit.
3. Disconnect the harness connector and remove the console front cover assembly.
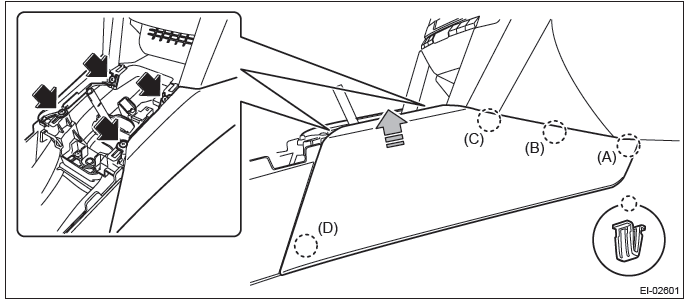
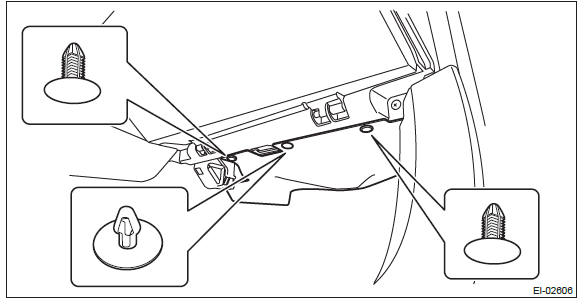
3) Remove the left and right console front side cover assembly.
- Remove the screws and release the clips (A) to (D) in order.
- Remove the console front side cover assembly by pulling it up.
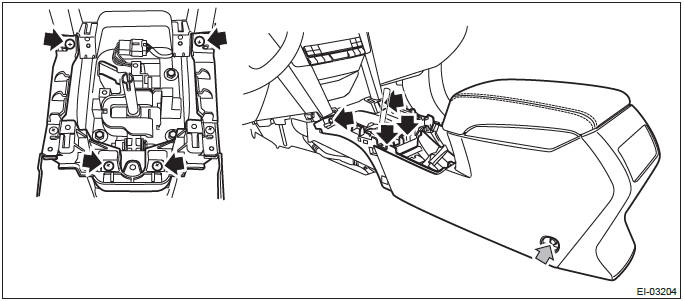
4) Remove the console box assembly.
- Move the seat forward, and remove the bolts after detaching the left and right caps.
NOTE: For a model with power seat, connect the battery ground cable and move the seat. Then, disconnect the battery ground cable again and wait for 60 seconds at least before restarting the work.
- Remove the screws, disconnect the harness connector and remove the console box assembly.
5) Remove the instrument panel lower cover.
- Remove the clips, and remove the instrument panel side cover LH.
- Remove the clips and data link connector, and remove the instrument panel lower cover under.
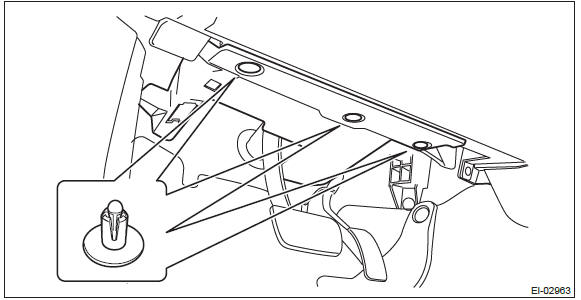
- Remove the screws and clips and release the claws, and remove the instrument panel lower cover while disconnecting the harness connectors.
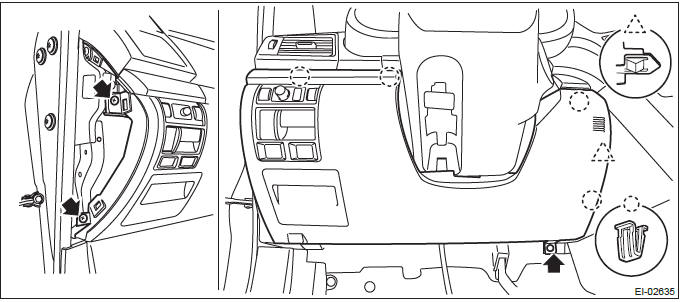
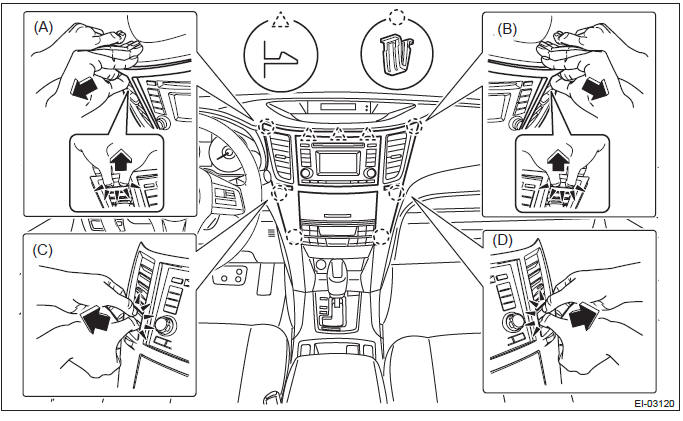
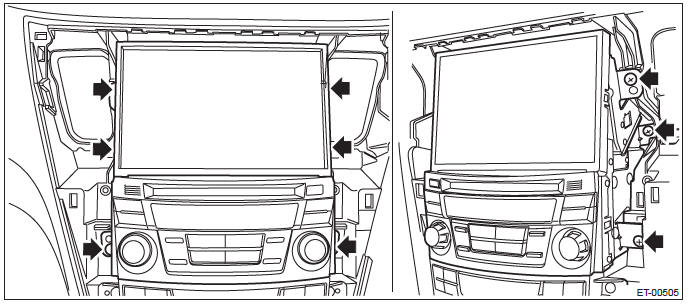
6) Remove the center panel assembly.
CAUTION: Do not put your finger on the fin of the air vent grille. Doing so may damage the fin.
- Attach the protective tape (a) to the meter visor.
- Insert a finger into the air vent grille and release the left and right
clips at the top of the center panel.
(A), (B)
- Insert a finger into the air vent grille and release the left and right
clips at the center of the center panel.
(C), (D)
- Release the clips at the bottom of the center panel and remove the center panel assembly.
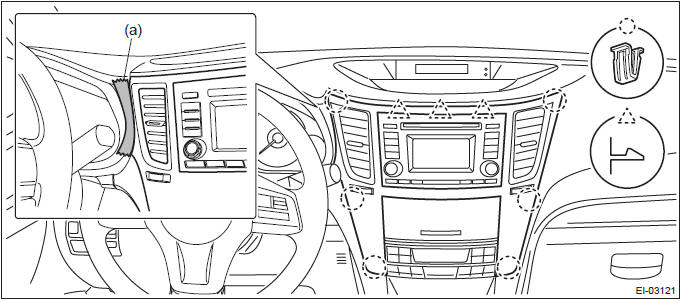
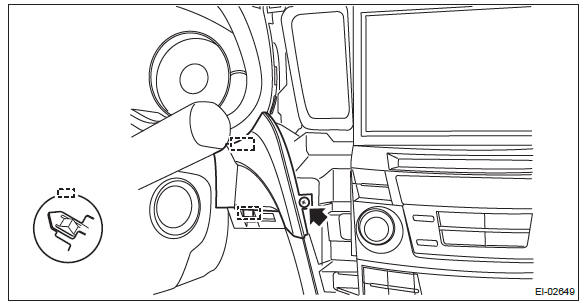
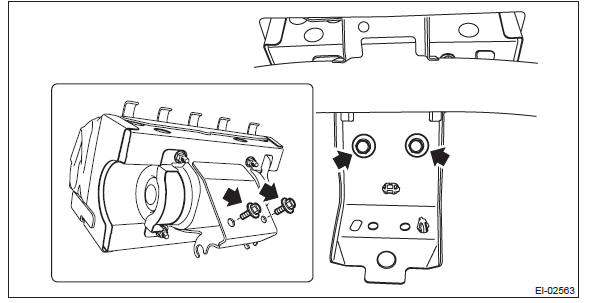
7) Remove the combination meter assembly.
CAUTION:
- Be careful not to damage the meter or instrument panel.
- Pay particular attention to avoid damaging the meter glass.
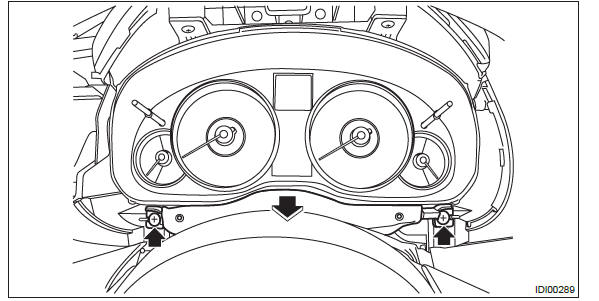
- Remove the screws and release the claws, then detach the starter cover assembly.
- Release the lock, tilt the steering column to the lowest end and fully extend the column by the telescopic system.
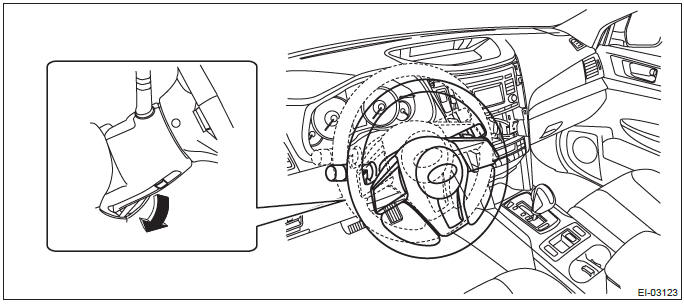
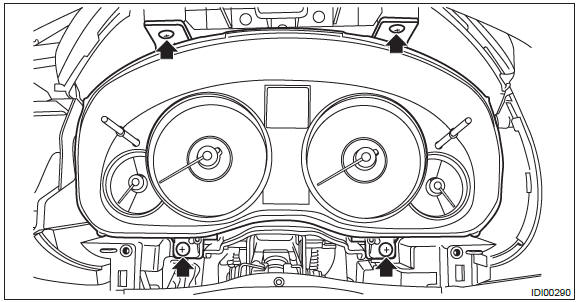
- Release the screws and clips, then detach the meter visor assembly.
- Remove the screws and pull the steering COMPL upper cover toward you.
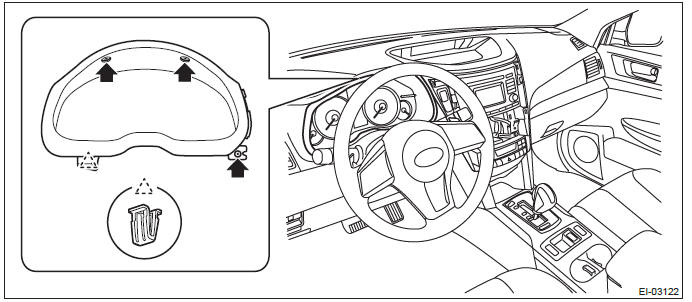
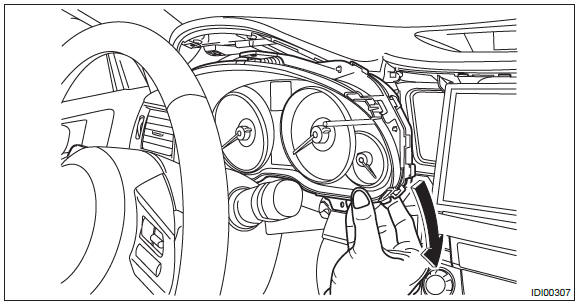
- Remove the four screws and pull out the combination meter toward you to disconnect the connectors.
- Remove the combination meter assembly as shown in the figure.
8) Remove the audio assembly.
- Remove the left and right screws, and partially pull the audio out from center console.
- Disconnect the connectors, and remove the audio assembly.
9) Remove the navigation assembly. (model with navigation)
- Remove the left and right screws.
- Disconnect the connectors, and remove the navigation assembly.
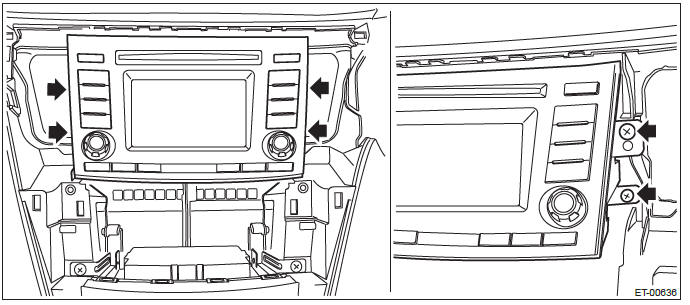
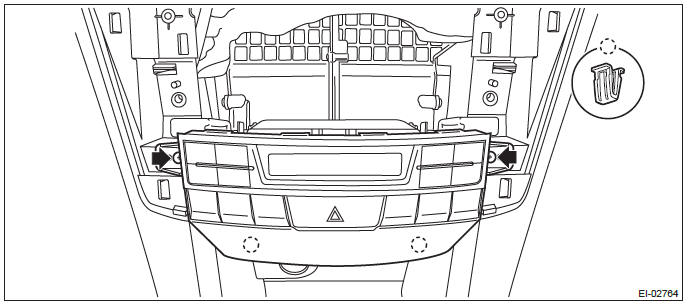
10) Remove the control panel assembly.
- Remove the screws, and pull out the control panel assembly toward you.
- Disconnect the connector, and remove the control panel assembly.
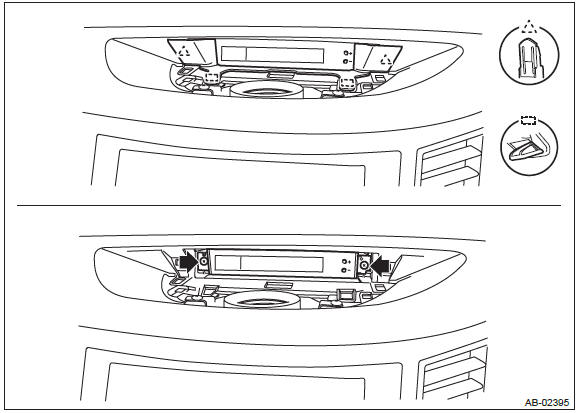
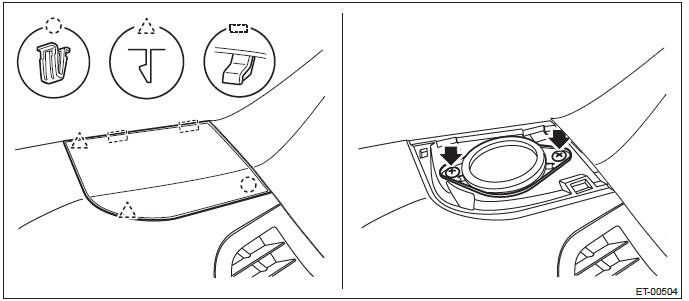
11) Remove the multi display assembly.
CAUTION: Be careful not to damage the multi display or instrument panel.
- Detach the center speaker cover by releasing the claws and hooks.
NOTE: An easy way of removal is to first remove the audio assembly or navigation assembly and push up the cover from the backside.
- Release the clips and claws, detach the multi display panel LWR.
- Remove the screws and pull out the multi display toward you to disconnect the connectors.
12) Remove the left and right front side speaker assembly. (Models with front side speaker)
- Release the clips and claws, then detach the side speaker cover.
CAUTION: To remove the cover, use a plastic clip remover or equivalent tool.
- Remove the screws.
Preparation tool: Stubby screwdriver
- Disconnect the connector and remove the front side speaker assembly.
NOTE: On the passenger's side, also disconnect the sunload sensor connector.
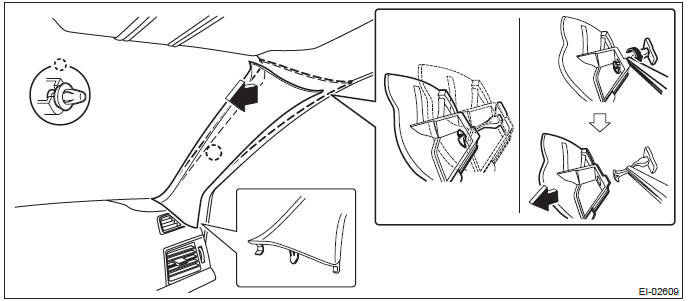
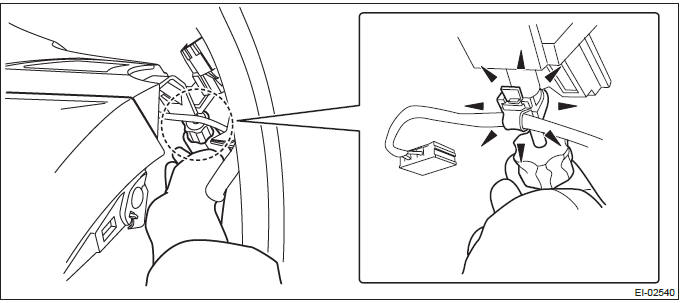
13) Remove the left and right front pillar trims.
- Pull the upper part of the front pillar trim towards the center of the vehicle.
- Insert long-nose pliers into the top part of the trim, grip the clip with the pliers and twist 90º in that position.
CAUTION: Be careful not to damage the pillar trim surface and curtain airbag module when inserting the pliers.
- Holding the clip twisted as in the previous step, remove the front pillar trim from the clip.
- Remove the clip and the front pillar trim.
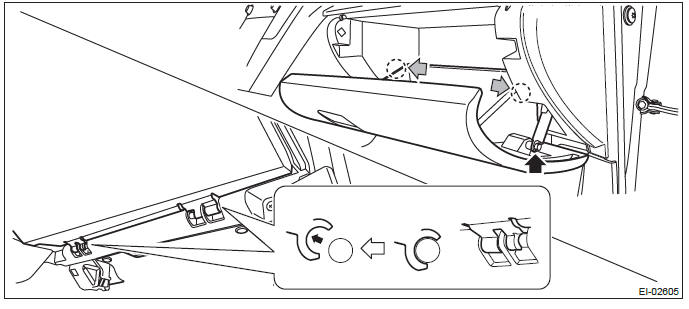
14) Remove the glove box lid assembly.
- Remove the glove box damper.
- Release the stoppers and remove the glove box lid assembly by pulling it toward you.
15) Remove the glove box back panel.
- Release the clips, and remove the instrument panel side cover RH.
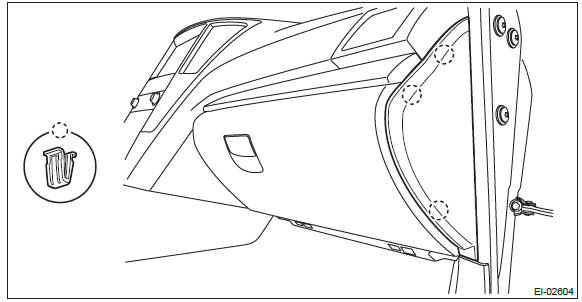
- Release the clips, and remove the glove box under cover.
- Release the clips and claws, and remove the ornament panel assembly P.
- Remove the screws and release the claws, then detach the glove box back panel.

- Disconnect the glove box light LED connector.
16) Disconnect the connector from the passenger's airbag module assembly and remove the bolt.
- Release the connector and harness clamps and disconnect the airbag connector.
- Remove passenger's airbag module assembly bolts.
17) Remove the steering shaft assembly. <Ref. to PS-26, REMOVAL, Steering Column.>
18) Remove the instrument panel assembly.
- Remove the screws. (A), (B), (C), (D), (E), (F), (G), (H), (I)
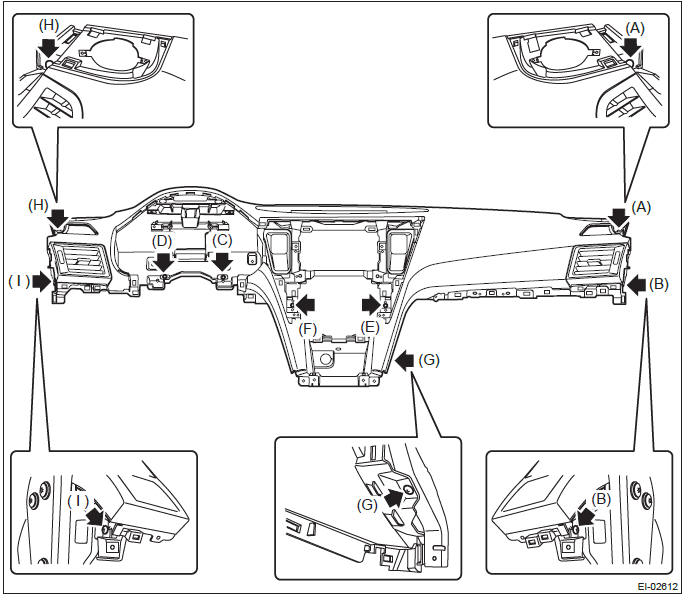
- Pull out the instrument panel assembly toward you and release the clamps of the left and right front side speakers.
Preparation tool: Stubby screwdriver
- After checking that all harness clamps and connectors are released and disconnected, remove the instrument panel assembly.
CAUTION: Be careful not to damage the instrument panel surface and interior trims.
19) Release the claws, and then remove the side sill cover - front INN on the left and right sides.
CAUTION: Do not pull with excessive force. Doing so may damage the claws of the side sill cover INN.
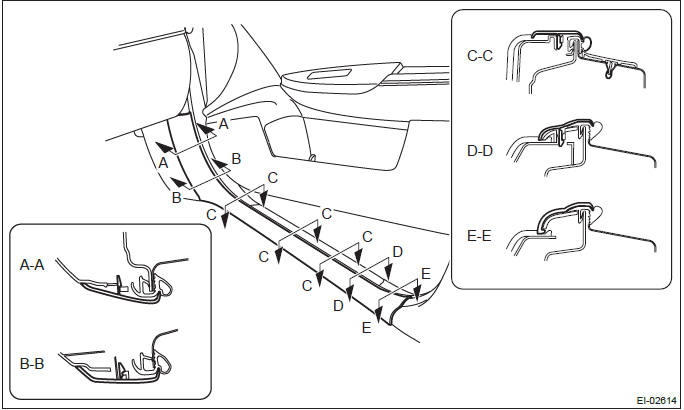
NOTE: To release the claws of the side sill cover INN, the following steps are recommended.
1. Take out the weather strip from under the side sill cover INN.
2. Turn over the floor mat and release the claw (C-C) by accessing from behind the side sill cover INN.
20) Remove the clip, and remove the left and right side sill cover front.

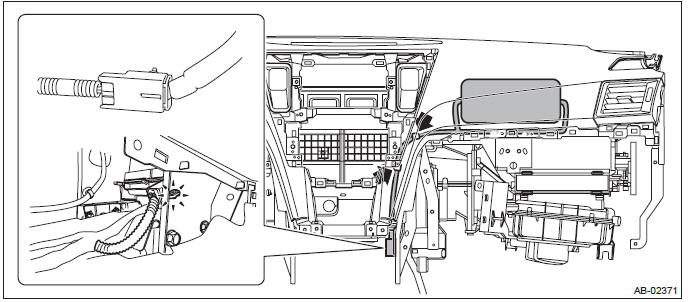
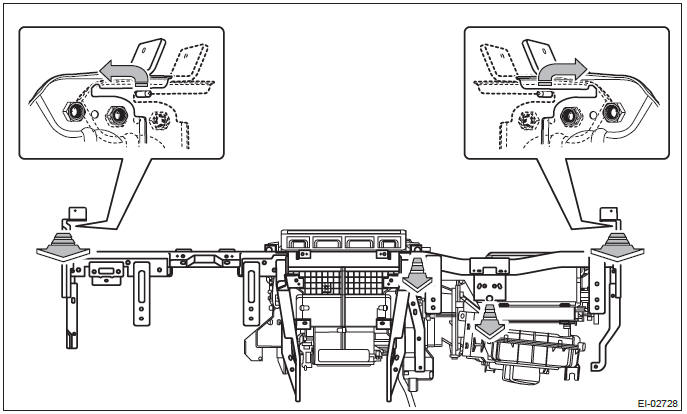
21) Remove the steering support beam assembly.
- Remove the fuse box and relay box.
- Remove the screws. (E)
- Disconnect all harness clamps and connectors of the instrument panel harness.
- Remove the TORX bolt and adjuster bolt (a) (only passenger's side). (A), (B)
Preparation tool:
TORX T40
Hexagon wrench (12 mm)
- Remove the bolts at the floor center. (C), (D)
- Remove the nut (F) and (G) behind the cooling unit.
- Remove the nut (H) behind the blower unit.
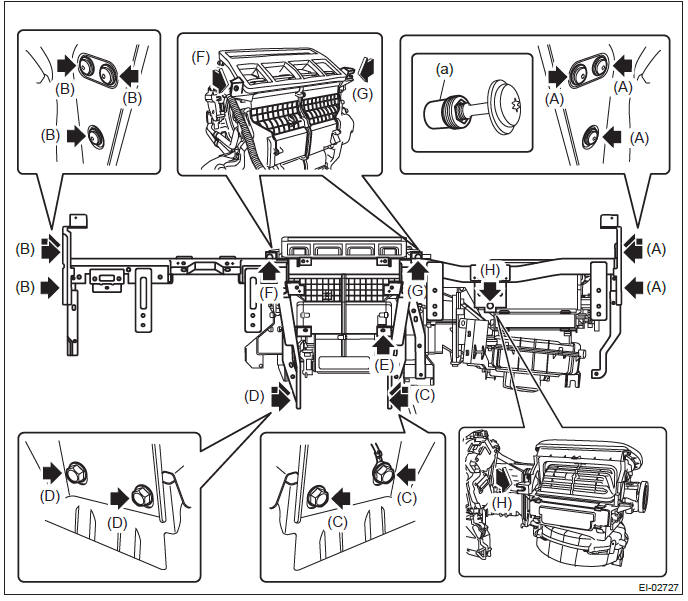
- Slightly lift the steering support beam assembly to detach the left and right pins. Then pull it toward you to remove the assembly.
CAUTION:
- Check that all harness clamps and connectors are detached.
- Be careful not to damage interior trims.
B: INSTALLATION
1) Install parts in the reverse order of removal to restore the instrument panel assembly.
NOTE: How to install insulators
- Adhesive
Use polyurethane adhesive. When assembling the instrument panel assembly, wait until the adhesive has evaporated to prevent filling of the smell in the compartment.
- Double-sided tape
Use commercial double-sided tape. (Use strong double-sided adhesive tape.)
2) Insert the three matching pins on body into the instrument panel assembly.
3) Check that the matching pins are inserted securely, and then route the harness.
4) Install each part in the reverse order of removal.
Tightening torque:
Steering support beam: <Ref. to EI-15, INSTRUMENT PANEL, COMPONENT, General
Description.>
Passenger's airbag module ASSY: 7.5 N*m (0.76 kgf-m, 5.5 ft-lb)
Steering shaft: <Ref. to PS-4, STEERING WHEEL AND COLUMN, COMPONENT, General
Description.>
Console box: 6.5 N*m (0.66 kgf-m, 4.8 ft-lb)
READ NEXT:
 Lower Inner Trim
A: REMOVAL
1) Release the claws, and then remove the side sill cover-front INN.
CAUTION:
Do not pull with excessive force. Doing so may damage the claws of the side sill
cover INN.
NOTE:
To release
Upper Inner Trim
A: REMOVAL
1) Remove the front pillar trim.
Pull the upper part of the front pillar trim towards the center of the
vehicle.
Insert long-nose pliers into the top part of the trim, grip the clip
Rear Quarter Trim
A: REMOVAL
1. SEDAN MODEL
1) Disconnect the ground cable from battery and wait for at least 60 seconds
before starting work.
CAUTION:
The airbag system is fitted with a backup power supply. After dis
SEE MORE:
Using your Owner’s Manual
Before you operate your vehicle, carefully read this manual. To protect yourself
and extend the service life of your vehicle, follow the instructions in this manual.
Failure to observe these instructions may result in serious injury and damage to
your vehicle.
This manual is composed of fourt
Differential Gear Oil in Continuously Variable Transmission
A: INSPECTION
Check that there is no leakage of differential gear oil from the converter case.
B: ADJUSTMENT
NOTE: Immediately after removing the overflow drain plug, remaining gear oil (approx. 8 cc) may come out of the overflow pipe. This is not included in the specified amount. When removing
