Subaru Outback (BR): Lower Inner Trim
A: REMOVAL
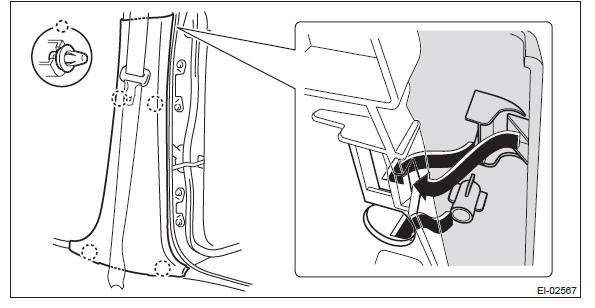
1) Release the claws, and then remove the side sill cover-front INN.
CAUTION: Do not pull with excessive force. Doing so may damage the claws of the side sill cover INN.
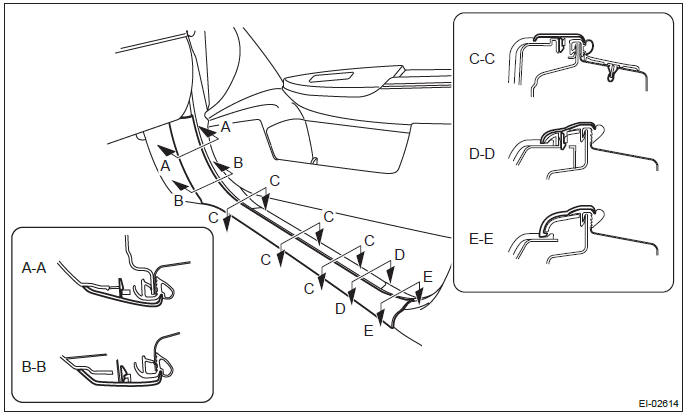
NOTE: To release the claws of the side sill cover INN, the following steps are recommended.
1. Take out the weather strip from under the side sill cover INN.
2. Turn over the floor mat and release the claw (C-C) by accessing from behind the side sill cover INN.
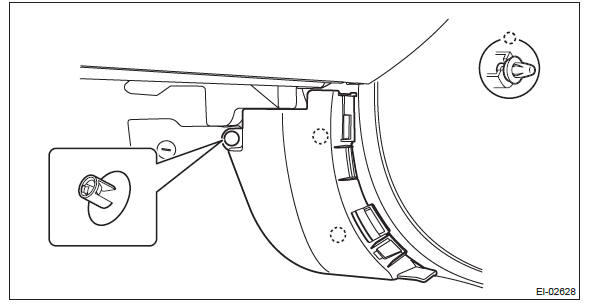
2) Remove the clip, and remove the side sill cover front.
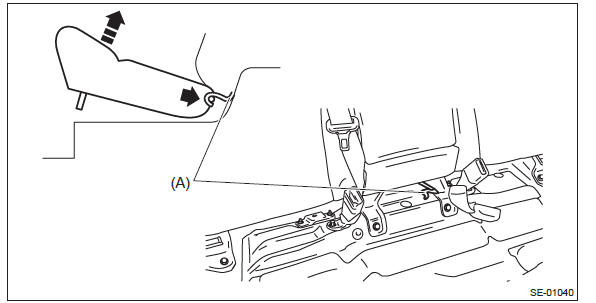
3) Remove the rear seat cushion assembly.
- Pull up the seat cushion and release the hook.
CAUTION: If the hook is disconnected from the vehicle body, replace the hook with the new part to prevent the decline of the fixed force of the seat.
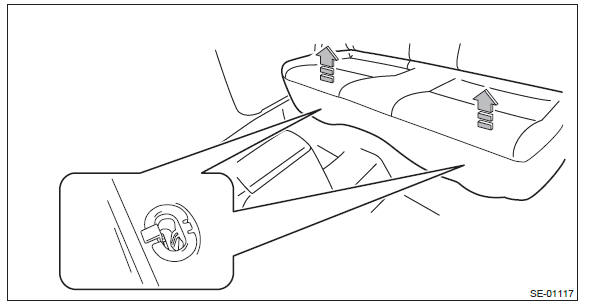
- Remove the hook (A) by pushing it back while lifting the front side of the seat cushion, and remove the seat cushion.
4) Release the clips and claws, and then remove the side sill cover - rear INN.
CAUTION: Do not pull with excessive force. Doing so may damage the claws of the side sill cover INN.
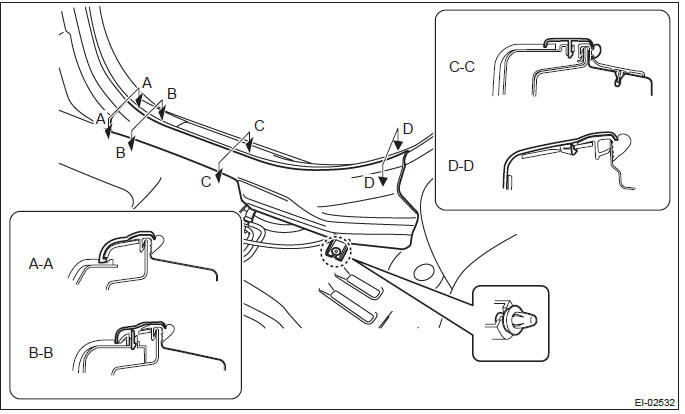
NOTE: To release the claws of the side sill cover INN, the following steps are recommended.
1. Take out the weather strip from under the side sill cover INN.
2. Turn over the floor mat and release the claw (C-C and D-D) by accessing from behind the side sill cover INN.
5) Remove the center pillar trim LWR.
- Release the clip by pulling the center pillar trim LWR toward you.
- Expand the claws of center pillar trim LWR outward and remove it from the center pillar trim UPR.
CAUTION: Do not expand the center pillar trim LWR excessively. Doing so may damage the trim.
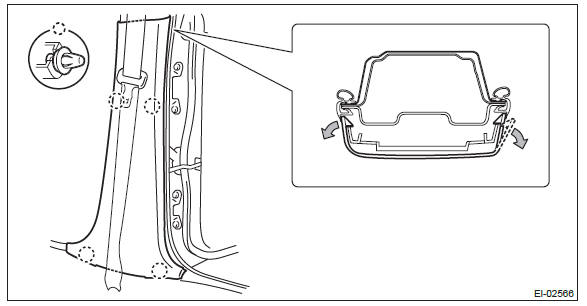
NOTE: First release the claw located to the rear of the vehicle.
6) Release the claws, and then remove the side sill cover-front OUT.
7) Release the claws and metal clips, and then remove the side sill cover-rear OUT.
B: INSTALLATION
CAUTION: If the hook is disconnected from the vehicle body, replace the hook with the new part to prevent the decline of the fixed force of the seat.
Install each part in the reverse order of removal.
NOTE: Assemble the center pillar trim LWR to the center pillar trim UPR securely.
READ NEXT:
 Upper Inner Trim
A: REMOVAL
1) Remove the front pillar trim.
Pull the upper part of the front pillar trim towards the center of the
vehicle.
Insert long-nose pliers into the top part of the trim, grip the clip
Rear Quarter Trim
A: REMOVAL
1. SEDAN MODEL
1) Disconnect the ground cable from battery and wait for at least 60 seconds
before starting work.
CAUTION:
The airbag system is fitted with a backup power supply. After dis
Rear Shelf Trim
A: REMOVAL
1) Disconnect the ground cable from battery and wait for at least 60 seconds
before starting work.
CAUTION:
The airbag system is fitted with a backup power supply. After disconnecting the
SEE MORE:
Center console box (front)
If you remove the divider plate from the dual cup holders, you can use the center
console box as a storage space.
To use as storage space:
Pull out the divider plate of the dual cup holder.
To use again as cup holders:
Insert the divider plate into the console box.
Vehicle Dynamics Control OFF indicator light
The light illuminates when the ignition switch is turned to the “ON” position
and turns off after approximately 2 seconds. The light illuminates when the Vehicle
Dynamics Control OFF switch is pressed to deactivate the Vehicle Dynamics Control
system.
The Vehicle Dynamics Control system
