Subaru Outback (BR): Front Strut
A: REMOVAL
1) Lift up the vehicle, and then remove the front wheels.
2) Remove the front strut.
- Place an alignment mark on the camber adjusting bolt and strut.
- Remove the brake hose bracket.
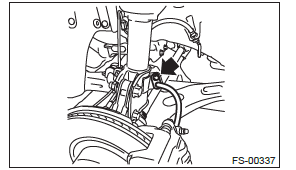
- Remove the ABS wheel speed sensor harness.
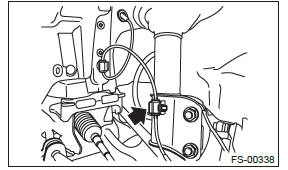
- Remove the two bolts securing the front axle housing to the strut.
NOTE: While holding the head of the adjusting bolt, loosen the flange nut.
- Remove the three nuts securing strut mount to body.
B: INSTALLATION
1) Install the strut mount at the upper side of strut to body, and tighten it with new self-locking nuts.
Tightening torque: 20 N*m (2.04 kgf-m, 14.8 ft-lb)
2) Align alignment marks on the camber adjusting bolt and strut.
Using new self-locking nuts, install the strut to the front axle housing.
NOTE: While holding the head of adjusting bolt, tighten the self-locking nut.
Tightening torque: 155 N*m (15.81 kgf-m, 114.3 ft-lb)
3) Secure the ABS wheel speed sensor harness to the strut.
4) Install the brake hose bracket.
Tightening torque: 33 N*m (3.36 kgf-m, 24.3 ft-lb)
5) Install the front wheels.
6) Inspect the wheel alignment and adjust if necessary.
- Inspection: <Ref. to FS-9, INSPECTION, Wheel Alignment.>
- Adjustment: <Ref. to FS-14, ADJUSTMENT, Wheel Alignment.>
C: DISASSEMBLY
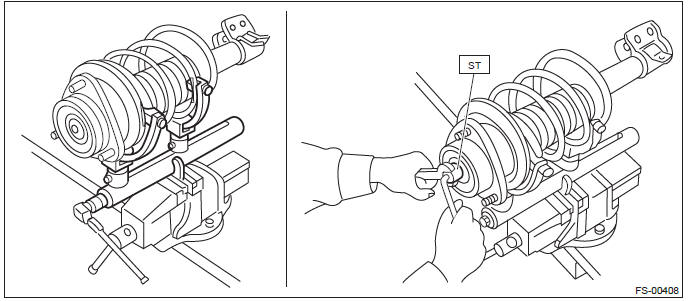
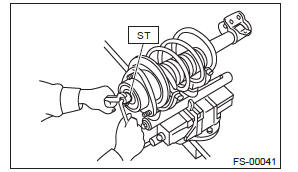
1) Using a coil spring compressor, compress the coil spring.
2) Using the ST, remove the self-locking nut.
PREPARATION TOOL: ST: STRUT MOUNT SOCKET (20399AG000)
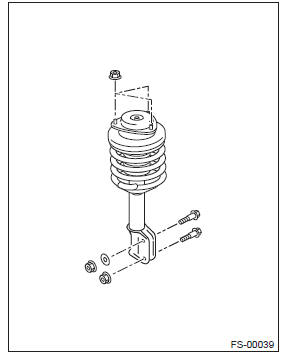
3) Remove the strut mount, spacer and upper spring seat from the strut.
4) Gradually decrease the compression force of compressor, and remove the coil spring.
5) Remove the dust cover and helper.
D: ASSEMBLY
1) Before assembly, check each part. <Ref. to FS-45, INSPECTION, Front Strut.>
2) Using a coil spring compressor, compress the coil spring.
NOTE: Make sure that the vertical install direction of the coil spring is as shown in the figure.
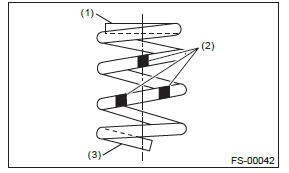
- Diameter is small (upper part)
- Identification paint
- Diameter is large (bottom part)
3) Set the coil spring correctly so that its end face seats well in the spring seat as shown in the figure.
CAUTION: Install the coil spring so that the end of spring is between the marks on the spring seat.
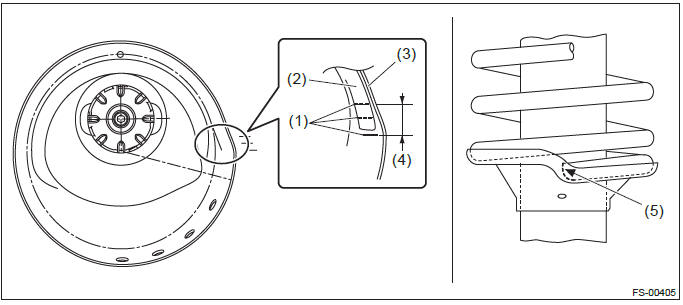
- Mark
- Spring
- Spring seat
- Install the spring within this area
- Coil spring end face
4) Install the dust cover and helper to the piston rod.
5) Pull the piston rod fully upward, and install the spring seat.
NOTE: Position the upper spring seat as shown in the figure.
- Outside of body
6) Install the spacer and strut mount to the piston rod, and temporarily tighten a new self-locking nut.
7) Using a hexagon wrench to prevent strut rod from turning, tighten the new self-locking nut with ST.
PREPARATION TOOL: ST: STRUT MOUNT SOCKET (20399AG000)
Tightening torque: 55 N*m (5.61 kgf-m, 40.6 ft-lb)
8) Loosen the coil spring compressor carefully.
E: INSPECTION
Check the removed part for wear, damage and cracks, and then repair or replace it if defective.
1. STRUT
1) Check for oil leaks.
2) Move the piston rod up and down to check that it operates smoothly without any hitch.
3) Check the piston rod for play as follows:
1. Fix the outer shell in place and fully extend the rod.
2. Set the dial gauge on the end of the rod L [10 mm (0.39 in) ].
3. While applying a force of W [20 N (2 kgf, 4 lbf) ] to the threaded part, read the dial gauge indication P1.
4. Apply a force of 20 N (2 kgf, 4 lbf) from the opposite direction of "W", and then read the dial gauge indication P2.
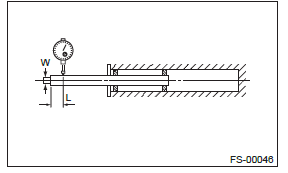
Play limit (P1 + P2): 0.8 mm (0.031 in)
4) Replace the strut if faulty is found in the inspection or limit value is exceeded.
2. STRUT MOUNT
Check the rubber part for deformation, cracks or deterioration, and then replace it with a new part if defective.
3. DUST COVER
If cracks or damage are found, replace it with a new part.
4. COIL SPRING
If a permanent strain is found, replace it with a new part.
5. HELPER
If major cracks or damage are found, replace it with a new part.
F: DISPOSAL
CAUTION:
- Before handling struts, be sure to wear goggles to protect eyes from gas, oil and cutting powder.
- Do not disassemble the strut damper or throw into flames.
- When discarding gas filled struts, drill holes in them to purge the gas.
1) Place the strut on a level surface with the piston rod fully expanded.
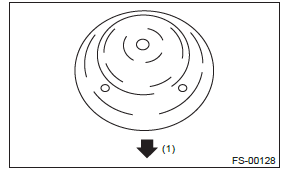
2) Using a 2 - 3 mm (0.08 - 0.12 in) dia. drill, make holes in areas shown in the figure.
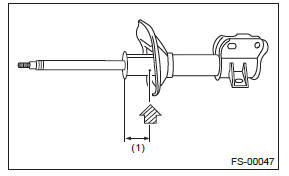
- 40 mm (1.57 in)
General Diagnostic Table
A: INSPECTION
1. IMPROPER VEHICLE POSTURE OR IMPROPER WHEEL ARCH HEIGHT

2. POOR RIDE COMFORT
1) Large rebound shock.
2) Rocking of the vehicle continues too long after running over bump and hump.
3) Excessive shock in bumping.
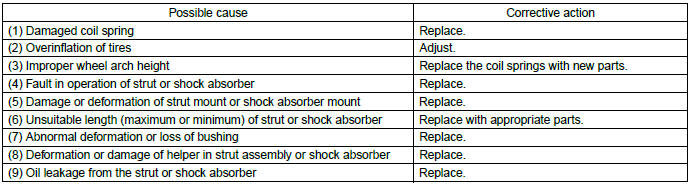
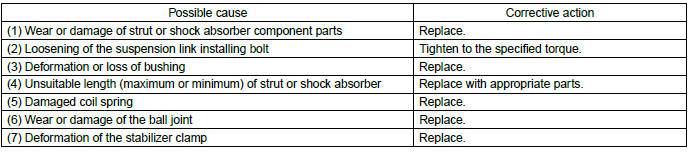
3. NOISE
READ NEXT:
 General Description of Rear Suspension
A: SPECIFICATION
Refer to "SPECIFICATIONS" in "FRONT SUSPENSION" section for rear suspension specifications. <Ref. to FS-2, SPECIFICATION, General Description.>
NOTE:
Rear Stabilizer
A: REMOVAL
1) Lift up the vehicle, and then remove the rear wheels.
2) Remove the rear stabilizer.
Remove left and right stabilizer links.
Detach the stabilizer clamp and remove the rear stabilize
SEE MORE:
AT and CVT models
CAUTION
If you restart the engine while the vehicle is moving, shift the select lever
into the “N” position. Do not attempt to place the select lever of a moving vehicle
into the “P” position.
1. Apply the parking brake.
2. Turn off unnecessary lights and accessories.
3. Shift the se
Driver’s seat
1) Seat position forward/backward control switch
To adjust the seat forward or backward, move the control switch forward or backward.
During forward/backward adjustment of the seat, you cannot adjust the seat cushion
angle or seat cushion height.
2) Seat cushion angle control switch
To adju
