Subaru Outback (BR): High beam light bulbs
1. Remove the air intake duct (right-hand side). For the method to remove the air intake duct, refer to “Removing air intake duct” F11-7.
Left-hand side
2. Use a screwdriver to remove the secured clip of the washer tank. To make it easy to access the bulb, move the washer tank to the horizontal direction (left-hand side).
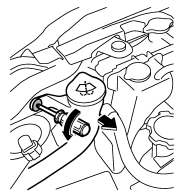
3. Disconnect the electrical connector from the bulb.
4. Remove the bulb from the headlight assembly by turning it counterclockwise.
5. Replace the bulb with new one. At this time, use care not to touch the bulb surface.
6. Reconnect the electrical connector.
7. To install the bulb to the headlight assembly, turn it clockwise until it clicks.
8. Install the air intake duct with clips (right-hand side).
9. Set the washer tank to the original place and secure it by clip (left-hand side).
READ NEXT:
 Front turn signal light
NOTE
It may be difficult to replace the bulbs. We recommend that you have the bulbs
replaced by your SUBARU dealer if necessary.
1. Turn over the protective cover of the engine compartment.
2
Front position light
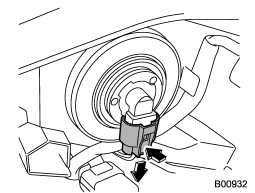
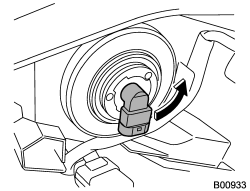
1. Turn the socket counterclockwise and pull it out.
2. Pull out the bulb from the socket and replace the bulb with a new one.
Front fog light (if equipped)
NOTE
It may be difficult to replace the bulbs. We recommend that you have the bulbs
replaced by your SUBARU dealer if necessary.
1. Pull off the fender lining. Refer to “Pulling off the fender l
SEE MORE:
Brake assist system
WARNING
Do not be overconfident about the brake assist. It is not a system that brings
more braking ability to the vehicle beyond its braking capability. Always use the
utmost care when driving regarding vehicle speed and safe distance.
CAUTION
When you need to brake suddenly, continue depres
ATF Cooler Pipe and Hose
A: REMOVAL
1) Remove the collector cover.
NOTE:
Follow the steps below when removing the collector
cover.
Pull up the two points at the rear (A).
Pull up the two points at the front (B) while
moving them forward.
2) Remove the battery.
3) Lift up the vehicle.
4) Remove the under cover. <R
