Subaru Outback (BR): Manual Transmission Mounting System
A: REMOVAL
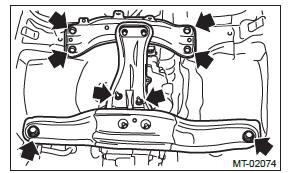
1. CROSSMEMBER AND CUSHION RUBBER
1) Disconnect the ground cable from battery.
2) Lift up the vehicle.
3) Remove the front under cover. <Ref. to EI-35, REMOVAL, Front Under Cover.>
4) Remove the front and center exhaust pipes. (non-turbo model) <Ref. to EX(H4SO)-5, REMOVAL, Front Exhaust Pipe.> <Ref. to EX(H4SO)-8, REMOVAL, Center Exhaust Pipe.>
5) Remove the center exhaust pipe. (turbo model) <Ref. to EX(H4DOTC)-12, REMOVAL, Center Exhaust Pipe.>
6) Remove the heat shield cover.
7) Set the transmission jack.
CAUTION: Always support the transmission case with a transmission jack.
8) Remove the front crossmember and the rear crossmember.
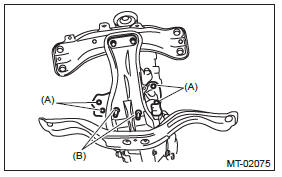
9) Remove the transmission cushion rubber.
B: INSTALLATION
1. CROSSMEMBER AND CUSHION RUBBER
1) Install the transmission cushion rubber to the transmission, and tighten the bolt (A).
2) Attach the transmission cushion rubber to the center crossmember, and tighten nut (B).
Tightening torque:
Bolt (A)
35 N*m (3.6 kgf-m, 25.8 ft-lb)
Nut (B)
35 N*m (3.6 kgf-m, 25.8 ft-lb)
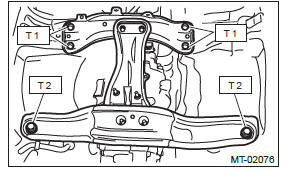
3) Install the front crossmember and rear crossmember.
Tightening torque:
T1: 75 N*m (7.6 kgf-m, 55.3 ft-lb)
T2: 140 N*m (14.3 kgf-m, 103.3 ft-lb)
4) Remove the transmission jack.
5) Install the heat shield cover. <Ref. to EI-168, INSTALLATION, Heat Shield Cover.>
6) Install the front and center exhaust pipe. (non-turbo model) <Ref. to EX(H4SO)-6, INSTALLATION, Front Exhaust Pipe.> <Ref. to EX(H4SO)-8, INSTALLATION, Center Exhaust Pipe.>
7) Install the center exhaust pipe. (turbo model) <Ref. to EX(H4DOTC)-13, INSTALLATION, Center Exhaust Pipe.>
8) Install the front under cover. <Ref. to EI-35, INSTALLATION, Front Under Cover.>
9) Lower the vehicle.
10) Connect the ground cable to battery.
C: INSPECTION
Perform the following inspection procedures and repair or replace faulty parts.
1. CROSSMEMBER AND CUSHION RUBBER
Check crossmember for bends or damage. Check that the cushion rubber is not stiff, cracked, or otherwise damaged.
READ NEXT:
 Oil Seal
A: INSPECTION
Check for transmission gear oil leaks at oil seal area.
If there is an oil leak, replace the oil seal with
new one and check the propeller shaft.
B: REPLACEMENT
1) Remove the collector
Switches and Harness in Manual Transmission
A: REMOVAL
1. BACK-UP LIGHT AND NEUTRAL POSITION SWITCH
1) Disconnect the ground cable from battery.
2) Remove the collector cover. (turbo model)
3) Remove the air intake boot assembly. (non-turbo
Transfer Case and Extension
Case Assembly
A: REMOVAL
1) Remove the manual transmission assembly
from the vehicle. <Ref. to 6MT-25, REMOVAL,
Manual Transmission Assembly.>
2) Remove the back-up light switch and the neutral
position swit
SEE MORE:
Repeating
Type A audio
Type B audio
To repeat a track/file (track), briefly press the “RPT/RDM” button (type A audio)
or “RPT” button (type B audio) while the track/file (track) is playing.
Each time you briefly press the button, the mode changes in the following sequences.
Type A audio:
Instrument Panel Lower Cover
A: REMOVAL
1) Disconnect the ground cable from battery.
2) Remove the clips, and remove the instrument panel side cover LH.
3) Remove the instrument panel lower cover.
Remove the clips and data link connector, and remove the instrument
panel lower cover under.
Remove the screws and clips a
