Subaru Outback (BR): Periodic Maintenance Services
General Description
A: GENERAL DESCRIPTION
Be sure to perform periodic maintenance in order to maintain vehicle performance and find problems before they occur.
Schedule
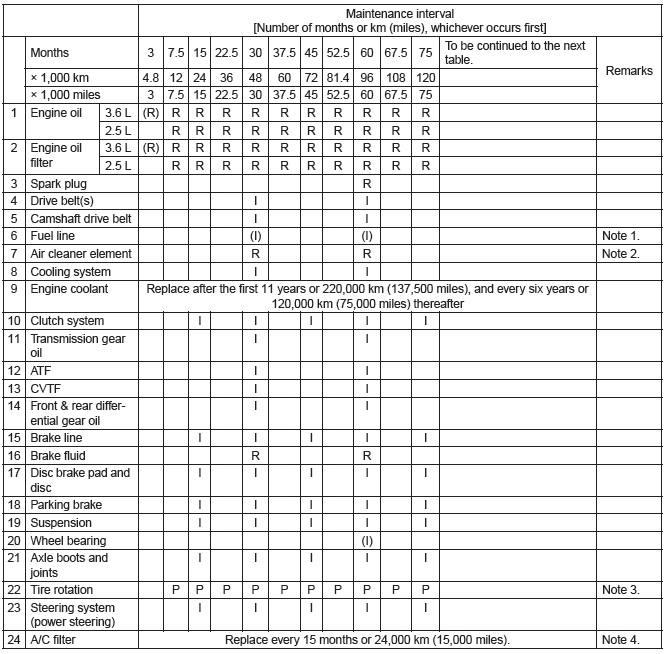
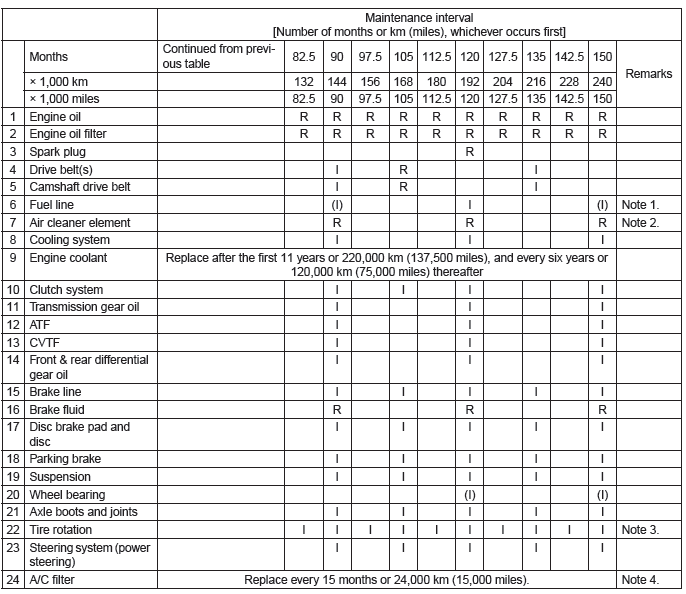
A: MAINTENANCE SCHEDULE 1
1. MODEL WITH US SPECIFICATION
- Other than U5 model
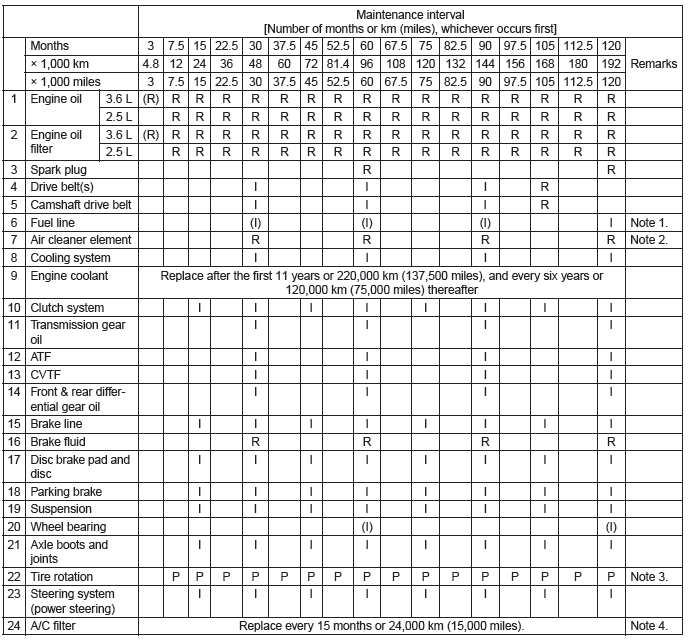
Symbols used:
R: Replace
I: Inspection
P: Perform
(R): Recommended service for maintaining better vehicle performance
(I): Inspections recommended for vehicle safety
NOTE:
1.This inspection is not required to maintain emission warranty eligibility and it dose not affect the manufacturer's obligations under EPA's in-use compliance program.
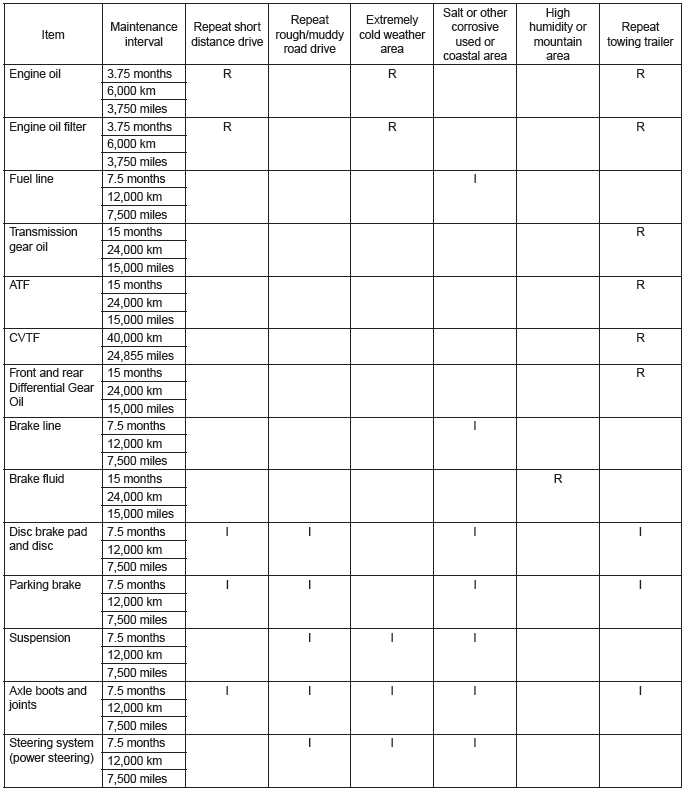
2.When the vehicle is used in extremely dusty conditions, the air cleaner element should be replaced more often.
3. A tire should be replaced when the tread wear indicator appears as a solid band across the tread. The indicators appear when the remaining tread has been worn to 1.6 mm (0.063 in) or less.
4.When the vehicle is used under extremely dusty conditions, replace the A/C filter frequently.
- U5 model
Symbols used:
R: Replace
I: Inspection
P: Perform
(R): Recommended service for maintaining better vehicle performance
(I): Inspections recommended for vehicle safety
NOTE:
1.This inspection is not required to maintain emission warranty eligibility and it dose not affect the manufacturer's obligations under EPA's in-use compliance program.
2.When the vehicle is used in extremely dusty conditions, the air cleaner element should be replaced more often.
3. A tire should be replaced when the tread wear indicator appears as a solid band across the tread. The indicators appear when the remaining tread has been worn to 1.6 mm (0.063 in) or less.
4.When the vehicle is used under extremely dusty conditions, replace the A/C filter frequently.
Symbols used:
R: Replace
I: Inspection
(I): Inspections recommended for vehicle safety
NOTE:
1.This inspection is not required to maintain emission warranty eligibility and it dose not affect the manufacturer's obligations under EPA's in-use compliance program.
2.When the vehicle is used in extremely dusty conditions, the air cleaner element should be replaced more often.
3. A tire should be replaced when the tread wear indicator appears as a solid band across the tread. The indicators appear when the remaining tread has been worn to 1.6 mm (0.063 in) or less.
4.When the vehicle is used under extremely dusty conditions, replace the A/C filter frequently.
B: MAINTENANCE SCHEDULE 2
Engine Oil
A: INSPECTION
Refer to "LU" section for engine oil inspection.
B: REPLACEMENT
Refer to "LU" section for engine oil replacement.
Engine Oil Filter
A: REPLACEMENT
Refer to "LU" section for engine oil filter replacement.
Spark Plug
A: REPLACEMENT
Refer to "IG" section for spark plug replacement.
V-belt
A: INSPECTION
Refer to "ME" section for V-belt inspection.
B: REPLACEMENT
Refer to "ME" section for V-belt replacement.
Timing Belt
A: INSPECTION
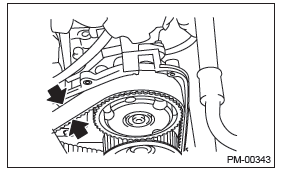
1. SOHC MODEL (INSPECTION OF TIMING BELT POSITION)
1) Remove the timing belt cover (LH).
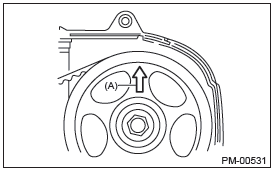
2) Turn the crank pulley to set #1 cylinder piston to top dead center of compression stroke and check the followings.
- Check that the arrow (A) of cam sprocket LH points to the upright.
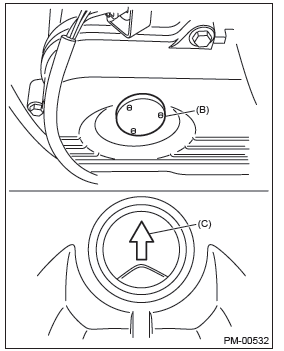
- Remove the sealing rubber (B) of the timing belt cover RH.
- Check that the arrow (C) of cam sprocket RH points to the upright.
3) When cam sprocket or timing belt position is offset, check for any defect and repair or replace as required.
2. SOHC MODEL (OTHER INSPECTIONS)
1) Remove the front timing belt cover and timing belt cover (LH).
2) While cranking engine at least four rotations, check the timing belt back surface for cracks or damage. Replace the faulty timing belt with new part as needed.
3) When the side part of timing belt is abnormally worn (fluff or jumping out of core) or damaged, check the idlers, tensioner, water pump pulley and cam sprocket to determine idler alignment (squareness).
Replace the worn timing belt with new part.
4) Install the front timing belt cover and timing belt cover (LH).
3. DOHC MODEL (INSPECTION OF TIMING BELT POSITION)
1) Remove the timing belt cover (LH) and (RH).
2) Turn the crank pulley and align single line mark (A) on the intake cam sprocket (RH) with notch (B) on timing belt cover and check the following.
- Make sure double lines (C) on intake and exhaust cam sprocket (RH side) are aligned.
- Make sure single line (D) on exhaust cam sprocket (RH side) is aligned to timing belt cover notch (E).
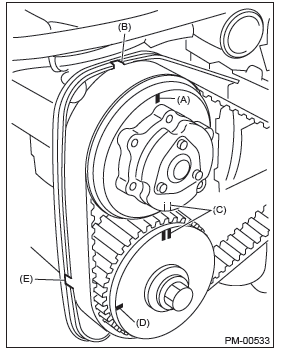
- Make sure single line (A) on intake cam sprocket (LH side) is aligned to timing belt cover notch (B).
- Make sure double lines (C) on intake and exhaust cam sprocket (LH side) are aligned.
- Check that the single line mark (D) on the exhaust cam sprocket (LH side) and notch (E) on the timing belt cover are aligned.
3) When cam sprocket position is offset, check for any defect, and repair or replace as required.
4. DOHC MODEL (OTHER INSPECTIONS)
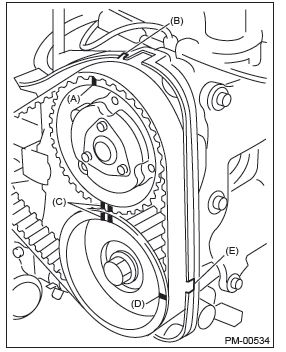
1) Remove the timing belt cover (LH).
2) While cranking engine at least four rotations, check the timing belt back surface for cracks or damage. Replace the faulty timing belt with new part as needed.
3) When the side part of timing belt (arrow direction shown in the figure) is abnormally worn (fluff or jumping out of core) or damaged, check the idlers, tensioner, water pump pulley and cam sprocket to determine idler alignment (squareness). Replace the worn timing belt with new part.
4) Install the timing belt cover (LH).
B: REPLACEMENT
Refer to "ME" section for timing belt replacement.
Fuel Line
A: INSPECTION
The fuel line is located mostly internally, so check pipes, areas near pipes, and engine compartment piping for rust, hose damage, loose band, etc. If faulty parts are found, repair or replace them.
Fuel Filter
A: REPLACEMENT
Refer to "FU" section for fuel filter replacement.
B: INSPECTION
Replace if the filter is clogged, or time for replacement has come.
Air Cleaner Element
A: REPLACEMENT
Refer to "IN" section for air cleaner element replacement.
Cooling System
A: INSPECTION
1. RADIATOR
Refer to "CO" section for radiator inspection.
2. RADIATOR CAP
Refer to "CO" section for radiator cap inspection.
3. COOLING FAN
Check the radiator fan operates using Subaru Select Monitor, when the coolant temperature exceeds 98ºC (208ºF). If it does not operate, check the radiator fan system.
4. COOLING SYSTEM
Start the engine, and then inspect that it does not overheat or it is not cooled excessively. If it overheats or it is cooled excessively, check the cooling system.
Engine Coolant
A: REPLACEMENT
Refer to "CO" section for engine coolant replacement.
Clutch System
A: INSPECTION AND ADJUSTMENT
Refer to "CL" section for inspection and adjustment of clutch system.
Transmission Gear Oil
A: INSPECTION
Refer to "6MT" section for transmission gear oil inspection.
B: REPLACEMENT
Refer to "6MT" section for transmission gear oil replacement.
Automatic Transmission Fluid
A: INSPECTION
Refer to "5AT" section for ATF inspection.
B: REPLACEMENT
Refer to "5AT" section for ATF replacement.
CVTF
A: INSPECTION
Refer to "CVT" section for CVTF inspection.
B: REPLACEMENT
Refer to "CVT" section for CVTF replacement.
Front & Rear Differential Gear Oil
A: INSPECTION
1. FRONT DIFFERENTIAL (MT MODEL)
Front differential gear oil of MT model lubricates the transmission and differential together. Refer to "Transmission Gear Oil" for replacement procedure.
2. FRONT DIFFERENTIAL (AT MODEL)
Refer to "5AT" section for inspection of AT model front differential gear oil.
3. FRONT DIFFERENTIAL (CVT MODEL)
Refer to "CVT" section for inspection of CVT model front differential gear oil.
4. REAR DIFFERENTIAL
Refer to "DI" section for rear differential gear oil inspection.
B: REPLACEMENT
1. FRONT DIFFERENTIAL (MT MODEL)
Front differential gear oil of MT model lubricates the transmission and differential together. Refer to "6MT" section for replacement procedure.
2. FRONT DIFFERENTIAL (AT MODEL)
Refer to "5AT" section for front differential gear oil replacement.
3. FRONT DIFFERENTIAL (CVT MODEL)
Refer to "CVT" section for front differential gear oil replacement.
4. REAR DIFFERENTIAL
Refer to "DI" section for rear differential gear oil replacement.
Brake Line
A: INSPECTION
1. BRAKE LINE
1) Check for scratches, swelling, corrosion, traces of fluid leakage on the brake hoses or pipe joints.
2) Make sure that brake pipes/hoses do not interfere with adjacent parts and there is no loose connector/ clamp during driving.
3) Check any trace of fluid leakage, scratches, etc.
on master cylinder, wheel cylinder and hydraulic unit.
NOTE:
- When the brake fluid level in the reservoir tank is lower than specified limit, the brake warning light on the combination meter will illuminate.
- Visually check the brake hose for damage. (Use a mirror where it is difficult to see)
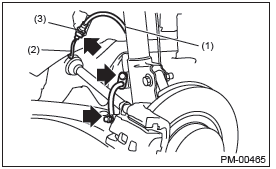
- Front brake hose
- Front brake pipe
- Clamp
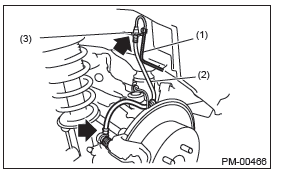
- Brake pipe
- Rear brake hose
- Clamp
2. SERVICE BRAKE
Refer to "BR" section for foot brake inspection.
3. BRAKE SERVO SYSTEM
1) With the engine off, depress the brake pedal several times applying the same pedal force.
Check that the travel distance should not change.
2) With the brake pedal depressed, start the engine.
Check that the pedal moves slightly toward the floor.
3) With the brake pedal depressed, stop the engine and keep the pedal depressed for 30 seconds.
Check that the pedal height does not change.
4) A check valve is built into the brake booster nipple.
Disconnect the vacuum hose to inspect function of check valve.
Check that check valve ventilates from booster side to engine side. Also, check that there is no ventilation from engine side to booster side.
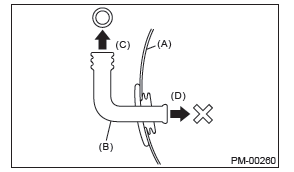
- Brake booster
- Check valve
- Engine side
- Brake booster side
5) Check the vacuum hose for cracks or other damage.
CAUTION: When installing the vacuum hose on the engine and brake booster, do not use soapy water or lubricating oil on their connections.
6) Check that the vacuum hose is securely tightened.
Brake Fluid
A: INSPECTION
Refer to "BR" section for brake fluid inspection.
B: REPLACEMENT
Refer to "BR" section for brake fluid replacement.
Disc Brake Pad and Disc
A: INSPECTION
Refer to "BR" section for disc brake pad and disc inspection.
Parking Brake
A: INSPECTION
Refer to "PB" section for parking brake inspection.
B: ADJUSTMENT
Refer to "PB" section for parking brake adjustment.
Suspension
A: INSPECTION
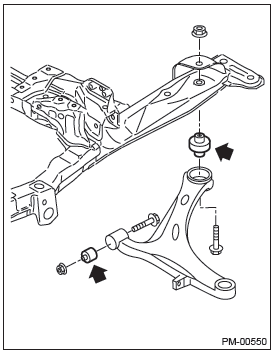
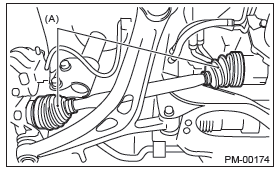
1. FRONT SUSPENSION BALL JOINT
1) Lift up the vehicle until front wheels are off ground.
2) Grasp the bottom of tire and move it in and out in axial direction. If movement (B) is observed between the brake disc cover (A) and end of front arm (D), ball joint (C) may be excessively worn.

3) Next, grasp the end of front arm (C) and move it up and down. If movement (A) between the housing (D) and front arm (C) boss is observed, ball joint (B) may be excessively worn.
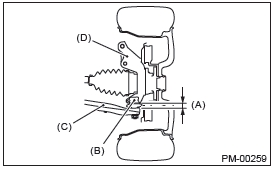
4) If the relative movement is observed in the preceding two steps, remove and inspect the ball joint.
If the free play exceeds standard value, replace the ball joint.
5) Damage of dust boot
Visually inspect the ball joint dust boot. Replace if ball joint is damaged.
NOTE: When the front arm ball joint is removed or replaced, check the toe-in of front wheel. If it is not within the specified value, adjust the toe-in.

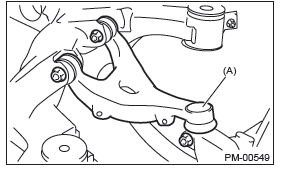
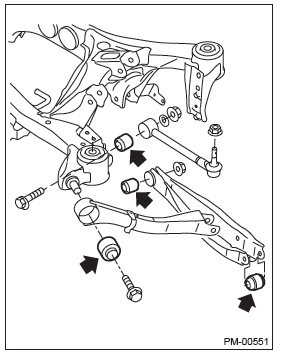
2. REAR SUSPENSION BALL JOINT
1) Lift up the vehicle until rear wheels are off ground.
2) Grasp the bottom of tire and move it in and out in axial direction.
3) If movement is observed between the brake disc cover (A) and end of front lateral link (B), ball joint may be excessively worn.
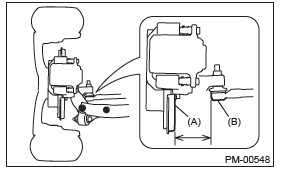
4) Grasp the end of front lateral link (B) and move it up and down. If movement is observed between the housing (C) and front lateral link (B) boss, ball joint may be excessively worn.
5) If the movement related to the previous two steps is observed, replace the front lateral link.
6) Damage of dust boot
Visually inspect the ball joint dust boot. Replace if front lateral link is damaged.
7) Check upper arm ball joint in the same manner.
- Upper arm ball joint
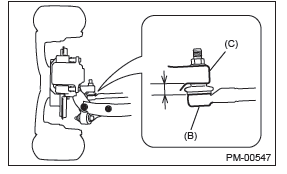
3. FRONT, REAR SUSPENSION BUSHING
Apply pressure with tire lever etc, and inspect the bushing for excessive wear or damage. Replace the bushings if faulty.
- Front suspension bushing
- Rear suspension bushing
4. WHEEL ARCH HEIGHT
Refer to "FS" section for wheel arch height inspection.
5. WHEEL ALIGNMENT
Measure and adjust the front and rear wheel alignment at a time. Refer to "FS" section for measurement and adjustment of wheel alignment.
6. OIL LEAKAGE OF STRUT AND SHOCK ABSORBER
Visually inspect the front strut and rear shock absorber for oil leakage. Replace the front strut and rear shock absorber if oil leaks excessively.
7. TIGHTNESS OF BOLTS AND NUTS
Check the bolts and nuts for looseness. Retighten the bolts and nuts to specified torque. If the self-locking nuts and bolts are removed, replace them with new parts.
8. DAMAGE TO SUSPENSION PARTS
Check the following parts and the fastening portion of the vehicle body for deformation or excessive rusting which impairs the suspension. Thoroughly remove the deposits of the lower spring seat of strut where dust or mud are likely piled up. If necessary, replace the damaged parts with new parts.
If minor rust formation, pitting, etc. are noted, remove the rust and take rust prevention measure.
- Front suspension
- Front arm
- Cradle
- Strut
- Rear suspension
- Sub frame
- Front lateral link
- Rear lateral link
- Upper arm
- Trailing link
- Shock absorber
- In the area where salt is sprayed to melt snow on a road in winter, check suspension parts for damage caused by rust every 12 months after lapse of 60 months. Take rust prevention measures as required.
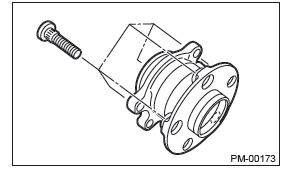
Wheel Bearing
A: INSPECTION
1. FRONT WHEEL BEARING
NOTE: Inspect the condition of front wheel bearing grease.
1) Jack-up the front side of vehicle.
2) While holding the front wheel by hand, swing it in and out to check bearing free play.
3) Loosen the wheel nuts, and remove the front wheel.
4) If the bearing free play exists in step 2) above, attach a dial gauge to the hub and measure axial play in axial direction.
Service limit: Straight-ahead position within 0.05 mm (0.0020 in)
5) Remove the bolts and self-locking nuts, and extract the front arm from front crossmember.
6) Remove the AAR of front drive shaft from transmission.
7) While supporting the front drive shaft horizontally with one hand, turn the hub with the other hand to check for noise or binding.
If the hub is noisy or binds, replace the front axle.
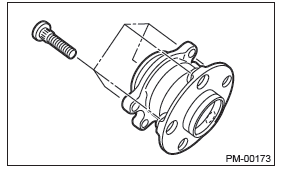
2. REAR WHEEL BEARING
1) Jack-up the rear side of vehicle.
2) While holding the rear wheel by hand, swing it in and out to check bearing free play.
3) Loosen the wheel nuts, and remove the rear wheel.
4) If the bearing free play exists in step 2) above, attach a dial gauge to the hub and measure axial play in axial direction.
Service limit: Straight-ahead position within 0.05 mm (0.0020 in)
5) Remove the DOJ of rear drive shaft from rear differential.
6) While supporting rear drive shaft horizontally with one hand, turn the hub with the other hand to check for noise or binding.
If the hub is noisy or binds, replace the rear axle.
Axle Boots & Joints
A: INSPECTION
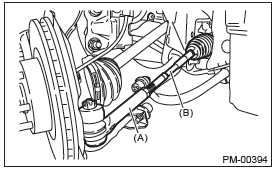
1. FRONT AND REAR AXLE BOOTS
Inspect the front axle boots (A) and rear axle boots (B) for deformation, damage or failure. If faulty, replace with new part.
- Front
- Rear
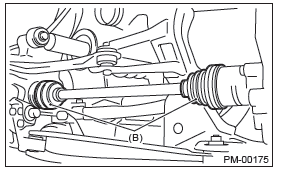
2. PROPELLER SHAFT
Inspect the propeller shaft for damage or failure. If faulty, replace with new part.
Tire Rotation
A: INSPECTION
Refer to "WT" section for tire rotation procedures.
Steering System (Power Steering)
A: INSPECTION
1. STEERING WHEEL
1) Set the steering wheel in a straight-ahead position, and check the wheel spokes to make sure they are correctly set in their specified positions.
2) Lightly turn the steering wheel to the left and right to determine the point where front wheels start to move.
Measure the distance of the movement of steering wheel (periphery).
Steering wheel free play: 0 - 17 mm (0 - 0.67 in)
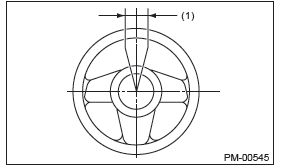
- Steering wheel free play
Move the steering wheel vertically toward the shaft to check if there is play in the direction.
Play limit: 0.5 mm (0.020 in)
3) Drive the vehicle and check the following items.
- Steering force: The effort required for steering should be smooth and even at all points, and should not vary.
- Pulled to one side: Steering wheel should not be pulled to one side while driving on a level surface.
- Wheel runout: Steering wheel should not show any sign of runout.
- Return status: Steering wheel should return to its original position after it has been turned and then released.
2. STEERING SHAFT JOINT
When the steering wheel free play is excessive, disconnect the universal joint of steering shaft and check it for any play and yawing torque (at the point of the crossing direction). Also inspect for any damage to sealing or worn serrations. If the joint is loose, retighten the mounting bolts to the specified torque.
Tightening torque: 24 N*m (2.4 kgf-m, 17.4 ft-lb)
3. GEARBOX
1) Set the steering wheel in the straight position, then rotate it 90º in both the left and right directions.
While steering wheel is being rotated, check the gearbox for looseness.
Tightening torque: 60 N*m (6.1 kgf-m, 44.3 ft-lb)
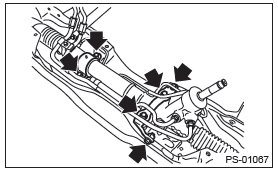
2) Check the boot for damage, cracks or deterioration.
3) With the vehicle stopped on a level surface, quickly turn the steering wheel to the left and right.
While steering wheel is being rotated, check the gear backlash. If any noise is noticed, adjust the gear backlash.
4. TIE-ROD
1) Check the tie-rod and tie-rod ends for bends, scratches or other damage.
- Tie-rod end
- Tie-rod
2) Confirm that the connections of knuckle ball joints for play, and then check for damage on dust boots and free play of ball studs. If castle nut is loose, retighten it to the specified torque, then tighten further up to a maximum of 60º until the cotter pin hole is aligned.
Tightening torque: 27 N*m (2.75 kgf-m, 19.9 ft-lb)
3) Check the lock nut on the tie-rod end for tightness.
If it is loose, retighten it to the specified torque.
Tightening torque: 85 N*m (8.7 kgf-m, 62.7 ft-lb)
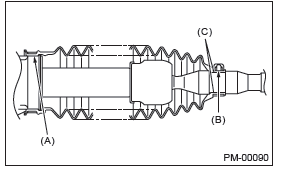
5. GEARBOX BOOTS
Inspect both sides of the gearbox boot as follows, and correct the defects if necessary.
1) The (A) and (B) positions of the gearbox boot are fitted in (A) and (C) grooves of gearbox and the rod.
2) Clips are fitted outside of positions (A) and (B) of boot.
3) Check that there is no cracks or holes in the boot.
NOTE: Rotate (B) position of gearbox boot against the torsion produced by the adjustment of toe-in etc. Apply grease to the groove (C).
A/C Filter
A: REPLACEMENT
Refer to "AC" section for A/C filter replacement.
READ NEXT:
 General Description of Fuel Injection System
A: SPECIFICATION
B: COMPONENT
1. INTAKE MANIFOLD
Intake manifold
Gasket
Intake manifold protector RH
Intake manifold protector LH
Fuel gallery RH
Fuel gallery LH
SEE MORE:
Roof rails with integrated crossbars (Outback)
1) Integrated crossbars
CAUTION
● For cargo carrying purposes, the bars must be used as crossbars and be used
together with the genuine SUBARU carrying attachment. The bars must never be used
alone to carry cargo. Otherwise, damage to the roof or paint or a dangerous road
hazard due
Transfer Case
General Description
A: NOTE
For general description, refer to "5AT", "CVT" or
"6MT" section.
5AT model:
<Ref. to 5AT-2, General Description.>
CVT model:
<Ref. to CVT-3, General Description.>
6MT model:
<Ref. to 6MT-2, General Description.>
Transfer Case and Extension
Case Assembly
