Subaru Outback (BR): Rear Door Glass
A: REMOVAL
1) Remove the rear door trim. <Ref. to EI-61, REAR DOOR, REMOVAL, Door Trim.>
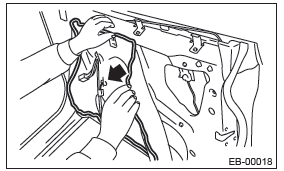
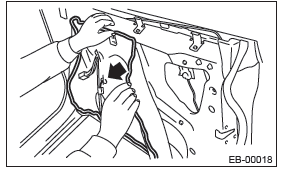
2) Remove the sealing cover.
CAUTION:
- Carefully remove the butyl tape. Excessive force will easily break the cover.
- If cover gets broken, replace it with a new part.
3) Attach the battery ground cable and power window switch and turn the ignition to ON.
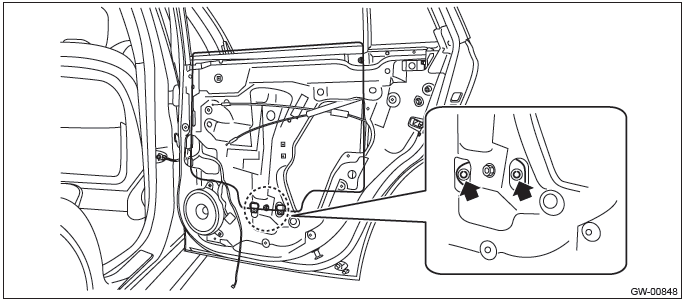
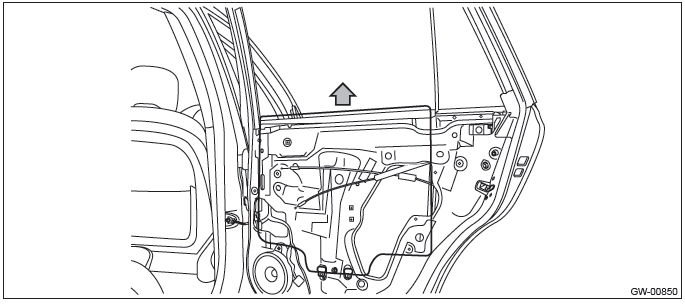
4) Remove the rear door glass.
- Operate the power window switch to move the rear door glass to the lowest position where the mounting bolts can be seen.
- Remove the screw and bolt and remove the door sash.
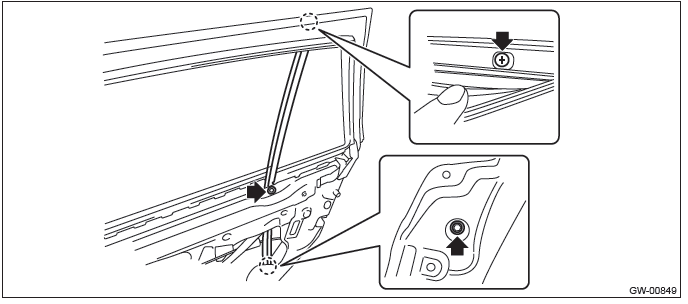
- Remove the bolt.

- Remove the rear door glass.
CAUTION: Avoid impact and damage to the glass.
B: INSTALLATION
CAUTION: Make sure that the glass run rubber is placed securely in the door frame and sash.
Install each part in the reverse order of removal.
Tightening torque: Refer to "COMPONENT" of "General Description". <Ref. to GW-5, REAR DOOR GLASS, COMPONENT, General Description.>
Rear Regulator and Motor Assembly
A: REMOVAL
1) Remove the rear door trim. <Ref. to EI-61, REAR DOOR, REMOVAL, Door Trim.>
2) Remove the sealing cover.
CAUTION:
- Carefully remove the butyl tape. Excessive force will easily break the cover.
- If cover gets broken, replace it with a new part.
3) Attach the battery ground cable and power window switch and turn the ignition to ON.
4) Remove the rear door glass. <Ref. to GW-34, REMOVAL, Rear Door Glass.>
- Operate the power window switch to move the rear door glass to the lowest position where the mounting bolts can be seen.
- Remove the screw and bolt and remove the door sash.

- Remove the bolt.
- Remove the rear door glass.
CAUTION: Avoid impact and damage to the glass.
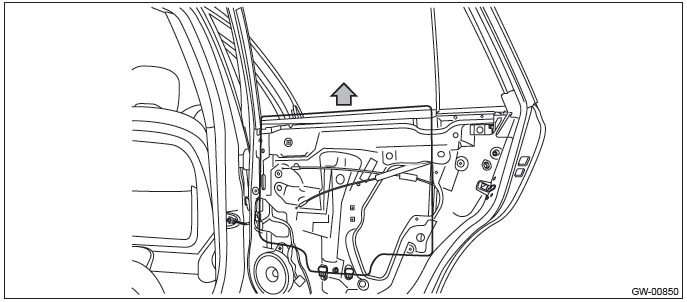
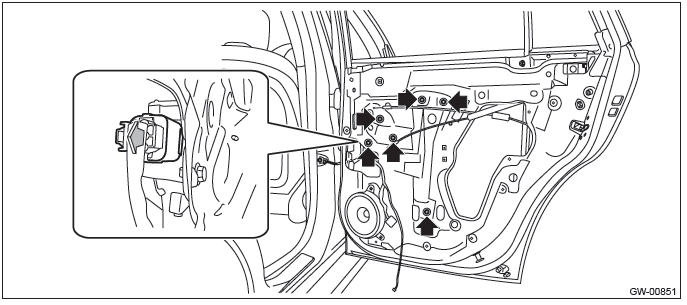
5) Remove the rear regulator and motor assembly.
- Disconnect the connector.
- Remove the bolts, and then remove the rear regulator and motor assembly.
B: INSTALLATION
Install each part in the reverse order of removal.
Tightening torque: Refer to "COMPONENT" of "General Description". <Ref. to GW-5, REAR DOOR GLASS, COMPONENT, General Description.>
C: INSPECTION
1) Disconnect the motor connector.
2) Apply battery voltage between the motor connector terminals and check the motor operation. Check to ensure that the motor rotates in reverse direction when the terminal to which battery voltage is applied is changed.
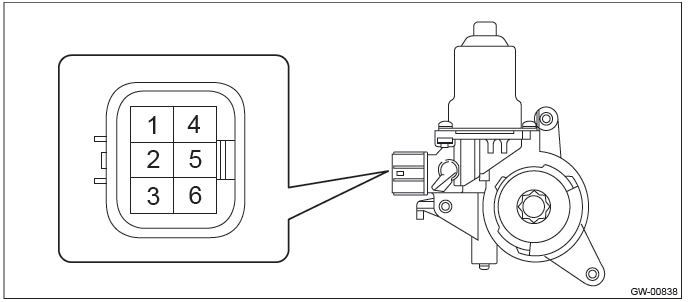

3) If the inspection results in improper operation, replace the rear regulator and motor assembly.
READ NEXT:
 Windshield Glass
A: REMOVAL
1. USING WINDSHIELD GLASS KNIFE
1) Disconnect the ground cable from battery. (Models with wiper deicer)
2) Remove the front pillar trim. <Ref. to EI-102, REMOVAL, Upper Inner Trim.>
Rear Gate Glass
A: REMOVAL
1) Disconnect the ground cable from battery.
2) Remove the rear gate trim. <Ref. to EI-160, REMOVAL, Rear Gate Trim.>
3) Remove the rear gate garnish. <Ref. to EI-164, REMOVAL, R
Rearview Mirror
A: REMOVAL
CAUTION:
Be careful not to damage the mirror surface and windshield glass.
1) Remove the TORX bolt, and then slide the rear view mirror to remove.
Preparation tool: TORX T20
2) When the mi
SEE MORE:
Photosensors in the mirror
The Subaru Outback (BR) features a mirror equipped with photosensors on both its front and rear sides. These sensors are designed to detect bright glare from headlights of vehicles behind you during nighttime driving. As a safety measure, the mirror automatically dims to reduce glare and ensure
Tire care – maintenance and safety practices
● Check on a daily basis that the tires are free from serious damage, nails,
and stones. At the same time, check the tires for abnormal wear.
● Inspect the tire tread regularly and replace the tires before their tread wear
indicators become visible. When a tire’s tread wear indica
