Subaru Outback (BR): Rearview Mirror
A: REMOVAL
CAUTION: Be careful not to damage the mirror surface and windshield glass.
1) Remove the TORX bolt, and then slide the rear view mirror to remove.
Preparation tool: TORX T20
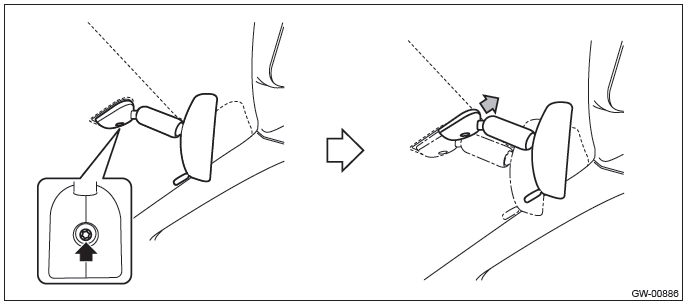
2) When the mirror mount is damaged, use something like piano wire or a spatula to remove.
B: INSTALLATION
CAUTION: When tightening the mounting TORX screw, be sure to observe the tightening torque. Otherwise, the mount may be damaged in over-torque conditions.
Install each part in the reverse order of removal.
Tightening torque: Refer to "COMPONENT" of "General Description". <Ref. to GW-6, MIRROR, COMPONENT, General Description.>
NOTE: If the mirror mount is removed, it is attached according to the following procedures.
1. Remove the old adhesive completely.
2. Attach the mirror mount by matching with the mark on the windshield glass.
3. Make sure that the mirror mount is firmly adhered.
Adhesive: REPAIR KIT IN MR (Part No. 65029FC000) or equivalent
C: INSPECTION
Check the mirror and mirror mount for damage.
Rearview Mirror (RCD Model)
A: REMOVAL
CAUTION: Be careful not to damage the mirror surface and windshield glass.
1) Disconnect the ground cable from battery.
2) Remove the rearview mirror.
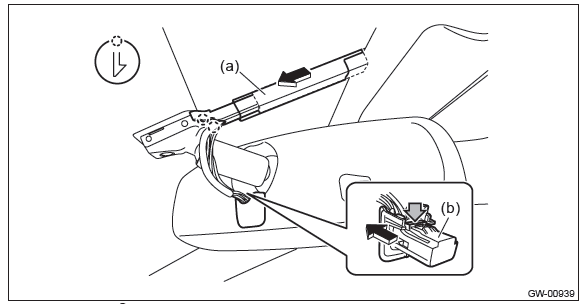
- Slide the upper section of the cover, and release the claws in the lower section, then remove the harness cover (a).
- Disconnect the rearview mirror connector (b).
CAUTION:
- Be careful not to pull the harness.
- In order to prevent damaging the mirror and harness, remove the
connector with the cap as a unit.
When removing the cap, disconnect the connector first.
- Remove the TORX bolt, and then slide the rear view mirror to remove.
Preparation tool: TORX T20
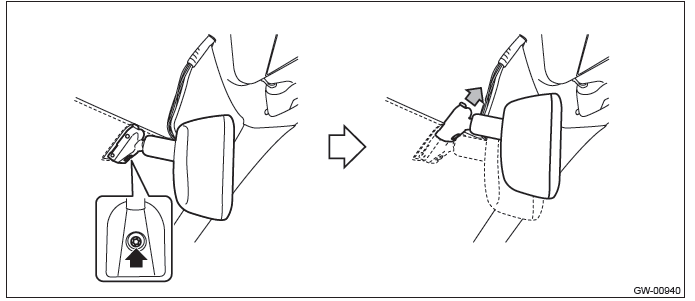
3) When the mirror mount is damaged, use something like piano wire or a spatula to remove.
B: INSTALLATION
CAUTION: When tightening the mounting TORX bolt, be sure to observe the specified torque. Otherwise, the mount may be damaged in over-torque conditions.
1) Install each part in the reverse order of removal.
2) Perform calibration and zone setting of the rearview mirror (RCD). <Ref. to GW-62, ADJUSTMENT, Rearview Mirror (RCD Model).>
Tightening torque: Refer to "COMPONENT" of "General Description". <Ref. to GW-6, MIRROR, COMPONENT, General Description.>
C: ADJUSTMENT
CAUTION:
- When the rearview mirror (RCD) is removed or replaced, perform calibration and zone setting by following the procedures below.
- The zone setting of the vehicle is set to zone "8" at factory setting.
1. CALIBRATION
1) Before performing calibration, check the following items.
- There is a sufficient distance from a big metal object or a building.
- Vehicle is parked on a level surface.
- The switch of unnecessary accessories (A/C system, audio system and lighting system) is turned to "OFF".
- All doors are closed.
2) Start the engine.
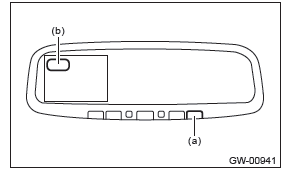
3) Hold down the multi-function button (a) for six to nine seconds. Once calibration mode starts, "C" is displayed on the screen (b).
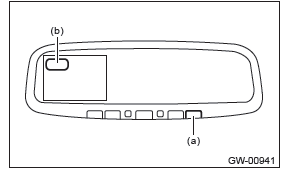
4) Drive the vehicle in a circle until the display of "C" on the screen goes off. (Approx. two or three times) 5) Display the compass to check the operation.
CAUTION: The mirror may not be able to perform the reading correctly. Therefore, when the compass operates only to the specific direction, repeat steps 3) to 5).
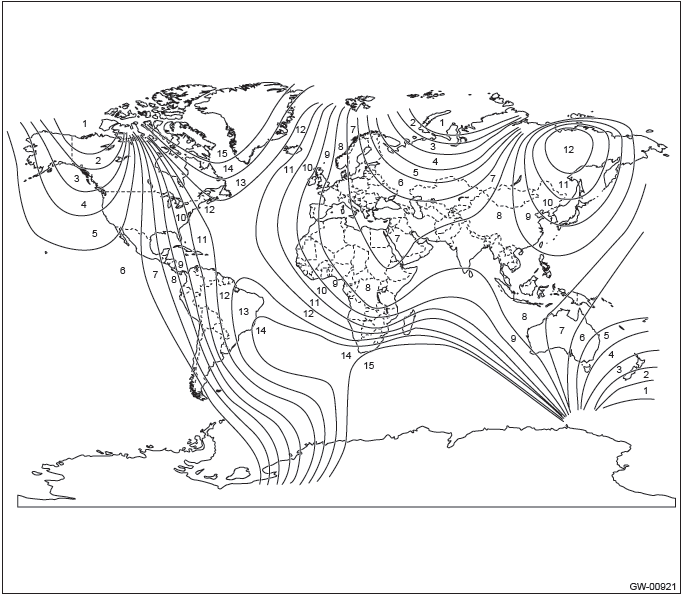
2. ZONE SETTING
1) Refer to the compass zone map to check the zone number of area you use the vehicle.
Compass zone map
2) Turn the ignition switch to ON.
3) Hold down the multi-function button (a) for three to six seconds. Once zone setting mode starts, the zone number that is already set is displayed on the screen (b).
4) Push the multi-function button repeatedly until the zone number you want to set is displayed.
NOTE: If you leave the multi-function button for three seconds, the zone setting mode is completed.
Wiper Deicer System
A: WIRING DIAGRAM
Refer to "Wiper Deicer System" in the wiring diagram. <Ref. to WI-255, Wiper Deicer System.>
B: INSPECTION
1. CHECK SYSTEM
NOTE:
- The wiper deicer does not operate when the ambient temperature becomes 5ºC (41ºF) or more.
- The wiper deicer operates with the rear window defogger at the same time.
- It is possible to perform a forced operation if you keep holding the rear window defogger switch for 3 seconds or more.

NOTE:
- Wiper deicer system can be customized using the Subaru Select Monitor, when the customize setting {A/ C ECM setting} of the body integrated unit is set to With.
- Set the system using the Rr Defogger op. mode, and setting will be the same as rear defogger system setting.

*: When one of the following conditions occurs, continuous operation is suspended and turned off after 15 minutes.
- Ambient temperature at 5ºC (41ºF) or more continues for 10 seconds.
- Malfunction occurs on ambient sensor.
- Vehicle speed of 15 km/h (9 MPH) or less continues 15 minutes (OFF when conditions are met)
- Battery voltage remains at 10 V or less for 30 seconds.
- Malfunction occurs in CAN communication.
2. CHECK WITH SUBARU SELECT MONITOR
CAUTION: Before performing the inspection, check the following settings.
- Wiper deicer setting → "support". If "no support", set to "support" using customize setting.
- Rr defogger op. mode setting → Initial setting or customize setting.
1) Check the input signal when the rear window defogger switch is operated using Subaru Select Monitor.
- Prepare the Subaru Select Monitor. <Ref. to GW-7, PREPARATION TOOL, General Description.>
- Turn the ignition switch to ON (engine OFF) and run the "PC application for Subaru Select Monitor".
- On "System Selection Menu" display, select {Integ. unit mode}.
- Select the {wiper deicer output} on {Current Data Display & Save}.
- Check the displayed data (ON/OFF) by operating the rear window defogger switch.
2) Check the operation with rear window defogger switch ON.
- When customize setting is set as "Continuous", it is normal if the 15-minute operation and 2-minute stop repeats.
- When customize setting is "Normal", it is normal if the operation lasts for 15 minutes and then turns OFF.
3) When the operation in 2) above fails, replace the body integrated unit.
3. HEAT WIRE INSPECTION
Refer to "HEAT WIRE INSPECTION" of "Rear Window Defogger System". <Ref. to GW-55, HEAT WIRE INSPECTION, INSPECTION, Rear Window Defogger System.>
NOTE: Heat wire inspection needs removing/installing procedure of instrument panel assembly.
C: REPAIR
Refer to "REPAIR" of "Rear Window Defogger System". <Ref. to GW-57, REPAIR, Rear Window Defogger System.>
NOTE: Heat wire repair needs removing/installing procedure of instrument panel assembly.
Body Structure
General Description
A: SPECIFICATION
Refer to "Body Repair Manual" for general description of body structure, reference points and reference dimensions.
READ NEXT:
 Instrumentation/Driver Info
General Description
A: SPECIFICATION
Combination meter
Clock
B: CAUTION
Before disassembling or reassembling parts, always disconnect the
battery ground cable from battery.
When replacing
General Description of the Seats
A: COMPONENT
1. FRONT SEAT
Manual seat LH
Backrest heater ASSY
Backrest pad
Backrest cover
Backrest frame ASSY
Backrest back cover
Headrest bushing
Hea
SEE MORE:
Washing
CAUTION
● When washing the vehicle, the brakes may get wet. As a result, the brake stopping
distance will be longer. To dry the brakes, drive the vehicle at a safe speed while
lightly pressing the brake pedal to heat up the brakes.
● Do not wash the engine compartment and areas adj
Exhaust
General Description
A: COMPONENT
Models other than C6 model
C6 model
Gasket
Spring
Chamber
Rear exhaust pipe
Cushion rubber (without protrusion)
Self-locking nut
Gasket
Muffler
Bolt
Center exhaust pipe front upper
cover
Rear catalytic converter upper
cover
Center exhaust pipe
