Subaru Outback (BR): Windshield Glass
A: REMOVAL
1. USING WINDSHIELD GLASS KNIFE
1) Disconnect the ground cable from battery. (Models with wiper deicer)
2) Remove the front pillar trim. <Ref. to EI-102, REMOVAL, Upper Inner Trim.>
3) Disconnect the wiper deicer connector. (Models with wiper deicer)
4) Remove the cowl panel. <Ref. to EI-32, REMOVAL, Cowl Panel.>
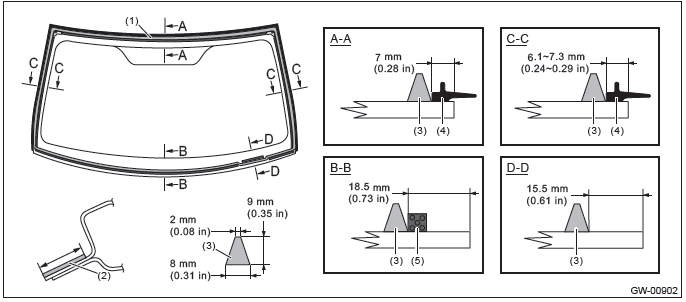
5) Remove the molding from the glass and tape the body side of the circumference of windshield glass for protection.
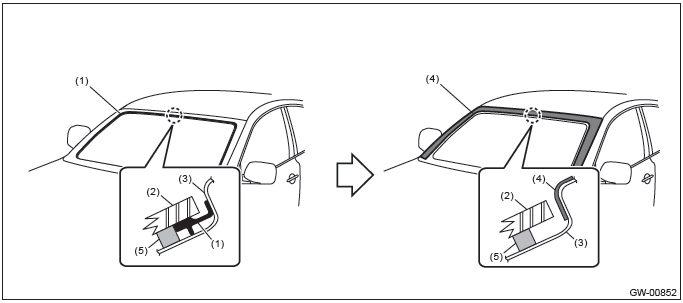
- Molding
- Windshield glass
- Body panel
- Protective tape
- Adhesive
6) Remove the windshield glass.
- Apply sufficient amount of soapy water to the adhesive part and insert the windshield glass knife.
- While holding the knife edge and windshield glass edge at a right angle, move the windshield glass knife parallel to the windshield glass edge along the surface and edge of windshield glass to cut the adhesive.
CAUTION:
- Cutting of adhesive part should be started with wider gap between windshield glass and body.
- Never twist the windshield glass knife.
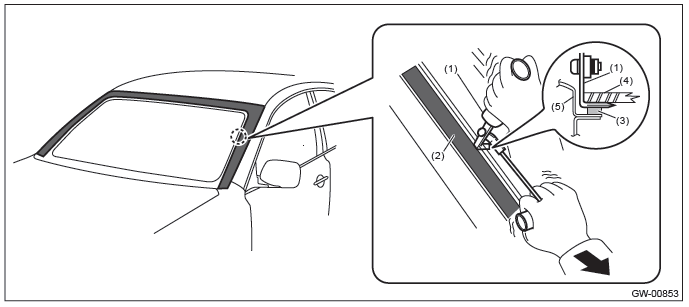
- Windshield glass knife
- Protective tape
- Adhesive
- Windshield glass
- Body panel
- Disconnect the locating pin and remove the windshield glass.
NOTE: The locating pins are bonded to the corners of glass. Use piano wire to disconnect the pins.
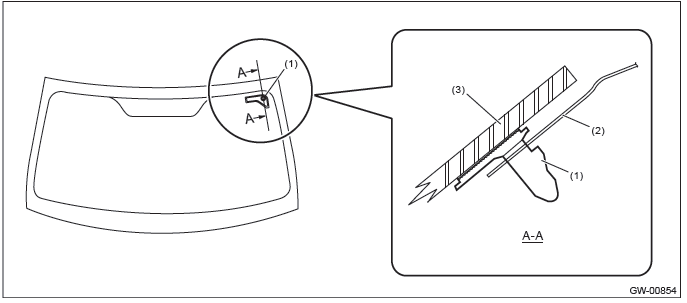
- Locating pin
- Body panel
- Windshield glass
2. USING PIANO WIRE
CAUTION:
- Do not tightly pull the piano wire against the windshield glass edge.
- Apply protective tape, etc, and be careful that the inner and outer components of the vehicle are not damaged.
- Do not cross piano wires. Otherwise they may be cut.
1) Disconnect the ground cable from battery. (Models with wiper deicer)
2) Remove the front pillar trim. <Ref. to EI-102, REMOVAL, Upper Inner Trim.>
3) Disconnect the wiper deicer connector. (Models with wiper deicer)
4) Remove the cowl panel. <Ref. to EI-32, REMOVAL, Cowl Panel.>
5) Remove the molding from the glass and tape the body side of the circumference of windshield glass for protection.

- Molding
- Windshield glass
- Body panel
- Protective tape
- Adhesive
6) Remove the windshield glass.
- Using a drill, make a hole in the adhesive part.
- Pass the piano wire through the hole, and pull the wire ends alternately to cut off the adhesive part and locating pin.
CAUTION: Attach a piece of wood to both piano wire ends.
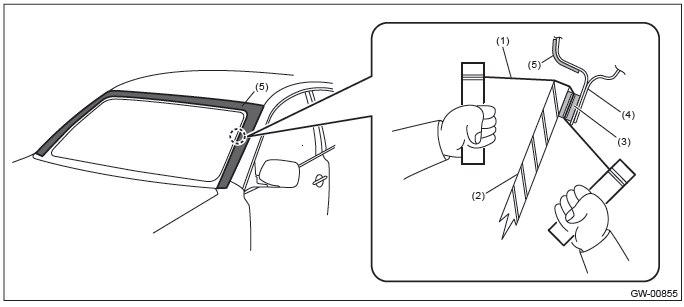
- Piano wire
- Windshield glass
- Adhesive
- Body panel
- Protective tape
B: INSTALLATION
1) Fabricate the cartridge nozzle tip as shown and set the sealant gun with the adhesive.
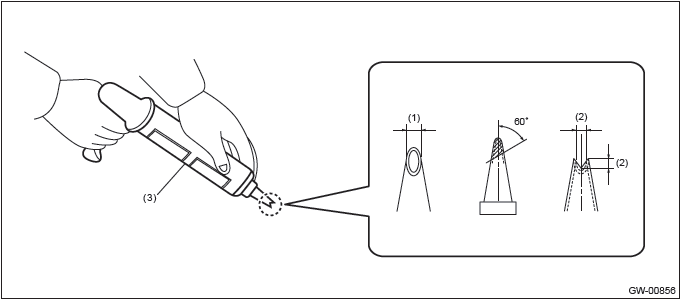
- 10 mm (0.39 in)
- 8 mm (0.31 in)
- Sealant gun
2) Remove the adhesive layer on the body using cutter knife to obtain smooth face of 2 mm (0.08 in) thick.
CAUTION:
- Be careful not to damage the body and paint surface.
- Be sure to keep some of old adhesive.
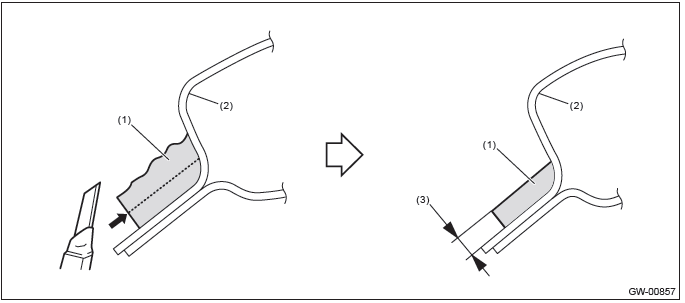
- Adhesive
- Body panel
- 2 mm (0.08 in)
3) Clean the glass and body with alcohol or white gasoline to eliminate cutting powder, dust and dirt completely.
4) Attach the dam rubber to the glass.
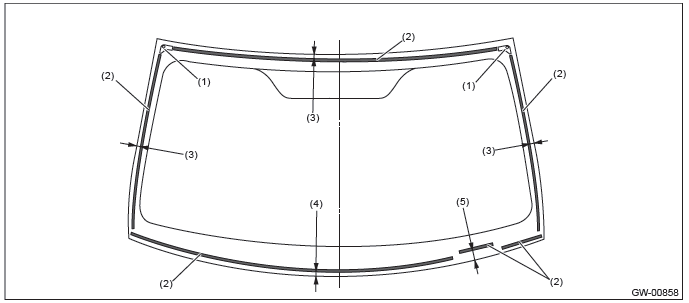
- Locating pin
- Dam rubber
- 15 mm (0.59 in)
- 13.5 mm (0.53 in)
- 23.5 mm (0.92 in)
5) Install the molding to the glass.
CAUTION: Be careful to attach the molding so that the molding has no loose or undulating part.
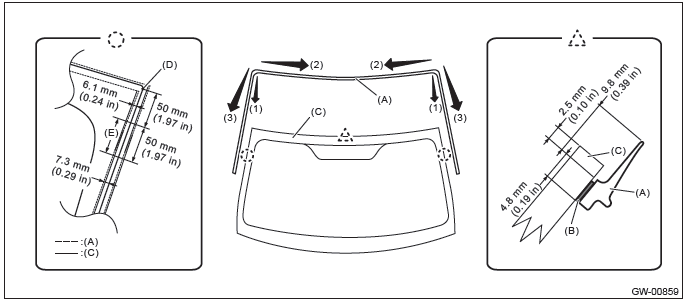
- Align the molding (A) with both ends of the upper edge of the windshield glass (C).
- Install the molding from both corners of the upper edge toward the center.
- Install the molding from both corners of the upper edge toward the lower side.
NOTE: Change the molding installation width within the gradual change range (E) based on the curve end point on the upper end of side area (D).
- Firmly apply the double sided tape (B) of the molding evenly to the glass surface.
6) Install the windshield glass.
- Apply the primer to the adhesive surface of glass side and body side using sponge.
Glass primer:
Dow Automotive's
ESSEX U-401, U-402 or equivalent
Painted surface primer:
Dow Automotive's
ESSEX U-413 or equivalent
NOTE:
- Primer once attached to the painted surface of the body and internal trim is hard to wipe off. Mask the circumference of such area.
- Let primer dry for about ten minutes before installing the glass.
- Do not touch the surface coated with primer.
- Apply adhesive to the glass end back surface.
Adhesive:
Dow Automotive's
ESSEX U-400HV or equivalent
- Application of primer (glass side)
- Application of primer (body side)
- Adhesive
- Molding
- Dam rubber
- Fit the locating pins to vehicle body using suction rubber cup to install the windshield glass.
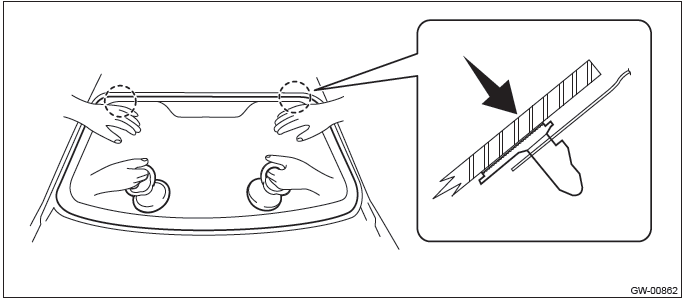
- Lightly press the entire perimeter of windshield glass for tight fit.
- Make flush the adhesive surface jutted out using spatula.
7) After completion of all work, allow the vehicle to stand for about 24 hours.
NOTE:
- When door is opened/closed after glass is bonded, always lower the door glass first, and then open/close it carefully.
- Move the vehicle slowly.
- For minimum drying time and vehicle standing time before driving after bonding, follow instructions or instruction manual from the adhesive manufacturer.
8) After curing of adhesive, pour the water on external surface of vehicle to check that there are no water leaks.
NOTE: When a vehicle is returned to the user, tell him or her that the vehicle should not be subjected to heavy impact for at least three days.
9) Install the cowl panel. <Ref. to EI-34, INSTALLATION, Cowl Panel.>
10) Connect the wiper deicer connector. (Models with wiper deicer)
11) Install the front pillar trim. <Ref. to EI-107, INSTALLATION, Upper Inner Trim.>
12) Connect the battery ground terminal. (Models with wiper deicer)
READ NEXT:
 Rear Gate Glass
A: REMOVAL
1) Disconnect the ground cable from battery.
2) Remove the rear gate trim. <Ref. to EI-160, REMOVAL, Rear Gate Trim.>
3) Remove the rear gate garnish. <Ref. to EI-164, REMOVAL, R
Rearview Mirror
A: REMOVAL
CAUTION:
Be careful not to damage the mirror surface and windshield glass.
1) Remove the TORX bolt, and then slide the rear view mirror to remove.
Preparation tool: TORX T20
2) When the mi
Instrumentation/Driver Info
General Description
A: SPECIFICATION
Combination meter
Clock
B: CAUTION
Before disassembling or reassembling parts, always disconnect the
battery ground cable from battery.
When replacing
SEE MORE:
Vehicle Dynamics Control OFF switch
Pressing the switch to deactivate the Vehicle Dynamics Control system can facilitate
the following operations.
● a standing start on a steeply sloping road with a snowy, gravel-covered, or
otherwise slippery surface
● extrication of the vehicle when its wheels are stuck in mud or
Wheel and Tire System
General Description
A: SPECIFICATION
Offset
P.C.D.
NOTE:
Size and inflation pressure of the standard equipment tire and spare tire for
emergency are described on the "Tire inflation pressure" label attached to the
body side of the driver's door.
1. SERVICE DATA
B: COMPONENT
TPMS & ke
