Subaru Outback (BR): Rear Gate Latch and Actuator Assembly
A: REMOVAL
1) Disconnect the ground cable from battery.
2) Remove the rear gate trim. <Ref. to EI-160, REMOVAL, Rear Gate Trim.>
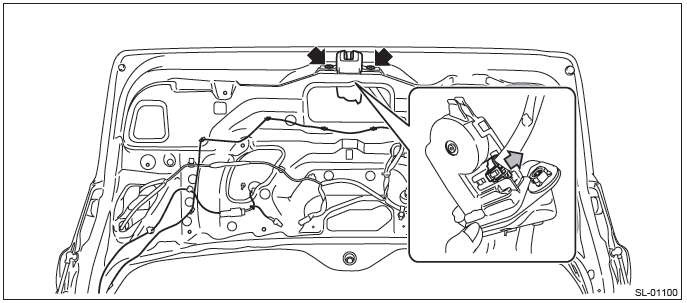
3) Remove the rear gate latch & actuator assembly.
- Remove the bolts and pull out the rear gate latch & actuator assembly to the vehicle front.
- Disconnect the connectors, and then remove the rear gate latch & actuator assembly.
B: INSTALLATION
Install each part in the reverse order of removal.
Tightening torque: Refer to "COMPONENT" of "General Description". <Ref. to SL-3, REAR GATE LOCK AND TRUNK LID LOCK, COMPONENT, General Description.>
C: INSPECTION
1. REAR GATE LATCH
Check if the rear gate latch operates normally.
If latch deformation, abnormal wear, or unsmooth lock operation is observed, replace the rear gate latch & actuator assembly.
2. LOCK ACTUATOR
1) Disconnect the rear gate latch & actuator assembly connector.
2) Check the door lock operation by applying battery voltage between the terminals of rear gate latch & actuator.
Preparation tool: Circuit tester
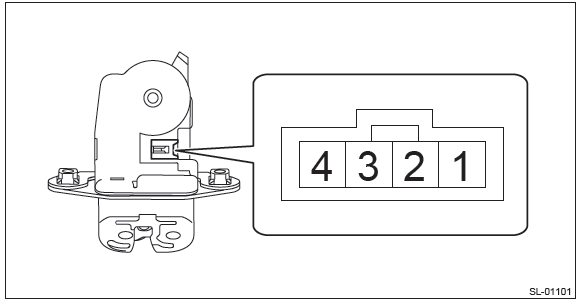

3) If the actuator does not operate normally, replace the rear gate latch & actuator assembly.
Trunk Lid Latch and Actuator Assembly
A: REMOVAL
1) Disconnect the ground cable from battery.
2) Remove the trunk lid trim. <Ref. to EI-127, TRUNK LID TRIM, REMOVAL, Trunk Room Trim.>
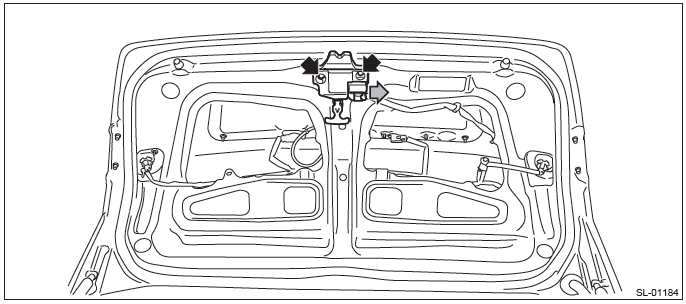
3) Remove the trunk lid latch and actuator assembly.
- Disconnect the connector.
- Remove the bolts, and remove the trunk lid latch & actuator assembly.
B: INSTALLATION
Install each part in the reverse order of removal.
Tightening torque: Refer to "COMPONENT" of "General Description". <Ref. to SL-3, REAR GATE LOCK AND TRUNK LID LOCK, COMPONENT, General Description.>
C: INSPECTION
1. TRUNK LID LATCH
Check if the trunk lid latch operates normally.
If latch deformation, abnormal wear, or unsmooth lock operation is observed, replace the rear gate latch & actuator assembly.
2. LOCK ACTUATOR
1) Disconnect the trunk lid latch & actuator assembly connector.
2) Check the door lock operation by applying battery voltage between the terminals of trunk lid latch & actuator.
Preparation tool: Circuit tester
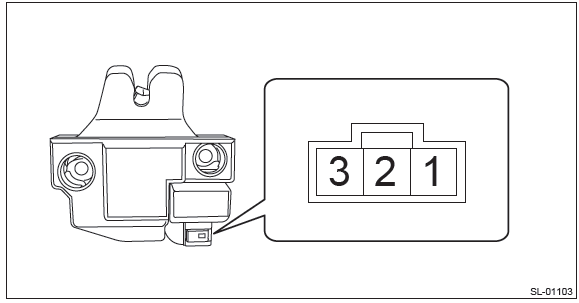

3) If the actuator does not operate normally, replace the trunk lid latch & actuator assembly
Front Hood Lock Assembly
A: REMOVAL
1) Open the front hood.
2) Remove the front bumper face. <Ref. to EI-39, REMOVAL, Front Bumper.>
3) Remove the clips and remove the air intake duct.
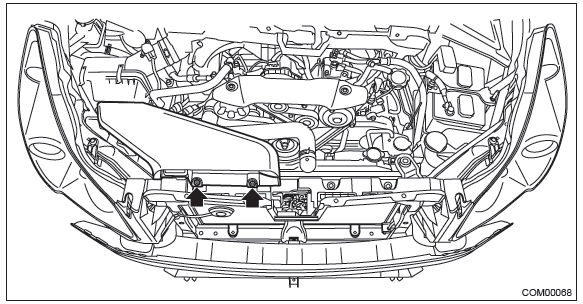
4) Remove the clips and remove the grille bracket.

5) Remove the front hood lock assembly.
- Remove the bolt.
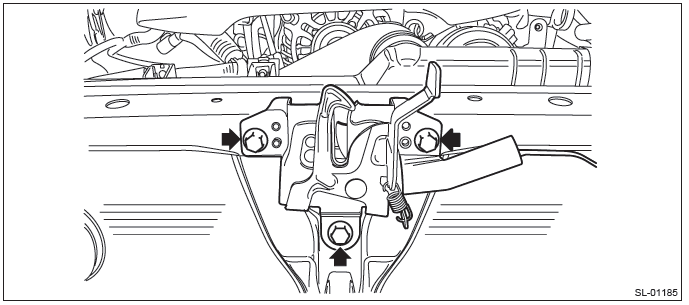
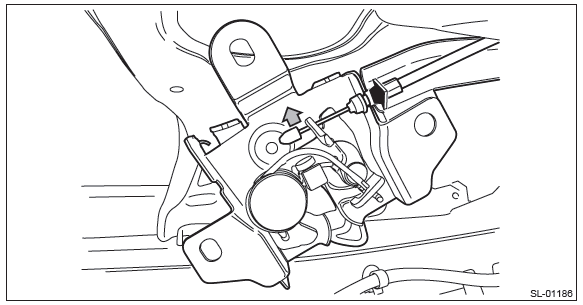
- Remove the release cable, and detach the front hood lock assembly.
B: INSTALLATION
1) Before installation, check the following items.
- Grease is applied sufficiently to cable joints.
If grease is insufficient, add it as necessary before assembling the cable.
2) Install each part in the reverse order of removal.
Tightening torque: Refer to "COMPONENT" of "General Description". <Ref. to SL-4, FRONT HOOD LOCK AND REMOTE OPENERS, COMPONENT, General Description.>
3) Adjust the fog light beam. (Model with fog light) <Ref. to LI-41, FOG LIGHT AIMING, ADJUSTMENT, Front Fog Light Assembly.>
C: ADJUSTMENT
1) Loosen the bolt, and adjust the lock assembly while moving it up and down.
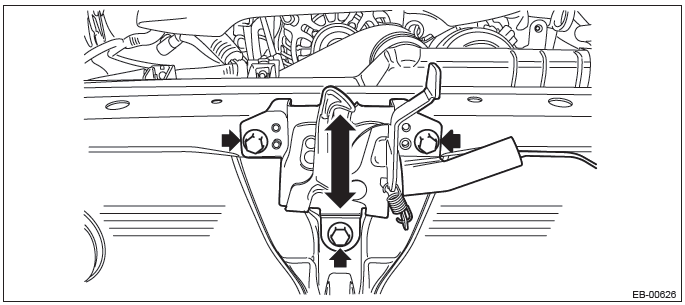
2) After adjustment, tighten the bolts securely.
Tightening torque: Refer to "COMPONENT" of "General Description". <Ref. to SL-4, FRONT HOOD LOCK AND REMOTE OPENERS, COMPONENT, General Description.>
D: INSPECTION
Check if the front hood lock ASSY operates normally.
If latch deformation, abnormal wear, or unsmooth lock operation is observed, replace the front hood lock assembly.
READ NEXT:
 Remote Openers
A: REMOVAL
1. FRONT HOOD OPENER
1) Remove the opener lever.
Remove the cable.
Remove the nut, and detach the opener lever.
2) Remove the following parts and remove the cable clip and cable.
Fro
Key Lock Cylinders
A: REPLACEMENT
1. FRONT DOOR
1) Raise the front door glass to the top position.
2) Remove the door trim. <Ref. to EI-60, FRONT DOOR, REMOVAL, Door Trim.>
3) Remove the sealing cover.
CAUTION:
Keyless Entry Control Module
A: REMOVAL
1. SEDAN MODEL
1) Disconnect the ground cable from battery.
2) Remove the rear shelf trim. <Ref. to EI-120, REMOVAL, Rear Shelf Trim.>
3) Remove the keyless entry control module.
SEE MORE:
Tire care – maintenance and safety practices
● Check on a daily basis that the tires are free from serious damage, nails,
and stones. At the same time, check the tires for abnormal wear.
● Inspect the tire tread regularly and replace the tires before their tread wear
indicators become visible. When a tire’s tread wear indica
Rear Stabilizer
A: REMOVAL
1) Lift up the vehicle, and then remove the rear wheels.
2) Remove the rear stabilizer.
Remove left and right stabilizer links.
Detach the stabilizer clamp and remove the rear stabilizer.
B: INSTALLATION
CAUTION:
Be sure to use a new flange nut and self-locking nut.
Always tighte
