Subaru Outback (BR): Reclining the seatback
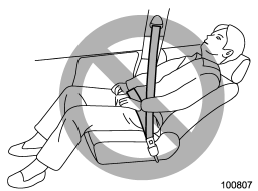
WARNING
To prevent the passenger from sliding under the seatbelt in the event of a collision, always put the seatback in the upright position while the vehicle is in motion. Also, do not place objects such as cushions between the passenger and the seatback. If you do so, the risk of sliding under the lap belt and of the lap belt sliding up over the abdomen will increase, and both can result in serious internal injury or death.
Pull the reclining lever up and adjust the seatback to the desired position. Then release the lever and make sure the seatback is securely locked into place.
The seatback placed in a reclined position can spring back upward with force when the lever is pulled. When operating the reclining lever to return the seatback, hold the seatback lightly so that it may be raised back gradually.
READ NEXT:
 Seat height adjustment (driver’s seat)
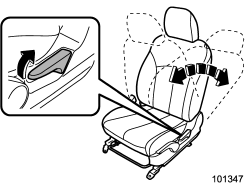
1) When the lever is pushed down, the seat is lowered.
2) When the lever is pulled up, the seat rises.
The height of the seat can be adjusted by moving the seat cushion adjustment
lever up or do
Power seat (if equipped)
WARNING
To prevent the passenger from sliding under the seatbelt in the event of a collision,
always put the seatback in the upright position while the vehicle is in motion.
Also, do not place
Driver’s seat
1) Seat position forward/backward control switch
To adjust the seat forward or backward, move the control switch forward or backward.
During forward/backward adjustment of the seat, you cannot ad
SEE MORE:
Back-up Light Bulb
A: REMOVAL
1. SEDAN MODEL
1) Disconnect the ground cable from battery.
2) Release the lock and remove the bulb inspection cover of trunk room trim.
3) Remove the bulb socket and back-up light bulb.
2. OUTBACK MODEL
1) Disconnect the ground cable from battery.
2) Release the claws and remove the
Replacement of brake pad and lining
CAUTION
If you continue to drive despite the scraping noise from the audible brake pad
wear indicator, it will result in the need for costly brake rotor repair or replacement.
The right front disc brake and the right rear disc brake have audible wear indicators
on the brake pads. If the brak
