Subaru Outback (BR): Driver’s seat
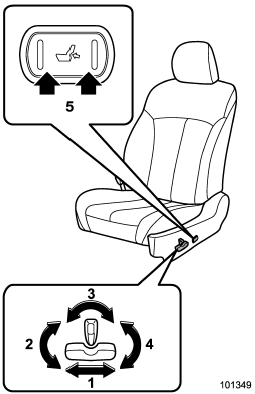
1) Seat position forward/backward control switch To adjust the seat forward or backward, move the control switch forward or backward. During forward/backward adjustment of the seat, you cannot adjust the seat cushion angle or seat cushion height.
2) Seat cushion angle control switch To adjust the seat cushion angle, pull up or push down the front end of the control switch.
3) Seatback angle (reclining) control switch To adjust the angle of the seatback, move the control switch.
4) Seat height control switch To adjust the seat height, pull up or push down the rear end of the control switch.
5) Lumbar support control switch To increase lower back support, push the front side of the switch. To decrease lower back support, push the rear side of the switch.
READ NEXT:
 Front passenger’s seat (if equipped)
1) Seat position forward/backward control switch
To adjust the seat forward or backward, move the control switch forward or backward.
2) Seatback angle (reclining) control switch
To adjust the an
Head restraint adjustment
1) Head restraint
2) Release button
Both the driver’s seat and the front passenger’s seat are equipped with head
restraints.
The head restraint should be adjusted so that the center of the
Seat heater (if equipped)
1) HIGH – Rapid heating
2) LOW – Normal heating
3) OFF – Off
A) Left-hand side
B) Right-hand side
The seat heater operates when the ignition switch is either in the “Acc” or “ON”
SEE MORE:
DTC P1160, P1443, P1492, P1493, P1494, P1495, P1496, P1497, P1498, P1499,
P1518, P1560, P2096, P2097, P2101, P2102, P2103, P2109, P2122, P2123, P2127,
P2128, P2135, P2138, P2227, P2228
DA:DTC P1160 RETURN SPRING FAILURE
NOTE:
For the diagnostic procedure, refer to DTC P2101. <Ref. to EN(H4SO)(diag)-267,
DTC P2101 THROTTLE
ACTUATOR CONTROL MOTOR CIRCUIT RANGE/PERFORMANCE, Diagnostic Procedure with
Diagnostic
Trouble Code (DTC).>
DB:DTC P1443 VENT CONTROL SOLENOID VALVE FUNC
Map light bulb replacing
1. Remove the lens by prying the edge of the lens with a flat-head screwdriver.
2. Turn the bulb until the flat surfaces at its ends are aligned vertically. Pull the bulb straight downward to remove it.
3. Install a new bulb.
4. Reinstall the lens.
