Subaru Outback (BR): Reverse Idler Gear
REMOVAL
1) Remove the manual transmission assembly from the vehicle. <Ref. to 6MT-25, REMOVAL, Manual Transmission Assembly.>
2) Remove the back-up light switch neutral position switch. <Ref. to 6MT-37, REMOVAL, Switches and Harness.>
3) Remove the transfer case together with the extension case assembly. <Ref. to 6MT-40, REMOVAL, Transfer Case and Extension Case Assembly.>
4) Remove the transmission case. <Ref. to 6MT- 57, REMOVAL, Transmission Case.>
5) Remove the drive pinion shaft assembly. <Ref. to 6MT-67, REMOVAL, Drive Pinion Shaft Assembly.>
6) Remove the main shaft assembly for single-range. <Ref. to 6MT-60, REMOVAL, Main Shaft Assembly for Single-Range.>
7) Remove the front differential assembly. <Ref. to 6MT-77, REMOVAL, Front Differential Assembly.>
8) Remove the shifter forks and rods. <Ref. to 6MT- 90, REMOVAL, Shifter Fork and Rod.>
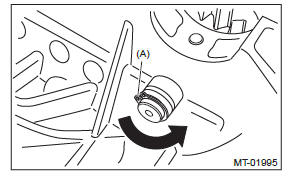
9) Remove the snap ring and bolt. Remove the reverse idler gear bushing and drive out the spring pin by tapping it.
NOTE: When driving out the spring pin, rotate the reverse idler gear shaft to prevent it from contacting the case and remove the spring pin into the case inside.
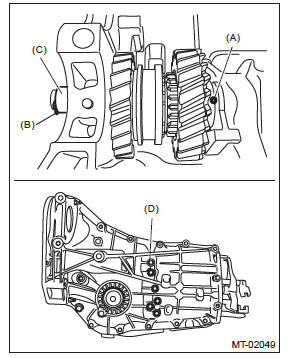
- Spring pin
- Snap ring
- Reverse idler gear bushing
- Bolt
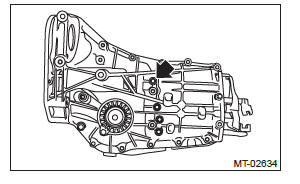
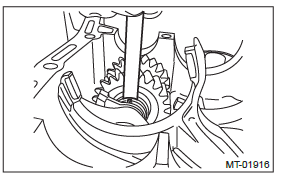
10) Pull out the reverse idler gear shaft toward the rear side and remove all parts.
NOTE: When pulling out the reverse idler gear shaft, remove the reverse idler gear assembly as a unit while supporting it from the bottom by hand to prevent the parts to scatter in the transmission case.
- Oil case guide
- Washer
- Reverse idler gear ASSY
- Reverse idler gear shaft
B: INSTALLATION
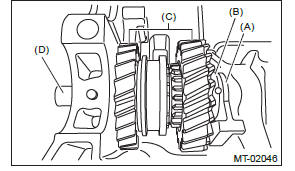
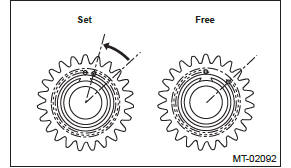
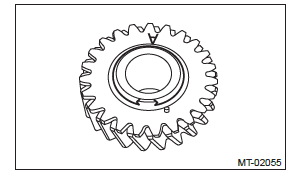
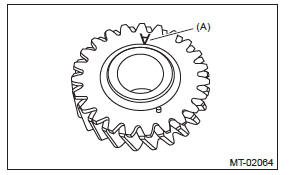
NOTE: Rotate the reverse idler sub gear by two teeth from free status in the direction of the arrow to make it engage with the reverse gear of the main shaft and install the main shaft assembly.
1) Insert the reverse idler gear shaft into the transmission case, then install the oil case guide, washer and reverse idler gear assembly as a single unit.
NOTE:
- Be sure to install the reverse idler gear shaft from rear side.

- Oil case guide
- Washer
- Reverse idler gear ASSY
- Reverse idler gear shaft
- Direction of the reverse idler gear shaft cutout can be either LH side or RH side of the transmission case.
2) Insert the reverse idler gear bushing into reverse idler gear shaft, install the snap ring, and then drive in the spring pin to fix.
NOTE:
- Use new spring pin.
- Spring pin
- Snap ring
- Reverse idler gear bushing
- After installation of snap ring, rotate the snap ring 360º to confirm that it is fitted in the groove completely.
- Snap ring
3) Install the reverse idler gear shaft securing bolt.
NOTE: Use a new gasket.
Tightening torque: 25 N*m (2.5 kgf-m, 18.4 ft-lb)
4) Check and adjust clearance between the reverse idler gear No. 2 and transmission case wall, and the reverse idler gear and reverse idler gear washer. <Ref. to 6MT-88, INSPECTION, Reverse Idler Gear.> <Ref. to 6MT-89, ADJUSTMENT, Reverse Idler Gear.>
5) Install the shifter forks and rods. <Ref. to 6MT- 91, INSTALLATION, Shifter Fork and Rod.>
6) Install the front differential assembly. <Ref. to 6MT-77, INSTALLATION, Front Differential Assembly.>
7) Install the main shaft assembly for single-range. <Ref. to 6MT-60, INSTALLATION, Main Shaft Assembly for Single-Range.>
8) Install the drive pinion shaft assembly. <Ref. to 6MT-67, INSTALLATION, Drive Pinion Shaft Assembly.>
9) Install the transmission case. <Ref. to 6MT-58, INSTALLATION, Transmission Case.>
10) Install the transfer case together with the extension case assembly. <Ref. to 6MT-40, INSTALLATION, Transfer Case and Extension Case Assembly.>
11) Install the back-up light switch and the neutral position switch. <Ref. to 6MT-37, INSTALLATION, Switches and Harness.>
12) Install the manual transmission assembly to the vehicle. <Ref. to 6MT-29, INSTALLATION, Manual Transmission Assembly.>
C: DISASSEMBLY
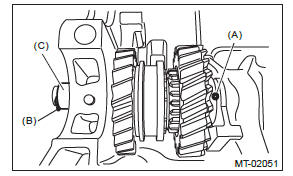
1) Remove the snap ring from the reverse idler gear assembly.
2) Remove the friction plate, reverse idler sub gear and reverse idler spring.
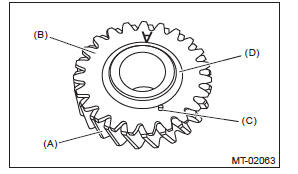
- Reverse idler gear
- Reverse idler sub gear
- Reverse idler spring
- Friction plate
D: ASSEMBLY
1) Insert the reverse idler spring into the holes on reverse idler gear and reverse idler sub gear to install.
NOTE: Install the reverse idler sub gear with the side with the mark on it facing outside.
- Side with the mark facing outside
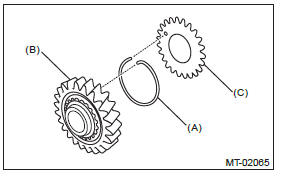
- Reverse idler spring
- Reverse idler gear
- Reverse idler sub gear
2) Install the friction plate, and then secure with the snap ring.
E: INSPECTION
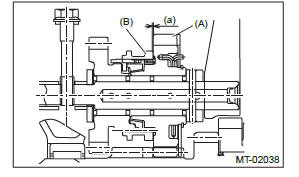
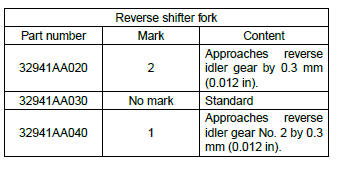
1) Move the reverse shifter rod toward the reverse side. Check the clearance between the reverse idler gear and reverse coupling sleeve. If out of specification, select the appropriate reverse shifter fork and adjust.
Clearance (a): 0.50 - 0.85 mm (0.020 - 0.033 in)

- Reverse idler gear
- Reverse coupling sleeve
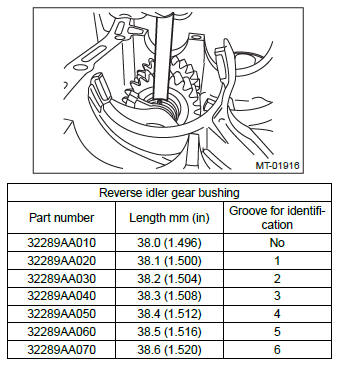
2) After installing a suitable reverse shifter fork, shift into neutral. Check the clearance between the reverse idler gear and reverse idler gear washer. If out of specification, select the appropriate reverse idler gear bushing and adjust.
NOTE: In clearance check, be sure to insert a thickness gauge vertically.
Clearance (a): 0.1 - 0.3 mm (0.004 - 0.012 in)
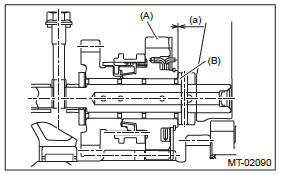
- Reverse idler gear
- Reverse idler gear washer
3) Check the reverse idler gear and shaft for damage.
Replace if it is damaged.
F: ADJUSTMENT
1) Select the appropriate reverse shifter fork from the table below, and adjust until the clearance between the reverse idler gear and reverse coupling sleeve is within specification.
Clearance (a): 0.50 - 0.85 mm (0.020 - 0.033 in)
- Reverse idler gear
- Reverse coupling sleeve
2) Select the appropriate reverse idler gear bushing from the table below, and adjust until the clearance between the reverse idler gear and reverse idler gear washer is within specification.
NOTE: In clearance check, be sure to insert a thickness gauge vertically.
Clearance (a): 0.1 - 0.3 mm (0.004 - 0.012 in)

- Reverse idler gear
- Reverse idler gear washer
READ NEXT:
 Shifter Fork and Rod
A: REMOVAL
1) Remove the manual transmission assembly
from the vehicle. <Ref. to 6MT-25, REMOVAL,
Manual Transmission Assembly.>
2) Remove the back-up light switch and the neutral
position swit
General Description of Clutch System
A: SPECIFICATION
B: COMPONENT
1. CLUTCH ASSEMBLY
Dust cover
Lever spring
Pivot
Release lever (non-turbo model)
Clip (non-turbo model)
Release bearing (non-turbo
SEE MORE:
Programming the transmitters
The remote keyless entry system is equipped with a special code learning feature
that allows you to program new transmitter codes into the system or to delete old
ones. The system can learn up to four unique transmitter codes. The four transmitter
codes may be the same or different.
Programmi
Power Steering Oil Pump
A: REMOVAL
1) Disconnect the ground cable from battery.
2) Remove the V-belts. <Ref. to ME(H4SO)-43, REMOVAL, V-belt.>
3) Remove the power steering oil pump assembly.
Disconnect the connector from power steering pump switch.
Disconnect the pressure hose (b) and suction hose (a)
