Subaru Outback (BR): Continuously Variable Transmission Control Device
A: REMOVAL
1) Remove the transmission assembly from vehicle body. <Ref. to CVT-55, REMOVAL, Automatic Transmission Assembly.>
2) Remove the oil pan and control valve body. <Ref. to CVT-111, REMOVAL, Control Valve Body.>
3) Remove the inhibitor switch. <Ref. to CVT-98, REMOVAL, Inhibitor Switch.>
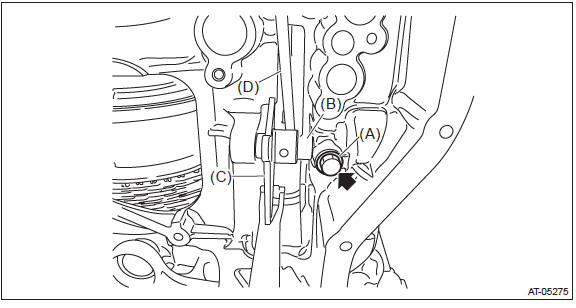
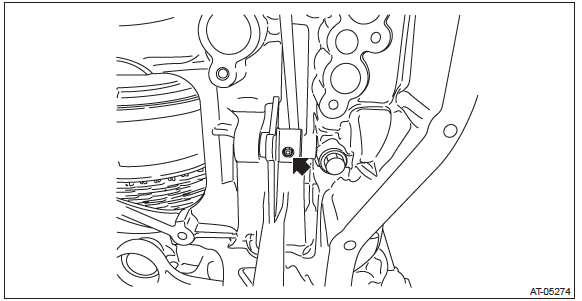
4) Remove the spring pin.
NOTE: Prevent the spring pin from dropping in the transmission using paper towel etc.
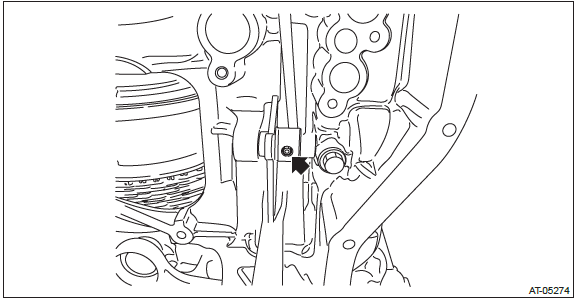
5) Remove the bolt and remove the range select lever, manual plate and parking rod.
NOTE: Do not damage the lip of oil seal press-fitted in the case.
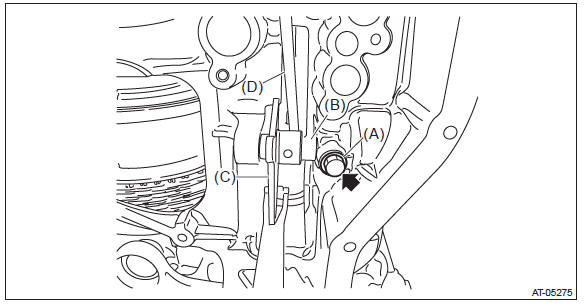
- Bolt
- Range select lever
- Manual plate
- Parking rod
6) Remove the detent spring.
B: INSTALLATION
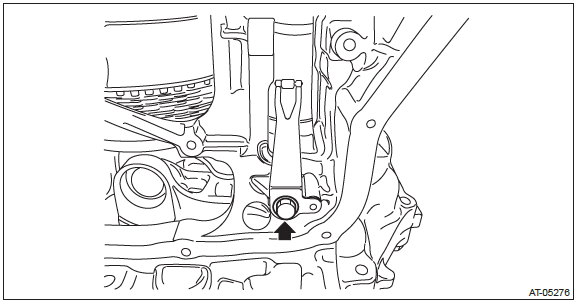
1) Install the detent spring to the transmission case.
Tightening torque: 7 N*m (0.7 kgf-m, 5.2 ft-lb)
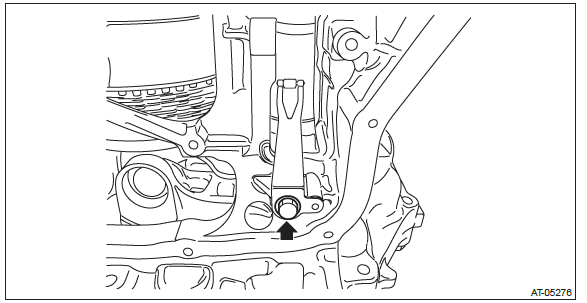
2) Install the manual plate, parking rod, range select lever and bolt.
Tightening torque: 7 N*m (0.7 kgf-m, 5.2 ft-lb)
- Bolt
- Range select lever
- Manual plate
- Parking rod
3) Install the spring pin.
NOTE: Use new spring pin.
4) Install the inhibitor switch. <Ref. to CVT-95, Inhibitor Switch.>
5) Adjust the inhibitor switch. <Ref. to CVT-95, Inhibitor Switch.>
6) Install the control valve body and oil pan. <Ref. to CVT-115, INSTALLATION, Control Valve Body.>
7) Install the transmission assembly to the vehicle. <Ref. to CVT-70, INSTALLATION, Automatic Transmission Assembly.>
C: INSPECTION
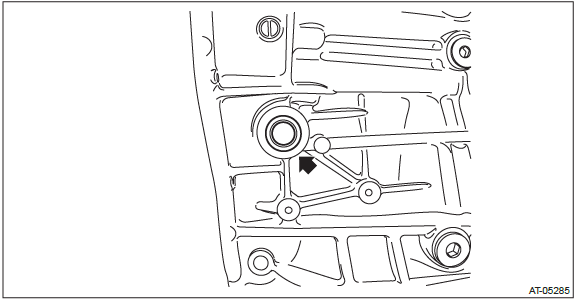
Make sure that the manual lever and detent spring are not worn or otherwise damaged.
Transmission Case
A: REMOVAL
1) Remove the transmission assembly from the vehicle. <Ref. to CVT-55, REMOVAL, Automatic Transmission Assembly.>
2) Remove the air breather hose. <Ref. to CVT-132, REMOVAL, Air Breather Hose.>
3) Remove the transmission harness. <Ref. to CVT-121, REMOVAL, Transmission Harness.>
4) Remove the secondary speed sensor. <Ref. to CVT-102, REMOVAL, Secondary Speed Sensor.>
5) Remove the inhibitor switch. <Ref. to CVT-98, REMOVAL, Inhibitor Switch.>
6) Remove the extension case. <Ref. to CVT-138, REMOVAL, Extension Case.>
7) Remove the rear drive shaft. <Ref. to CVT-141, REMOVAL, Rear Drive Shaft.>
8) Remove the transfer clutch assembly. <Ref. to CVT-146, REMOVAL, Transfer Clutch.>
9) Remove the transfer reduction driven gear assembly. <Ref. to CVT-158, REMOVAL, Transfer Reduction Driven Gear.>
10) Remove the intermediate case. <Ref. to CVT-165, REMOVAL, Intermediate Case.>
11) Remove the forward clutch assembly. <Ref. to CVT-180, REMOVAL, Forward Clutch Assembly.>
12) Remove the reduction driven gear. <Ref. to CVT-200, REMOVAL, Reduction Driven Gear.>
13) Remove the oil pan and control valve body. <Ref. to CVT-111, REMOVAL, Control Valve Body.>
NOTE: When removing the control valve body, also remove the pressure pipe if it is attached on the case.
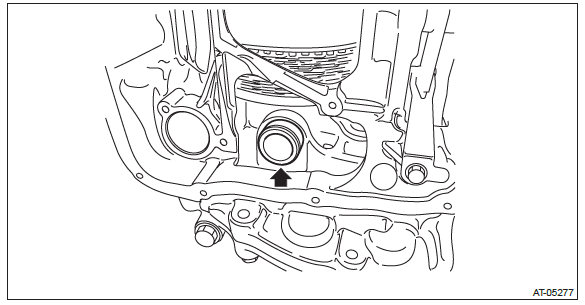
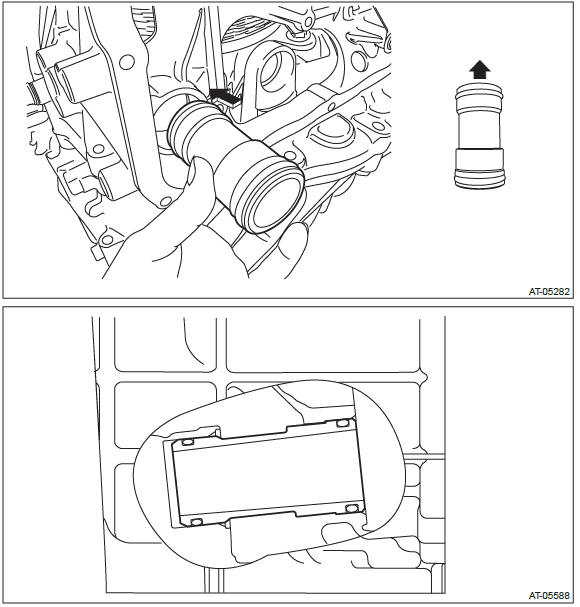
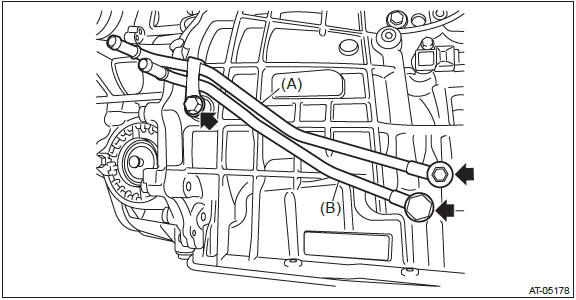
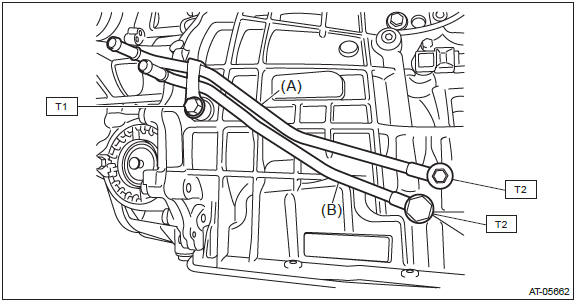
14) Remove the CVTF pipe using a tire lever etc.
NOTE: Remove by hooking the stepped portion of CVTF pipe with a tire lever etc.
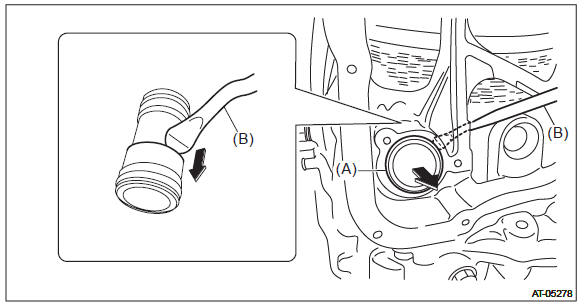
- CVTF pipe
- Tire lever
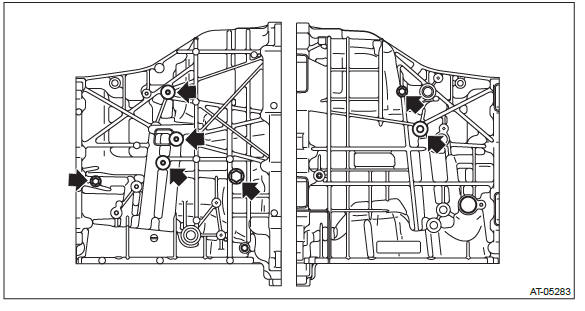
15) Remove the transmission case.
NOTE: The total number of transmission case mounting bolts is 15.
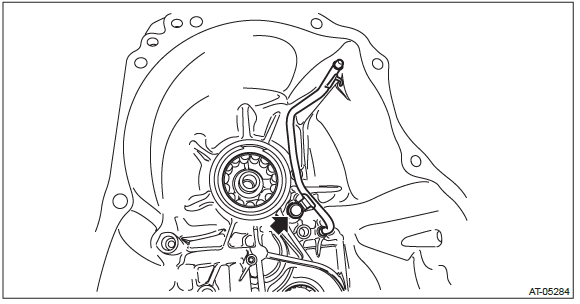
16) Remove the O-ring of lubrication pipe.

17) Remove the control device system. <Ref. to CVT-207, REMOVAL, Transmission Control Device.>
B: INSTALLATION
1) Clean the mating surface of transmission case and converter case.
2) Install the control device system. <Ref. to CVT-209, INSTALLATION, Transmission Control Device.>
3) Install the O-ring to the lubrication pipe.
NOTE:
- Use new O-rings.
- Apply CVTF to the O-ring.
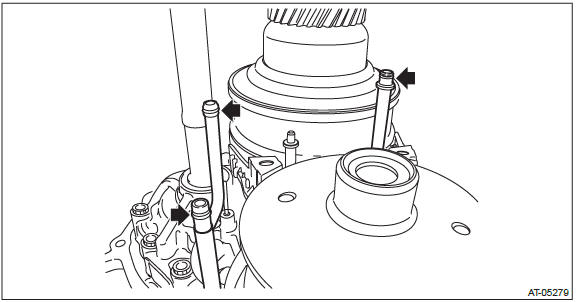
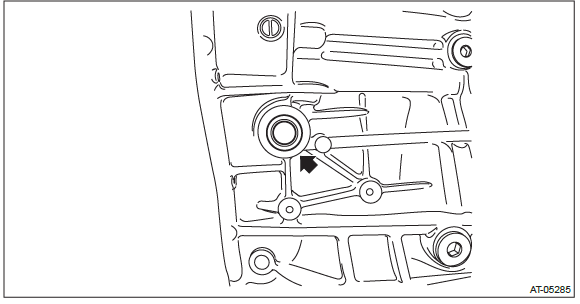
4) Make sure the lubrication pipe and support rod are in vertical position.
5) Apply liquid gasket seamlessly to the mating surface of transmission case.
Liquid gasket: THREE BOND 1215 (Part No. 004403007) or equivalent
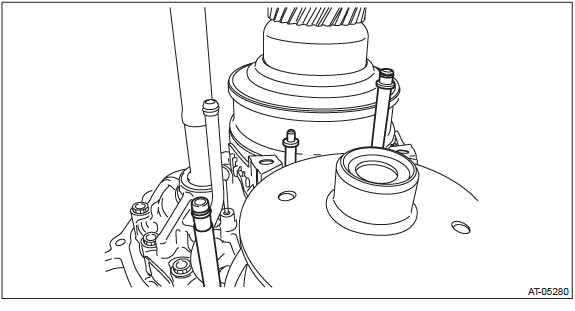
6) Install the transmission case.
CAUTION: If the transmission case gets in contact with the lubrication pipe and support rod, do not install the transmission case forcibly.
NOTE:
- Install while checking the lubrication pipe and support rod is being inserted properly into transmission case.
- If installing the transmission is difficult, check if the lubrication pipe and support rod are bent.
- The total number of transmission case mounting bolts is 15.
Tightening torque: 41 N*m (4.2 kgf-m, 30.2 ft-lb)
7) Install the O-ring to CVTF pipe.
NOTE:
- Use new O-rings.
- Apply CVTF to the O-ring.
8) The smaller opening of CVTF pipe should be inserted to transmission.
NOTE: After installing, make sure the CVTF pipe does not stick out of transmission case.
9) Install the reduction driven gear. <Ref. to CVT-201, INSTALLATION, Reduction Driven Gear.>
10) Install the forward clutch assembly. <Ref. to CVT-181, INSTALLATION, Forward Clutch Assembly.>
11) Install the intermediate case. <Ref. to CVT-166, INSTALLATION, Intermediate Case.>
12) Install the transfer reduction driven gear assembly. <Ref. to CVT-158, INSTALLATION, Transfer Reduction Driven Gear.>
13) Install the transfer clutch assembly. <Ref. to CVT-147, INSTALLATION, Transfer Clutch.>
14) Install the rear drive shaft. <Ref. to CVT-147, INSTALLATION, Transfer Clutch.>
15) Install the extension case. <Ref. to CVT-138, INSTALLATION, Extension Case.>
16) Install the inhibitor switch. <Ref. to CVT-100, INSTALLATION, Inhibitor Switch.>
17) Install the secondary speed sensor. <Ref. to CVT-103, INSTALLATION, Secondary Speed Sensor.>
18) Install the transmission harness. <Ref. to CVT-123, INSTALLATION, Transmission Harness.>
19) Install the control valve body and oil pan. <Ref. to CVT-115, INSTALLATION, Control Valve Body.>
20) Install the air breather hose. <Ref. to CVT-132, INSTALLATION, Air Breather Hose.>
21) Install the transmission assembly to the vehicle. <Ref. to CVT-70, INSTALLATION, Automatic Transmission Assembly.>
C: DISASSEMBLY
1) Remove the CVTF inlet pipe and CVTF outlet pipe.
- CVTF outlet pipe
- CVTF inlet pipe
2) Remove all plugs from the transmission case.
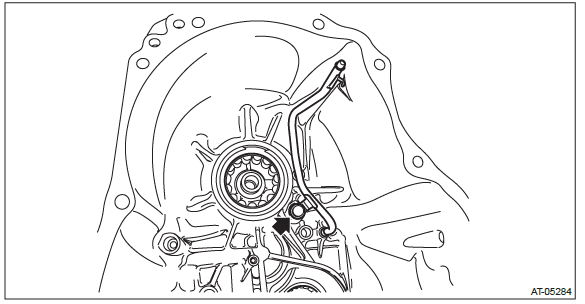
3) Remove the lubrication pipe.
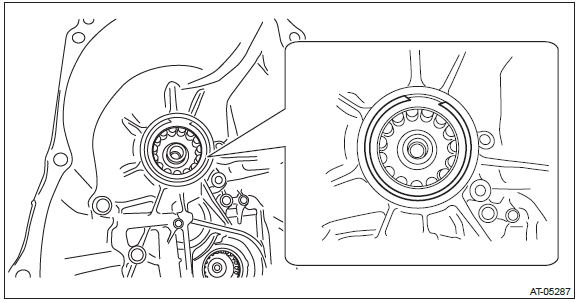
4) Remove the oil seal using a screwdriver wrapped with cloth etc.
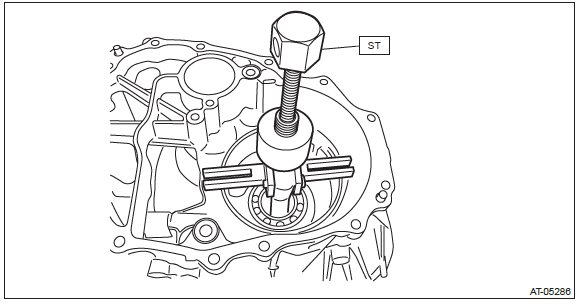
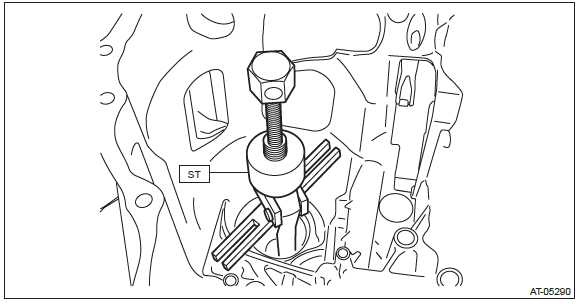
5) Remove the ball bearing from reduction driven gear using ST.
ST 398527700 PULLER ASSY
6) Remove the snap ring on primary pulley side.
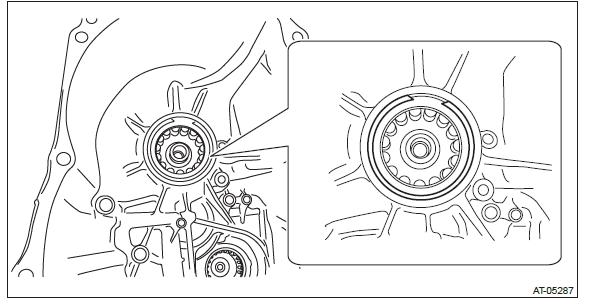
7) Using the ST, remove the roller bearing on primary pulley side.
NOTE: Warm up the bearing area of transmission case using a drier or heat gun.
ST 398527700 PULLER ASSY
8) Remove the snap ring on secondary pulley side.
9) Using the ST, remove the roller bearing on secondary pulley side.
NOTE: Warm up the bearing area of transmission case using a drier or heat gun.
ST 398527700 PULLER ASSY
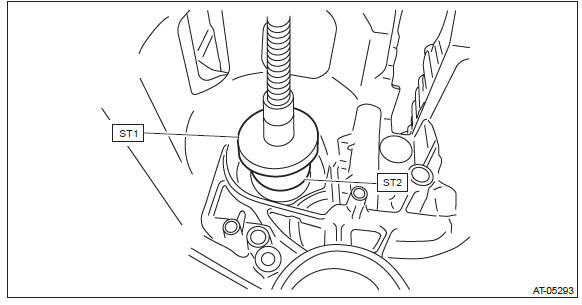
D: ASSEMBLY
1) Using the ST, install the oil seal.
ST 18657AA000 INSTALLER
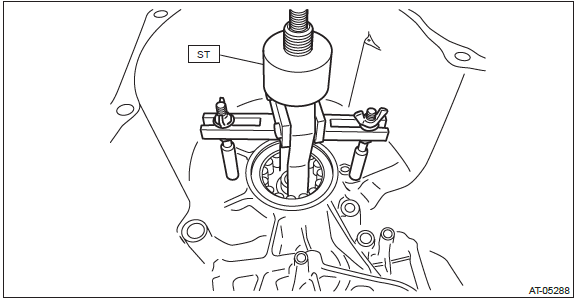
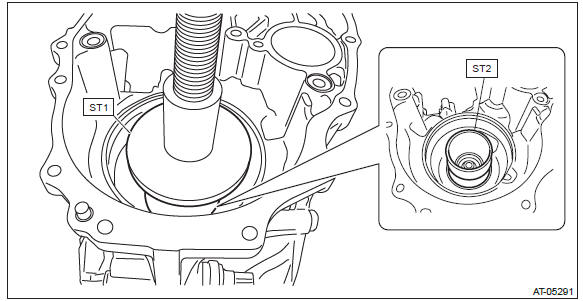
2) Using ST1 and ST2, install the ball bearing on the reduction gear side.
NOTE: Use a new ball bearing.
ST1 398177700 INSTALLER
ST2 499755602 PRESS SNAP RING
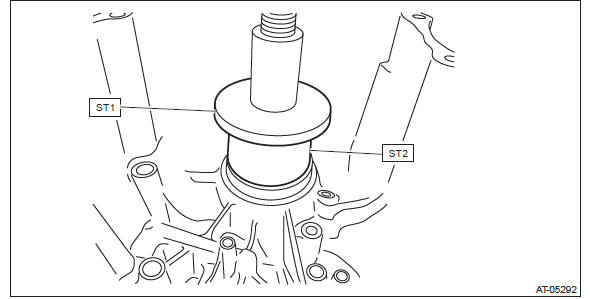
3) Using ST1 and ST2, install the roller bearing on primary pulley side.
NOTE:
- Use a new roller bearing.
- Make adjustment so that PRESS gets in contact with the center of ST2.
ST1 398177700 INSTALLER
ST2 20299AG010 PRESS SNAP RING
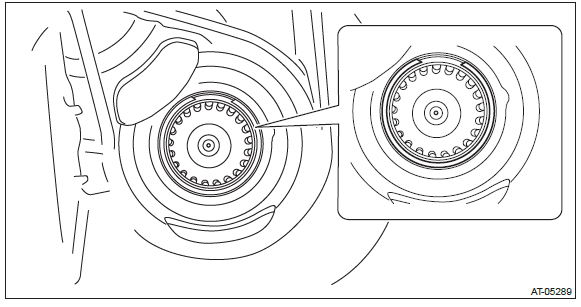
4) Install the snap ring on primary pulley side.
NOTE: Use new snap rings.
5) Using ST1 and ST2, install the roller bearing on secondary pulley side.
NOTE:
- Use a new roller bearing.
- Make adjustment so that PRESS gets in contact with the center of ST2.
ST1 398177700 INSTALLER
ST2 499755602 PRESS SNAP RING
6) Install the snap ring on secondary pulley side.
NOTE: Use new snap rings.

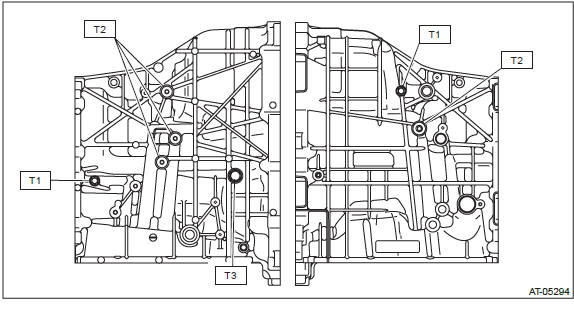
7) Install all plugs.
NOTE: Use new gaskets and O-rings.
Tightening torque:
T1: 13 N*m (1.3 kgf-m, 9.6 ft-lb)
T2: 25 N*m (2.5 kgf-m, 18.4 ft-lb)
T3: 35 N*m (3.5 kgf-m, 25.8 ft-lb)
8) Install the lubrication pipe and O-ring.
NOTE:
- Use new O-rings.
- Apply CVTF to the O-ring.
Tightening torque: 16 N*m (1.6 kgf-m, 11.8 ft-lb)
9) Install the CVTF inlet pipe and CVTF outlet pipe.
NOTE: Use a new gasket.
Tightening torque:
T1: 16 N*m (1.6 kgf-m, 11.8 ft-lb)
T2: 40 N*m (4.1 kgf-m, 29.5 ft-lb)
- CVTF outlet pipe
- CVTF inlet pipe
E: INSPECTION
- Check the transmission case for damage.
- Check for leakage of CVTF from the connection between converter case and transmission case.
- Check for leakage of CVTF from the connection between intermediate case and transmission case.
- Check the lubrication pipe for bend or damage.
- Check the bearing for smooth rotation.
- Check the bearing for seizure or wear.
F: ADJUSTMENT
NOTE: When replacing the transmission case with a new part, perform the following check and adjustment for the selection.
- Select the thrust bearing for the forward clutch assembly. <Ref. to CVT-198, ADJUSTMENT, Forward Clutch Assembly.>
- Select the snap ring for the reduction gear. <Ref. to CVT-205, ADJUSTMENT, Reduction Driven Gear.>
READ NEXT:
 Primary Pulley and Secondary Pulley
A: REMOVAL
NOTE:
Always replace primary pulley and secondary pulley as an assembly because they
are non-disassembled
parts.
1) Remove the transmission assembly from the vehicle. <Ref. to CVT-55,
Drive Pinion Shaft Assembly in Continuously Variable Transmission
A: REMOVAL
1) Remove the transmission assembly from the vehicle. <Ref. to CVT-55, REMOVAL, Automatic Transmission Assembly.>
2) Remove the air breather hose. <Ref. to CVT-132, REMOVAL, Air
Front Differential Assembly in Continuously Variable Transmission
A: REMOVAL
1) Remove the transmission assembly from the vehicle. <Ref. to CVT-55, REMOVAL, Automatic Transmission Assembly.>
2) Remove the air breather hose. <Ref. to CVT-132, REMOVAL, Air
SEE MORE:
Rear Inner Remote
A: REMOVAL
1) Remove the door trim. <Ref. to EI-60, REMOVAL, Door Trim.>
2) Remove the screws and detach the rear inner remote handle.
B: INSTALLATION
1) Before installation, check the following items.
Cable is free from deformation such as fray.
Grease is applied sufficiently to cable jo
Front Reduction Driven Gear
A: REMOVAL
NOTE:
For removal of front reduction driven gear, refer to the "Front Reduction Drive
Gear". <Ref. to CVT-297, REMOVAL,
Front Reduction Drive Gear.>
B: INSTALLATION
NOTE:
For installation of front reduction driven gear, refer to the "Front Reduction
Drive Gear". <Ref. to CVT-29
