Subaru Outback (BR): Continuously Variable Transmission Mounting System
A: REMOVAL
1) Disconnect the ground cable from battery.
2) Lift up the vehicle.
3) Remove the center exhaust pipe. <Ref. to EX(H4SO)-8, REMOVAL, Center Exhaust Pipe.>
4) Remove the heat shield cover.
5) Set the transmission jack under the transmission. Make sure that the support plate of transmission jack does not touch the oil pan.
6) Remove the transmission rear crossmember.
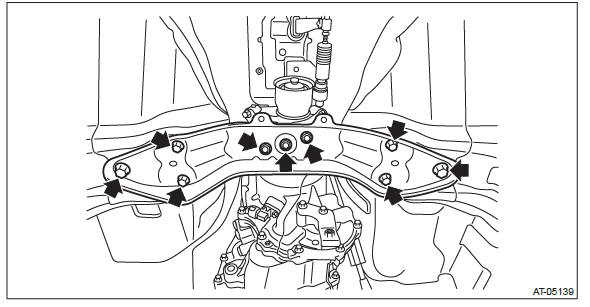
7) Remove the rear cushion rubber.
B: INSTALLATION
1) Attach the rear cushion rubber to the transmission.
Tightening torque: 40 N*m (4.1 kgf-m, 29.5 ft-lb)

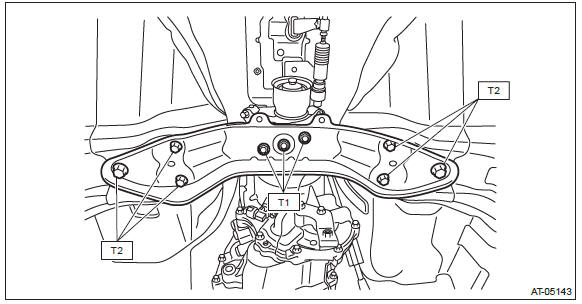
2) Install the crossmember.
Tightening torque:
T1: 35 N*m (3.6 kgf-m, 25.8 ft-lb)
T2: 75 N*m (7.6 kgf-m, 55.3 ft-lb)
3) Remove the transmission jack.
4) Install the heat shield cover.
Tightening torque: 18 N*m (1.8 kgf-m, 13.3 ft-lb)

5) Install the center exhaust pipe. <Ref. to EX(H4SO)-8, INSTALLATION, Center Exhaust Pipe.>
6) Connect the battery ground terminal.
C: INSPECTION
- Check the crossmember for bends or damage.
- Check that the cushion rubber is not stiff, cracked or otherwise damaged.
Extension Case Oil Seal
A: INSPECTION
Check for leakage of CVTF from the joint section of transmission and propeller shaft. If a leak is found, inspect the propeller shaft and replace the oil seal.
B: REPLACEMENT
CAUTION: Immediately after the vehicle has been running or after idling for a long time, the differential gear oil will be hot. Be careful not to burn yourself.
1) Lift up the vehicle.
2) Clean the transmission exterior.
3) Remove the center exhaust pipe. <Ref. to EX(H4SO)-8, REMOVAL, Center Exhaust Pipe.>
4) Remove the heat shield cover.
5) Remove the propeller shaft. <Ref. to DS-10, REMOVAL, Propeller Shaft.>
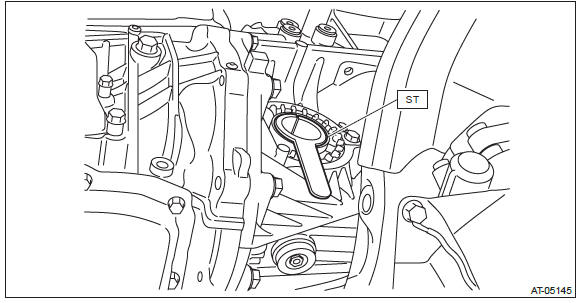
6) Using a screwdriver or ST, remove the oil seal trying not to damage the extension case.
ST 398527700 PULLER ASSY
7) Using the ST, install the oil seal.
NOTE: Use a new oil seal.
ST 498057300 OIL SEAL DRIFT
8) Install the propeller shaft. <Ref. to DS-11, INSTALLATION, Propeller Shaft.>
9) Install the heat shield cover.
Tightening torque: 18 N*m (1.8 kgf-m, 13.3 ft-lb)
10) Install the center exhaust pipe. <Ref. to EX(H4SO)-8, INSTALLATION, Center Exhaust Pipe.>
11) Adjust the CVTF level and check there is no leakage. <Ref. to CVT-37, ADJUSTMENT, CVTF.>
Differential Side Retainer Oil Seal
A: INSPECTION
Check for leakage of gear oil from differential side retainer oil seal part. If there is an oil leak, inspect the front drive shaft and replace the oil seal.
B: REPLACEMENT
CAUTION:
- Immediately after the vehicle has been running or after idling for a long time, the differential gear oil will be hot. Be careful not to burn yourself.
- Be careful not to spill the differential gear oil on exhaust pipe to prevent it from emitting smoke or fire. If differential gear oil is spilled on the exhaust pipe, wipe it off completely.
1) Lift up the vehicle, and remove the front wheels.
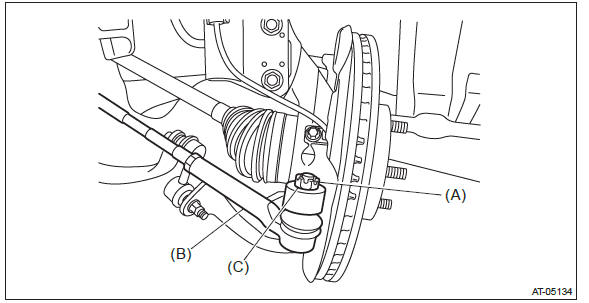
2) After pulling off the cotter pin and removing the castle nut, use a puller to remove the tie-rod end from the knuckle arm.
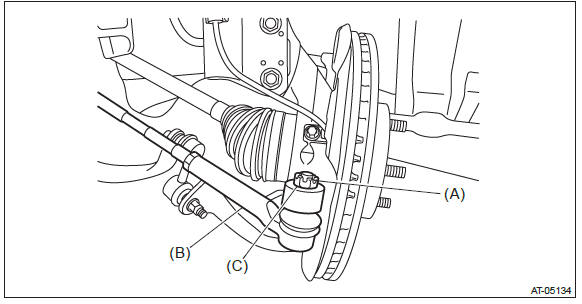
- Cotter pin
- Tie-rod end
- Castle nut
3) Lift up the vehicle.
4) Remove the center exhaust pipe. <Ref. to EX(H4SO)-8, REMOVAL, Center Exhaust Pipe.>
5) Remove the differential gear oil drain plug using TORX bit T70, and then drain differential gear oil.
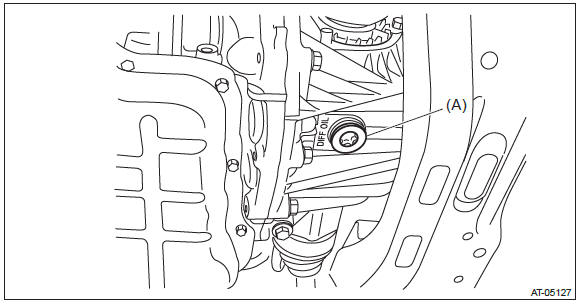
- Differential gear oil drain plug
6) Tighten the differential gear oil drain plug.
NOTE: Use a new gasket.
Tightening torque: 70 N*m (7.1 kgf-m, 51.6 ft-lb)
7) Remove the stabilizer link. <Ref. to FS-29, REMOVAL, Front Stabilizer.>
8) Disconnect the ball joint and housing.
9) Holding the joint of front drive shaft from transmission side, pull out the drive shaft from transmission with care not to stretch the boot.
10) Remove the differential side retainer oil seal using driver wrapped with vinyl tape etc.
11) Using the ST, install the differential side retainer oil seal by lightly tapping with a hammer.
ST 18675AA000 DIFFERENTIAL SIDE OIL SEAL INSTALLER
NOTE:
- Apply differential gear oil to the oil seal lips.
- Oil seal has an identification mark (R, L). When installing oil seals, do not confuse the left and right.

12) Set the ST to side retainer.
ST 28399SA010 OIL SEAL PROTECTOR
13) Replace the circlip of the drive shaft with a new part.
14) Insert the front drive shaft spline section into transmission and remove the ST (DIFFERENTIAL SIDE OIL SEAL INSTALLER).
15) Insert the drive shaft into the transmission securely by pressing the housing from outside of the vehicle.
16) Insert the ball joint into housing and secure with bolt.
Tightening torque: 50 N*m (5.1 kgf-m, 36.9 ft-lb)
CAUTION:
- Do not apply grease to the tapered portion of ball stud.
- Before tightening, make sure the lower side of housing and stepped section of ball joint are in contact.
17) Install the stabilizer link.
Tightening torque: 60 N*m (6.1 kgf-m, 44.3 ft-lb)
18) Install the center exhaust pipe. <Ref. to EX(H4SO)-8, INSTALLATION, Center Exhaust Pipe.>
19) Lower the vehicle.
20) Connect the tie-rod end and knuckle arm, and attach the castle nut.
Tightening torque: 27 N*m (2.75 kgf-m, 19.9 ft-lb)
CAUTION: When connecting, do not hit the cap at the bottom of tie-rod end with hammer.
21) After tightening the castle nut to the specified tightening torque, tighten it further within 60º until the cotter pin hole is aligned with slot in the nut. Fit the cotter pin into the nut, and then bend the pin to lock.
- Cotter pin
- Tie-rod end
- Castle nut
22) Refill differential gear oil from the charge pipe. <Ref. to CVT-41, Differential Gear Oil.>
23) Adjust the level of differential gear oil. <Ref. to CVT-41, ADJUSTMENT, Differential Gear Oil.>
24) Install the front wheels.
READ NEXT:
 Inhibitor Switch
A: INSPECTION
When the driving condition or starter motor operation is improper, first
check the shift linkage for improper operation.
If the shift linkage is functioning properly, check the inhibit
Secondary Speed Sensor
A: REMOVAL
CAUTION:
Be sure to prevent water or oil from contacting the connector terminal of
secondary speed sensor. If
adhesion occurs, replace with a new part.
1) Remove the transmission from the
Control Valve Body
A: REMOVAL
CAUTION:
Directly after the vehicle has been running or the engine has been
long idle running, the CVTF is
hot. Be careful not to burn yourself.
Be careful not to spill CVTF on the ex
SEE MORE:
Throttle Body
A: REMOVAL
1) Disconnect the ground cable from battery.
2) Remove the cover (A) and clip (B) from air intake
boot assembly.
3) Loosen the clamp (A) which connects the air intake
boot assembly and air cleaner case.
4) Loosen the clamp (B) which connects the air intake
boot assembly and throttle bo
Replacing an air filter
1. Remove the glove box.
(1) Open the glove box.
(2) Remove the damper shaft from the glove box.
(3) Pull out the glove box.
2. Remove the cover of the air filter.
3. Remove the air filter.
4. Replace the air filter element with a new one.
5. Reinstall the cover of the air filter.
