Subaru Outback (BR): Trunk Lid
A: REMOVAL
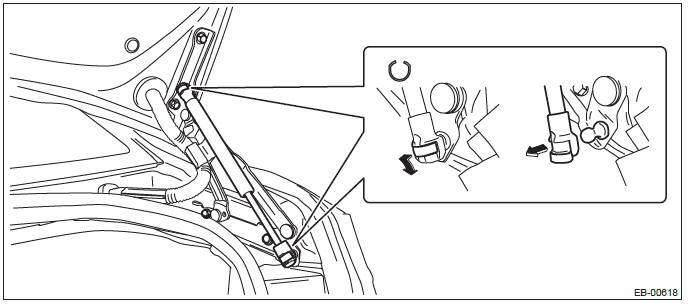
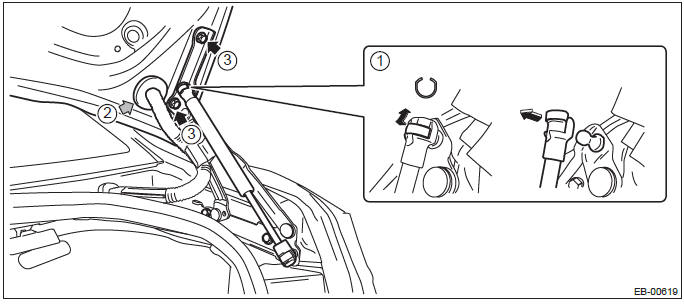
1. TRUNK LID DAMPER STAY
1) Open the trunk lid.
2) Remove the trunk lid damper stay.
- Float the lock pin using a flat tip screwdriver, etc. and slide it.
- Remove the trunk lid damper stay by pulling the damper stay mounting point.
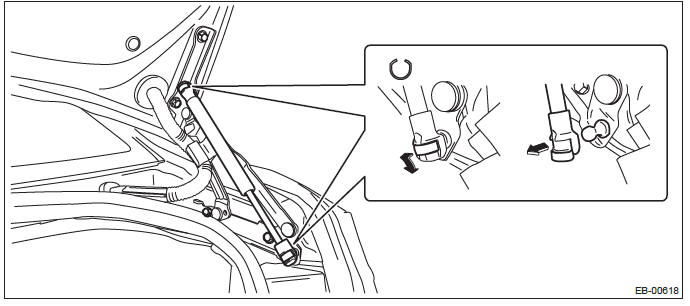
2. TRUNK LID HINGE
1) Open the trunk lid.
2) Remove the trunk lid damper stay.
- Float the lock pin using a flat tip screwdriver, etc. and slide it.
- Remove the trunk lid damper stay by pulling the damper stay mounting point.
3) Remove the trunk lid trim.
- Remove the trunk handle.
- Remove the clips and the trunk lid trim.
4) Remove the trunk lid hinges.
- Disconnect the trunk lid harness connector and remove the grommet, and pull out the trunk lid harness.
- Remove the harness clamps and bolts, and remove the trunk lid panel.
- Remove the bolts, then remove the trunk lid hinge.
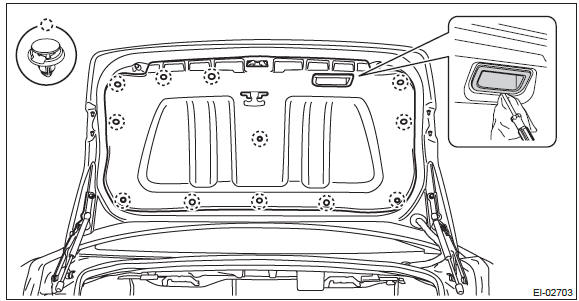
3. TRUNK LID PANEL
1) Disconnect the ground cable from battery.
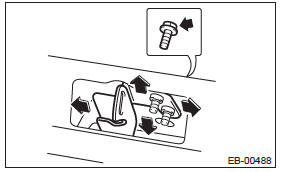
2) Remove the trunk lid trim.
- Remove the trunk handle.
- Remove the clips and the trunk lid trim.

3) Disconnect the connector to remove the trunk lid harness.
4) Remove the trunk lid latch & actuator assembly. <Ref. to SL-49, REMOVAL, Trunk Lid Latch and Actuator Assembly.>
5) Remove the trunk lid garnish. <Ref. to EI-163, REMOVAL, Trunk Lid Garnish.>
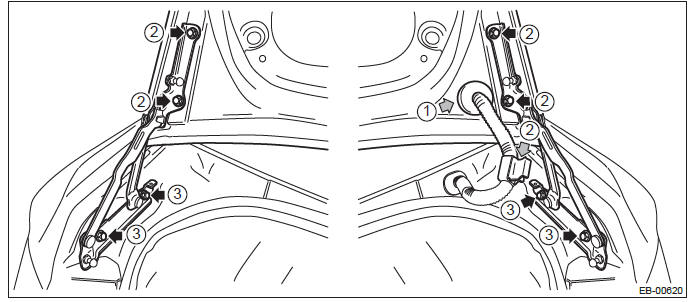
6) Remove the trunk lid panel.
- Remove the left and right damper stay upper.
- Remove the grommet and pull out the trunk lid harness. (RH side only)
- Remove the left and right bolts, and remove the trunk lid panel.
B: INSTALLATION
1) Install each part in the reverse order of removal.
2) Apply grease to the rotating area of hinges and damper stay.
3) Install while paying attention to make a uniform clearance around the trunk lid panel. <Ref. to EB-46, ADJUSTMENT, Trunk Lid.>
Tightening torque: Refer to "COMPONENT" of "General Description". <Ref. to EB-6, TRUNK LID PANEL, COMPONENT, General Description.>
C: ADJUSTMENT
Adjust the clearance around the trunk lid panel as follows.
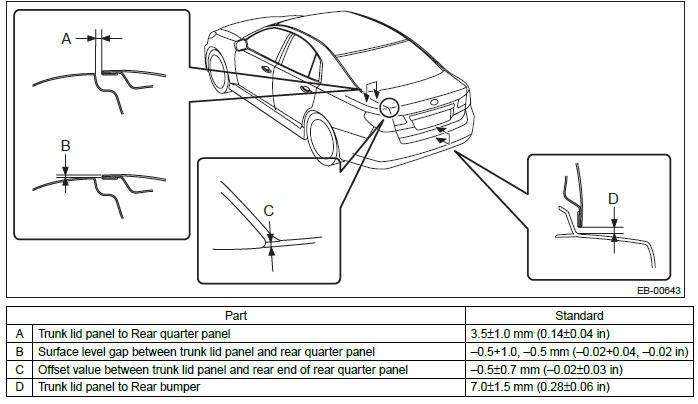
1) Adjust the trunk lid panel lateral position.
- Loosen the mounting bolt.
- Align the trunk lid panel lateral panel dimension.

2) Adjust the gap between trunk lid panel and body surface.
- Loosen the bolt.
- Tap striker using plastic hammer to adjust the gap between trunk lid panel and body surface.
READ NEXT:
 Rear Gate
A: REMOVAL
CAUTION:
Rear gate panels are heavy. When removing and installing them, always work in a
team of two or
more persons.
1. REAR GATE PANEL
1) Disconnect the ground cable from battery.
2) Re
Cruise Control System
General Description
A: COMPONENT
Engine control module (ECM)
Cruise control command switch
Stop light and brake switch
Cruise indicator light and cruise
set indicator light
Transmission contro
Cruise Control System (Diagnostics)
Basic Diagnostic Procedure
A: PROCEDURE
CAUTION:
When performing diagnosis, observe the legal speed limit on the road.
The cancel code will be also appear when cruise control is cancelled
by the
SEE MORE:
Winter driving on 2.5 L turbo models
Original equipment summer tires are installed on your vehicle, which are not suitable for driving on slippery surfaces like snow-covered or icy roads. Compared to winter and all-season tires, summer tires provide much less traction on snowy and icy roads. Therefore, it is highly recommended to use w
Oil Pressure Switch
A: REMOVAL
1) Disconnect the ground cable from battery.
2) Remove the generator. <Ref. to SC(H4SO)-18,
REMOVAL, Generator.>
3) Disconnect the terminal from oil pressure switch.
4) Remove the oil pressure switch.
B: INSTALLATION
1) Apply liquid gasket to the oil pressure switch
threads.
Li
