Subaru Outback (BR): Woofer
A: REMOVAL
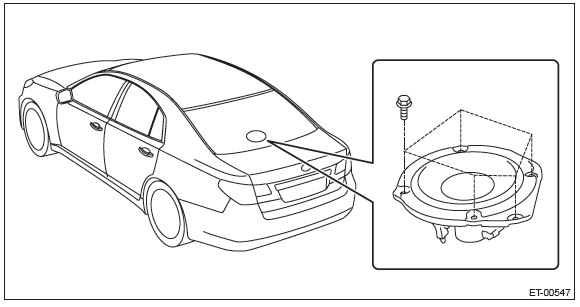
1. SEDAN MODEL
NOTE: harman/kardon audio system only.
1) Disconnect the ground cable from battery.
2) Remove the rear shelf trim. <Ref. to EI-120, REMOVAL, Rear Shelf Trim.>
3) Remove the woofer.
- Remove the screws.
- Disconnect the harness connector and remove the woofer assembly.
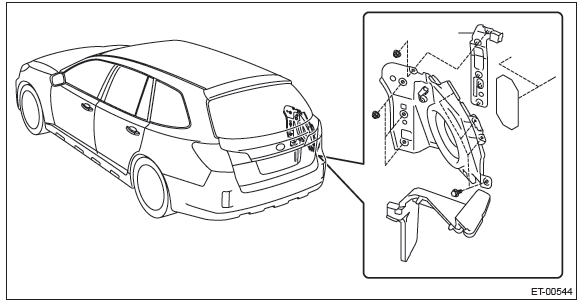
2. OUTBACK MODEL
NOTE: harman/kardon audio system only.
1) Disconnect the ground cable from battery.
2) Remove the rear quarter trim LWR. <Ref. to EI-114, OUTBACK MODEL, REMOVAL, Rear Quarter Trim.>
3) Remove the woofer.
- Remove the woofer bracket mounting clips and screws, then remove the woofer bracket.
- Disconnect the harness connector and remove the woofer assembly.
B: INSTALLATION
Install each part in the reverse order of removal.
Tightening torque: 7.5 N*m (0.76 kgf-m, 5.5 ft-lb)
Power Amplifier
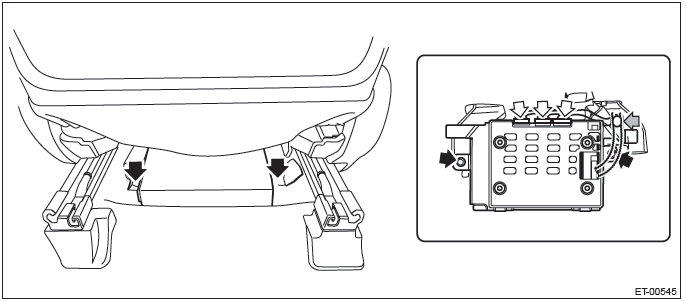
A: REMOVAL
NOTE: harman/kardon audio system only.
1) Disconnect the ground cable from battery.
NOTE: For the power seat, move the seat before removing the battery ground terminal.
2) Move the passenger's seat to the front-most position.
3) Remove the power amplifier.
- Disconnect the harness connector.
- Remove the nut and remove the power amplifier.
B: INSTALLATION
Install each part in the reverse order of removal.
Tightening torque: 4.5 N*m (0.46 kgf-m, 3.32 ft-lb)
READ NEXT:
 Antenna
A: REMOVAL
1. RADIO ANTENNA AMPLIFIER
Sedan model
1) Remove the rear quarter trim LH. <Ref. to EI-110, SEDAN MODEL, REMOVAL,
Rear Quarter Trim.>
2) Remove the radio antenna amplifier assemb
Steering Satellite Switch
A: REMOVAL
CAUTION:
Refer to "CAUTION" of "General Description" before handling the airbag module.
<Ref. to AB-9,
CAUTION, General Description.>
1) Position the front wheels straight ahead. (Af
GPS Antenna
A: REMOVAL
1) Disconnect the ground cable from battery.
2) Remove the center panel assembly.
CAUTION:
Do not put your finger on the fin of the air vent grille. Doing so may damage
the fin.
Attach
SEE MORE:
P (Park)
This position is for parking the vehicle and starting the engine.
In this position, the transmission is mechanically locked to prevent the vehicle
from rolling freely.
When you park the vehicle, first apply the parking brake, then shift into the
“P” position. Do not hold the vehicle with o
Relay and Fuse, Power Window System
A: LOCATION
NOTE: For other related fuses, refer to the wiring diagram. <Ref. to WI-15, Power Supply Circuit.>
B: INSPECTION
1. CHECK FUSE.
1) Remove the fuse and check visually.
2) If the fuse is blown out, replace the fuse.
2. CHECK RELAY
1) Check the resistance between relay ter
