
Subaru Outback (BR): Help line
The help line (distance marker and vehicle width line) is a guide to help you realize the actual distance from the screen.
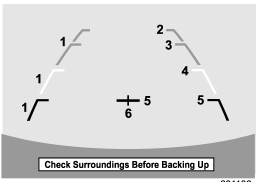
Help lines displayed on the navigation monitor
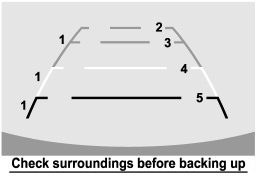
Help lines displayed on the inside mirror
1) Vehicle width line (oblique vertical line) 2) Approx. 10 feet (3 m) from the bumper (green horizontal line) 3) Approx. 6.5 feet (2 m) from the bumper (green horizontal line) 4) Approx. 3 feet (1 m) from the bumper (yellow horizontal line) 5) Approx. 1.5 feet (0.5 m) from the bumper (red horizontal line) 6) Vehicle centerline
When the shift lever or select lever is set to position “R”, the monitor screen displays the help lines together with the rear view image.
CAUTION
● When moving backward, always check the back with your eyes without relying on the help lines.
● The actual position may be different from the indication of the help lines.
● Differences may occur due to number of passengers or loaded cargo.
● When the vehicle is on a slope or when the vehicle is inclined against the road, the indication is different from the actual position.
READ NEXT:
 Difference between screen and actual road
The distance markers show the distance for a level road when the vehicle is not
loaded. It may be different from the actual distance depending on the loading conditions
or road conditions.
When t
Feature of distance marker
1) 3 feet (1 m) line
2) 6.5 feet (2 m) line
3) 10 feet (3 m) line
The distance marker shows the distance on the road. If there is a car or other
object close behind, distance cannot be correctl
SEE MORE:
Windshield washer fluid
CAUTION
Never use engine coolant as washer fluid because it could cause paint damage.
If you spray washer fluid on the windshield but the windshield washer fluid warning
light illuminates or the supply of washer fluid runs out, add washer fluid in the
tank.
Remove the washer tank filler
Front Lateral Link
A: REMOVAL
1) Lift up the vehicle, and then remove the rear wheels.
2) Remove the trailing link.
Remove the bracket, and remove the parking brake cable from the guide
(a).
Remove the bolts and nuts, and then remove the trailing link.
3) Remove the front lateral link.
Remove the snap pin (a
