Subaru Outback (BR): Clutch Pipe and Hose
A: REMOVAL
1) Disconnect the ground cable from battery.
2) Remove the collector cover. (turbo model) 3) Remove the air intake boot assembly. (non-turbo model) <Ref. to IN(H4SO)-8, REMOVAL, Air Intake Boot.>
4) Remove the intercooler. (turbo model) <Ref. to IN(H4DOTC)-17, REMOVAL, Intercooler.>
5) Thoroughly drain the clutch fluid from the reservoir tank.
6) Disconnect the clutch pipe from the clutch hose and connector. Disconnect the reservoir tank hose from the reservoir tank.
CAUTION: Be careful not to spill the clutch fluid. Clutch fluid spilled on the vehicle body will harm the paint surface; wash it off with water and wipe clean quickly if spilled.
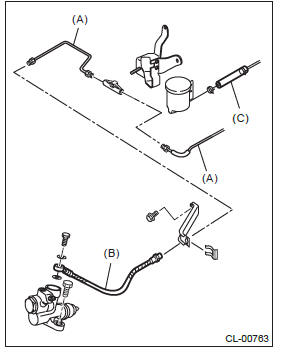
- Clutch pipe
- Clutch hose
- Reservoir tank hose
7) Pull out the clamp, then remove the clutch hose from the clutch bracket.
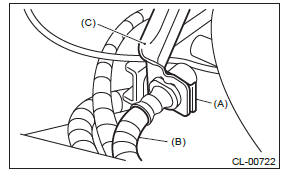
- Clamp
- Clutch hose
- Clutch bracket
8) Disconnect the clutch hose from operating cylinder.
9) Remove the clutch bracket.
10) Remove the instrument panel lower cover.
<Ref. to EI-64, REMOVAL, Instrument Panel Lower Cover.>
11) Remove the pedal assembly. <Ref. to CL-26, REMOVAL, Clutch Pedal.>
12) Remove the clutch pipe from the reservoir tank hose, mass damper, clutch damper, master cylinder and clutch pipe grommet.
- Clutch pipe
- Reservoir tank hose
B: INSTALLATION
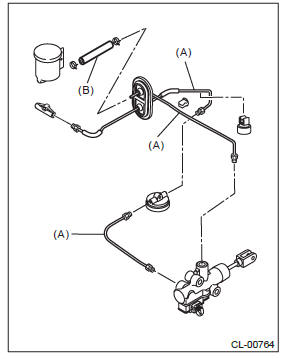
Install in the reverse order of removal.
NOTE: After bleeding air from the clutch fluid, ensure that the clutch operates properly. <Ref. to CL-25, Clutch Fluid Air Bleeding.>
Tightening torque: T: 15 N*m (1.5 kgf-m, 11.1 ft-lb)
- Clutch pipe
- Reservoir tank hose
- Clutch pipe grommet
- Clamp
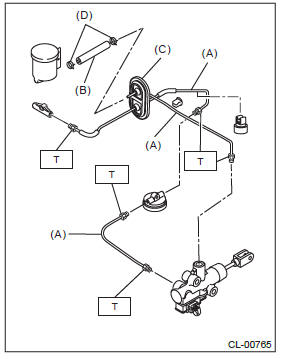
Tightening torque:
T1: 7.5 N*m (0.8 kgf-m, 5.5 ft-lb)
T2: 15 N*m (1.5 kgf-m, 11.1 ft-lb)
T3: 18 N*m (1.8 kgf-m, 13.3 ft-lb)
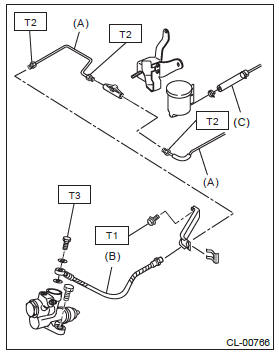
- Clutch pipe
- Clutch hose
- Reservoir tank hose
C: INSPECTION
Check the clutch pipe, reservoir tank hose and clutch hose for crack, breaks or damage. Check the joint for clutch fluid leakage. If crack, breakage, damage or leakage is found, repair or replace the faulty clutch pipe, reservoir tank hose or clutch hose.
READ NEXT:
 Clutch Fluid
A: INSPECTION
1) Park the vehicle on a level surface.
2) Check the clutch fluid level using the scale on
the outside of the reservoir tank. If the clutch fluid
level is below "MIN", fill the clutch f
Clutch Pedal
A: REMOVAL
1) Disconnect the ground cable from battery.
2) Remove the collector cover. (turbo model)
3) Remove the air intake boot assembly. (non-turbo
model) <Ref. to IN(H4SO)-8, INSTALLATION,
Clutch Switch
A: REMOVAL
1) Disconnect the ground cable from battery.
2) Remove the instrument panel lower cover. <Ref.
to EI-64, REMOVAL, Instrument Panel Lower Cover.>
3) Disconnect the connector from clu
SEE MORE:
Center console box (rear)
The center console box has a two-layer structure consisting of an upper compartment
and a lower compartment.
Upper compartment
1) Upper compartment lock release Pull up the upper compartment lock release
to open the upper compartment.
Lower compartment
1) Lower compartment lock release
Choosing a child restraint system
Choose a child restraint system that is appropriate for the child’s age and size
(weight and height) in order to provide the child with proper protection. The child
restraint system should meet all applicable requirements of Federal Motor Vehicle
Safety Standards for United States or Canad
