Subaru Outback (BR): Differential Gear Oil replacement
A: INSPECTION
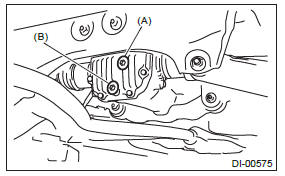
1) Remove the filler plug, and then check the gear oil. Replace the gear oil if it is contaminated, deteriorated or cloudy. <Ref. to DI-23, REPLACEMENT, Differential Gear Oil.>
2) Check that the gear oil level is within -5 mm (- 0.2 in) from the bottom of the filler plug hole. If the level is low, make sure that there is no oil leakage and refill up to the bottom of filler plug hole.
NOTE: On VA1-types at factory settings, the oil level may be within -14 mm (-0.6 in) from the bottom of the filler plug. This is at normal level, requiring no oil refill.
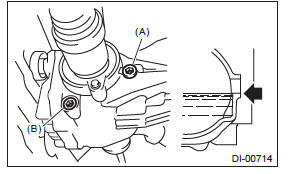
- T-type
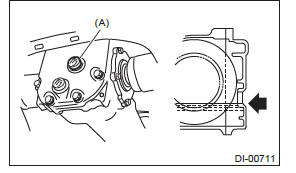
- Filler plug
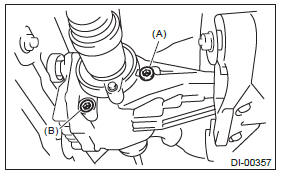
- VA1-type
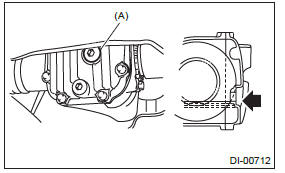
- Filler plug
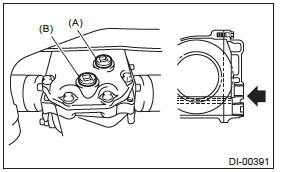
- VA2-type
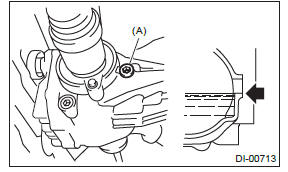
- Filler plug
B: REPLACEMENT
CAUTION:
- Gear oil is extremely hot just after driving. Be wary of receiving burns.
- Be careful not to spill the differential gear oil on exhaust pipe. If gear oil is spilled, wipe it off completely.
1) Lift up the vehicle.
2) Remove the drain plug and filler plug, and drain the gear oil.
- T-type
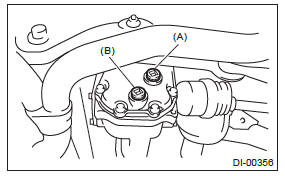
- Filler plug
- Drain plug
- VA1-type
- Filler plug
- Drain plug
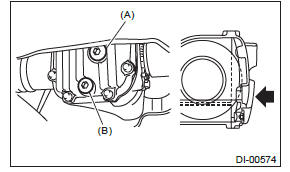
- VA2-type
- Filler plug
- Drain plug
3) Tighten the drain plug.
NOTE:
- For the T-type, apply liquid gasket to the drain plug.
Liquid gasket: THREE BOND 1105 (Part No. 004403010) or equivalent
- For VA type, use a new gasket.
Tightening torque:
T-type
49 N*m (5.0 kgf-m, 36.1 ft-lb)
VA-type:
50 N*m (5.1 kgf-m, 36.9 ft-lb)
4) Fill the differential carrier with gear oil to the bottom of filler plug.
NOTE: Carefully refill gear oil while watching the level. Excessive or insufficient oil must be avoided.
Recommended gear oil: <Ref. to DI-2, SPECIFICATION, General Description.>
Oil capacity: 0.8  (0.8 US qt, 0.7 Imp qt)
- T-type
- Filler plug
- Drain plug
- VA1-type
- Filler plug
- Drain plug
- VA2-type
- Filler plug
- Drain plug
5) Install the filler plug.
NOTE:
- For the T-type, apply liquid gasket to the filler plug.
Liquid gasket: THREE BOND 1105 (Part No. 004403010) or equivalent
- For VA type, use a new gasket.
Tightening torque:
T-type:
49 N*m (5.0 kgf-m, 36.1 ft-lb)
VA-type:
50 N*m (5.1 kgf-m, 36.9 ft-lb)
Front Differential Assembly
A: NOTE
1. CVT MODEL
For front differential for the CVT model, refer to the "CVT" section. <Ref. to CVT-263, Front Differential Assembly.>
2. AT MODEL
For front differential of 5AT model, refer to "5AT" section. <Ref. to 5AT-89, Front Differential Assembly.>
3. MT MODEL
For front differential for the 6MT model, refer to the "6MT" section. <Ref. to 6MT-77, Front Differential Assembly.>
READ NEXT:
 Rear Differential (T-type)
A: REMOVAL
1) Shift the select lever or gear shift lever to neutral.
2) Release the parking brake.
3) Disconnect the ground cable from battery.
4) Loosen the wheel nuts.
5) Lift up the vehicle.
6
Rear Differential (VA-type)
A: REMOVAL
The removal procedure for VA-type is included in
"REMOVAL" for T-type. <Ref. to DI-26, REMOVAL,
Rear Differential (T-type).>
B: INSTALLATION
The installation procedure for VA-type is
Rear Differential Front Oil
Seal
A: INSPECTION
Make sure that there is no leakage from front oil
seal portion. If there is any leakage, replace the oil
seal and inspect the propeller shaft.
B: REPLACEMENT
1) Shift the select lever or
SEE MORE:
Rear Brake Pad
A: REMOVAL
1) Lift up the vehicle, and then remove the rear wheels.
2) Remove the rear brake pad.
Remove the bolts and remove the brake hose bracket.
Remove the caliper bolt, and raise and hold the caliper body.
NOTE:
Do not disconnect the brake hose from the caliper body.
Remove the brake p
Battery (inspection, removal, installation)
A: REMOVAL
1) After disconnecting the battery ground terminal, remove the terminal cover, then disconnect the positive terminal.
2) Remove the battery cable holder from the battery rod.
3) Remove flange nut from the battery rod and remove battery holder.
Remove the battery.
B: INSTALLATION
