Subaru Outback (BR): Rear Differential (VA-type)
A: REMOVAL
The removal procedure for VA-type is included in "REMOVAL" for T-type. <Ref. to DI-26, REMOVAL, Rear Differential (T-type).>
B: INSTALLATION
The installation procedure for VA-type is included in "INSTALLATION" for T-type. <Ref. to DI-28, INSTALLATION, Rear Differential (T-type).>
C: DISASSEMBLY
1. VA1-TYPE
To detect the real cause of trouble, inspect the following items before disassembling.
- Tooth contact and backlash between hypoid driven gear and drive pinion
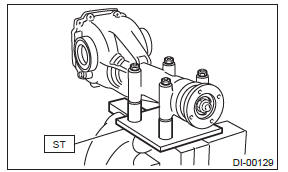
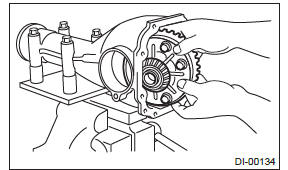
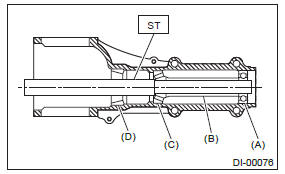
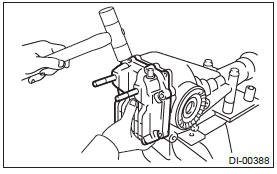
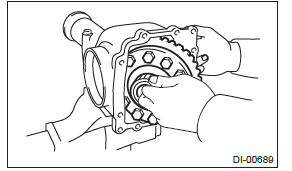
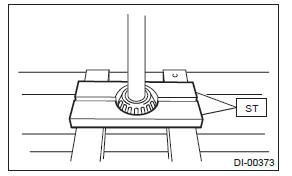
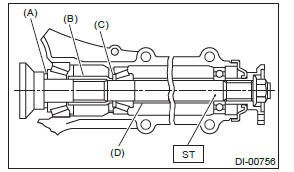
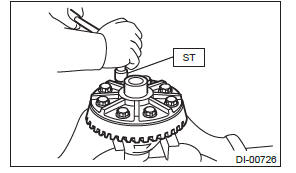
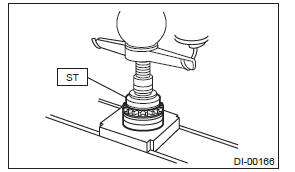
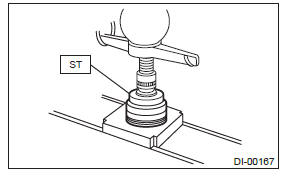
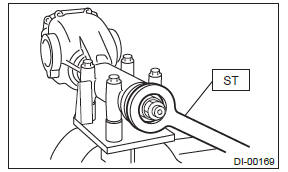
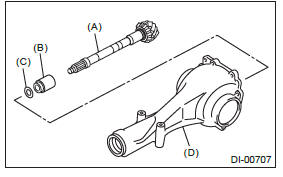
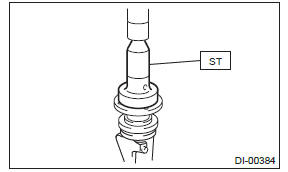
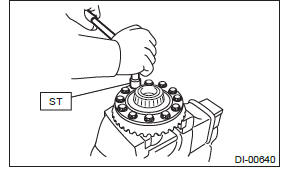
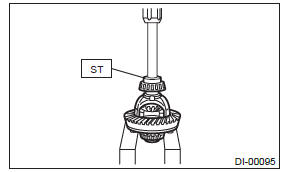
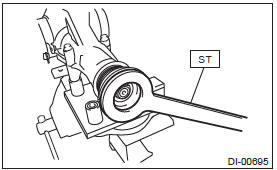
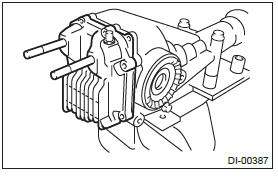
1) Set the ST on vise and install the differential assembly to ST.
ST 398217700 ATTACHMENT SET
2) Remove the drain plug and filler plug.
3) Remove the rear cover by removing retaining bolts.
NOTE: Remove it by tapping with a plastic hammer.
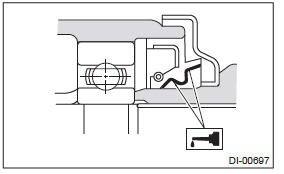
4) Remove the air breather cap.
NOTE:
- Do not attempt to remove the air breather cap unless necessary.
- Whenever the air breather cap is removed, replace it with a new part.
- Air breather cap
- Rear cover
5) Remove the lock plate RH and LH.

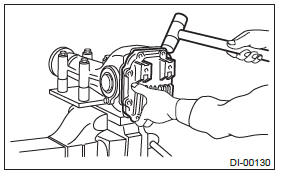
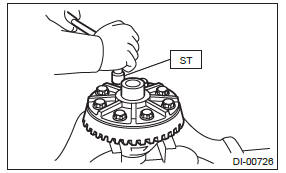
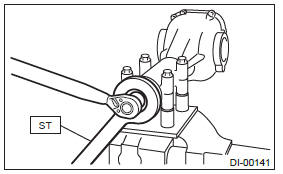
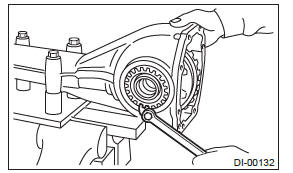
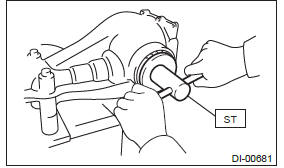
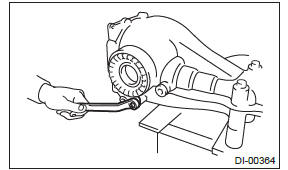
6) Remove the side retainer RH and LH with ST.
NOTE: When keeping the retainers aside, use labels etc. to avoid confusing the left and right.
ST 18630AA010 WRENCH COMPL RETAINER
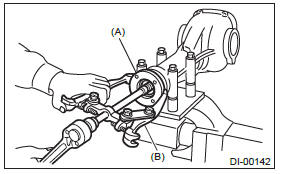
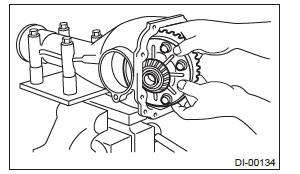
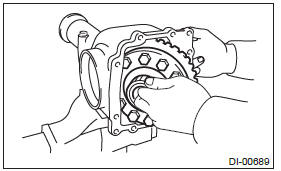
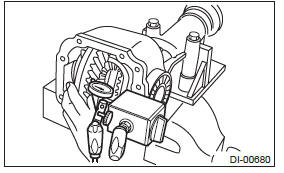
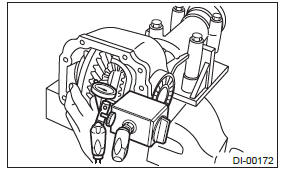
7) Pull out the differential case assembly from differential carrier.
NOTE: Be careful not to hit the teeth of hypoid driven gear against the differential carrier.
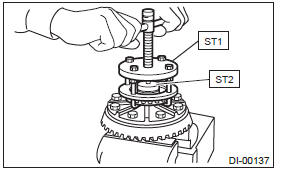
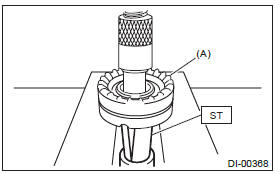
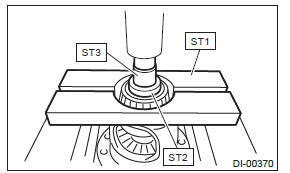
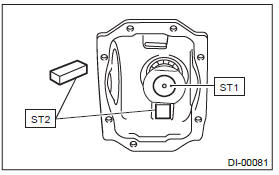
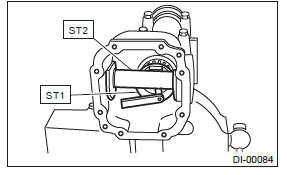
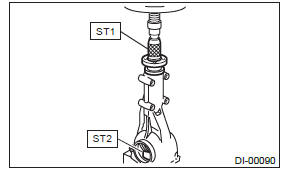
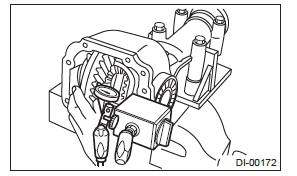
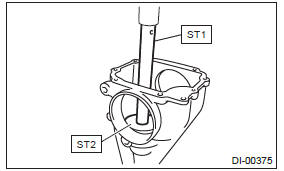
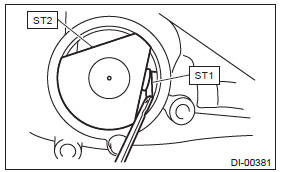
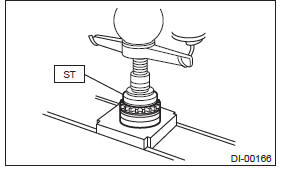
8) Remove the bearing race from side retainer RH and LH with ST1 and ST2.
ST1 499705401 PULLER ASSY
ST2 499705404 SEAT

- Bearing race
- Side retainer
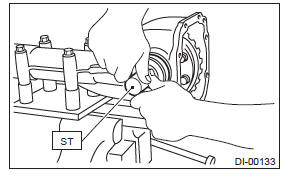
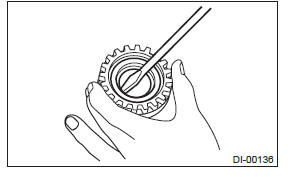
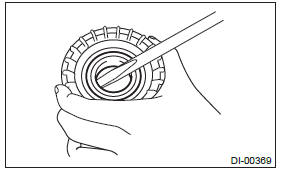
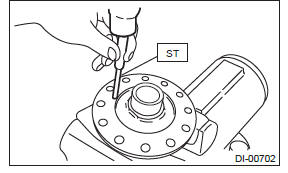
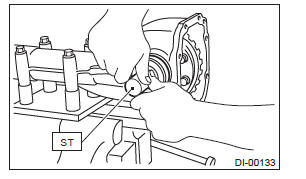
9) Remove the oil seal from the RH and LH side retainers using a screwdriver.
NOTE: Perform this operation only when changing oil seal.
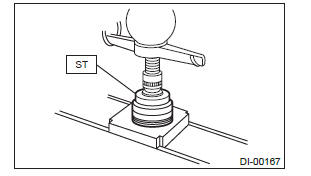
10) Extract the bearing cone with ST1 and ST2.
NOTE:
- Do not attempt to disassemble the parts unless necessary.
- Set the puller so that its claws catch the edge of the bearing cone.
- Store so that the right and left side bearing races and cones are not mixed together.
ST1 899524100 PULLER SET
ST2 399520105 SEAT
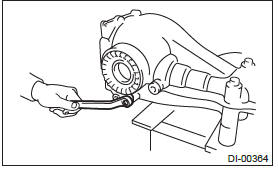
11) Using the ST, loosen the hypoid driven gear bolt and remove the hypoid driven gear.
ST 18270KA020 SOCKET (E20)
12) Remove the spring pin from hypoid driven gear side using ST.
ST 899904100 STRAIGHT PIN REMOVER
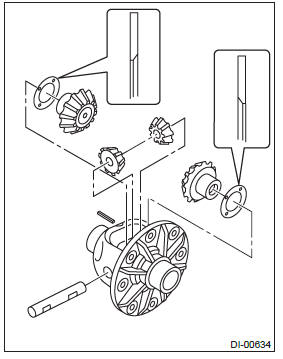
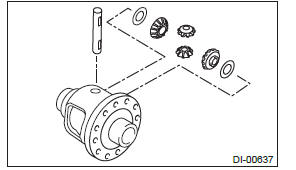
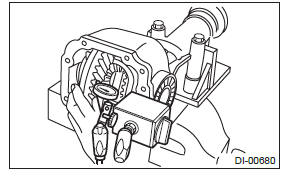
13) Draw out the pinion mate shaft and remove pinion mate gears, side gears and thrust washers.
NOTE: The gears and washers should be marked with RH or LH, front or rear, or kept separately.
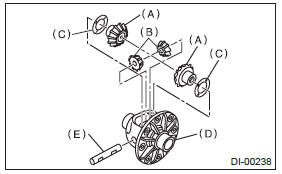
- Side gear
- Pinion mate gear
- Thrust washer
- Differential case
- Pinion mate shaft
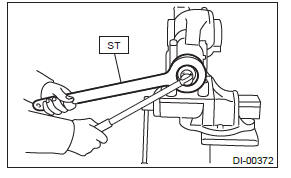
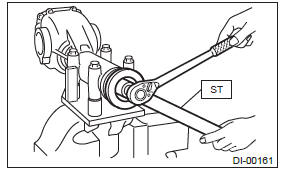
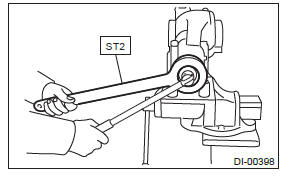
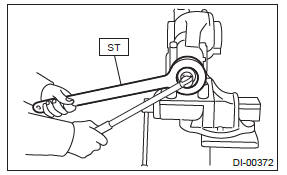
14) Remove the self-locking nut while securing the companion flange with ST.
ST 498427200 FLANGE WRENCH
15) Extract the companion flange with a puller.
- Companion flange
- Puller
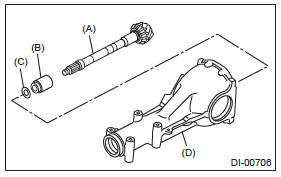
16) Press the end of drive pinion shaft and extract it together with rear bearing cone, pinion height adjusting washer and washer by using the ST.
NOTE: Hold the drive pinion so as not to drop it.
ST 398467700 DRIFT
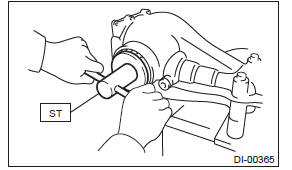
17) Remove the rear bearing cone from drive pinion by supporting the cone with ST.
NOTE: Place the replacer so that its center-recessed side faces the bearing cone.
ST 498515500 REPLACER

18) Remove the front oil seal from differential carrier using ST.
ST 398527700 PULLER ASSY
- Differential carrier
- Front oil seal
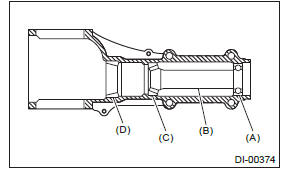
19) Remove the pilot bearing together with the front bearing cone and spacer using the ST.
ST 398467700 DRIFT
- Pilot bearing
- Spacer
- Front bearing
- Rear bearing cup
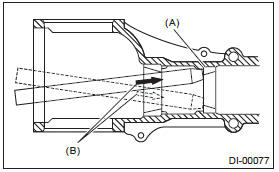
20) When replacing the bearings, hit out the front bearing cup and rear bearing cup in this order using a brass bar.
- 2 cutout portions along diagonal lines
- Tap alternately with brass bar.
2. VA2-TYPE
To detect the real cause of trouble, inspect the following items before disassembling.
- Tooth contact and backlash between hypoid driven gear and drive pinion
1) Set the ST on vise and install the differential assembly to ST.
ST 398217700 ATTACHMENT SET

2) Remove the drain plug and filler plug.
3) Remove the rear cover by removing retaining bolts.
NOTE: Remove it by tapping with a plastic hammer.
4) Remove the air breather cap.
NOTE:
- Do not attempt to remove the air breather cap unless necessary.
- Whenever the air breather cap is removed, replace it with a new part.
- Air breather cap
- Rear cover
5) Remove the lock plate RH and LH.
6) Remove the side retainer RH and LH with ST.
NOTE: When keeping the retainers aside, use labels etc. to avoid confusing the left and right.
ST 18630AA010 WRENCH COMPL RETAINER
7) Pull out the differential case assembly from differential carrier.
NOTE: Be careful not to hit the teeth of hypoid driven gear against the differential carrier.
8) Remove the bearing race from side retainer RH and LH with ST and the press.
NOTE:
- Be sure to turn the bolt of the ST by hand.
- Set the puller so that its claws catch the groove of side retainer.
ST 18758AA000 PULLER
- Groove
- Claw
- Side retainer
9) Remove the oil seal from the RH and LH side retainers using a screwdriver.
NOTE: Perform this operation only when changing oil seal.
10) Extract the bearing cone with ST1, ST2 and ST3.
NOTE:
- Do not attempt to disassemble the parts unless necessary.
- Never mix up the RH and LH bearing races and cones.
ST1 498077000 REMOVER
ST2 399520105 SEAT
ST3 899864100 REMOVER
11) Using the ST, loosen the hypoid driven gear bolt and remove the hypoid driven gear.
ST 18270KA020 SOCKET (E20)

12) Remove the spring pin from hypoid driven gear side using ST.
ST 899904100 STRAIGHT PIN REMOVER
13) Draw out the pinion mate shaft and remove pinion mate gears, side gears and thrust washers.
NOTE: The gears and washers should be marked with RH or LH, front or rear, or kept separately.

- Side gear
- Pinion mate gear
- Thrust washer
- Differential case
- Pinion mate shaft
14) Remove the circlip from the side gear.
15) Remove the self-locking nut while securing the companion flange with ST.
ST 498427200 FLANGE WRENCH
16) Extract the companion flange using a puller.
- Companion flange
- Puller
17) Remove the drive pinion shaft.
18) Remove the rear bearing cone from drive pinion by supporting the cone with ST.
NOTE: Place the replacer so that its center-recessed side faces the bearing cone.
ST 398517700 REPLACER
19) Remove the front oil seal from differential carrier using screwdriver.
20) Remove the pilot bearing, front bearing cone and spacer.
- Pilot bearing
- Spacer
- Front bearing
- Rear bearing race
21) When replacing the bearings, tap out the front bearing race and rear bearing race in this order using a brass bar to remove them.
- 2 cutout portions along diagonal lines
- Tap alternately with brass bar.
D: ASSEMBLY
1. VA1-TYPE
NOTE:
- Assemble in the reverse order of disassembly.
- Check and adjust each part during assembly.
- Use new gaskets and O-rings.
- Keep the shims and washers in order, so that they are not improperly installed.
- Thoroughly clean the surfaces on which the shims, washers and bearings are to be installed.
- Apply gear oil when installing the bearings and thrust washers.
- Be careful not to mix up the RH and LH bearing races.
- Replace the oil seal and O-ring with a new part at every disassembly.
- Be careful not to mix up the side oil seal RH and LH.
- Apply differential gear oil to the lips when installing the oil seal.
1) Adjusting preload for front and rear bearings NOTE: Adjust the bearing preload between front and rear bearings with preload adjusting spacer and washer.
Pinion height adjusting washer is not affected by this adjustment. The adjustment must be carried out with oil seal removed.
- Install the rear bearing race into the differential carrier using ST1 and ST2.
ST1 398477701 HANDLE
ST2 398477702 DRIFT
- Install the front bearing race to the differential carrier using ST1 and ST2.
ST1 398477701 HANDLE
ST2 498447110 DRIFT
- Insert the front bearing cone.
NOTE: Use new front bearing cone.
- Measure and record the thickness of pinion height adjusting washer.
NOTE: If tooth contact (drive pinion and hypoid driven gear) is normal in the inspection before disassembling, verify that the washer is not deformed, and then reuse the used washer.
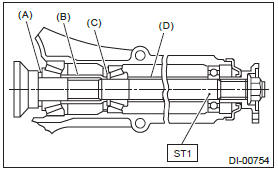
- Insert the ST (DUMMY SHAFT) into case with the pinion height adjusting washer and rear bearing cone fitted onto it.
NOTE: Use new rear bearing cone.
- Install the preload adjusting spacer, washer, front bearing cone, spacer, pilot bearing, companion flange, and self-locking nut.
ST 498447150 DUMMY SHAFT
Part No. 32285AA000 Spacer
- Pinion height adjusting washer
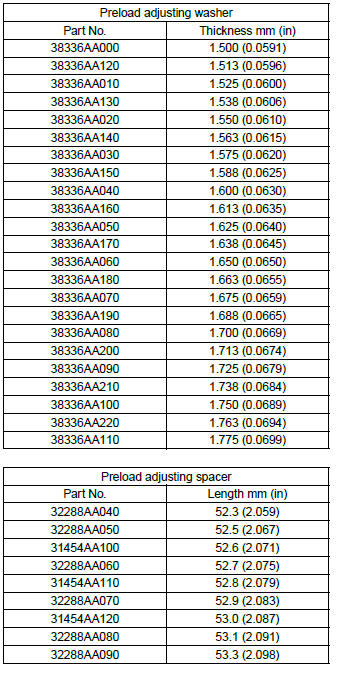
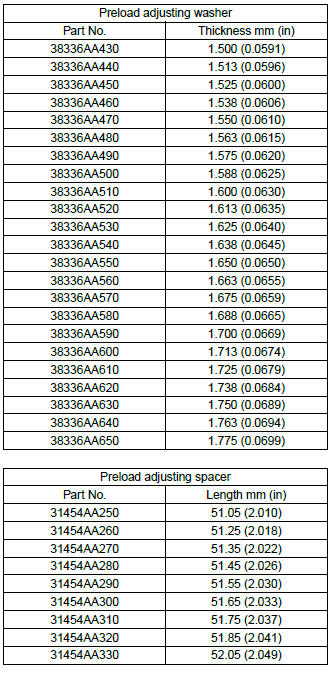
- Preload adjusting spacer
- Preload adjusting washer
- Spacer (SUBARU genuine parts)
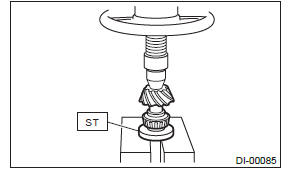
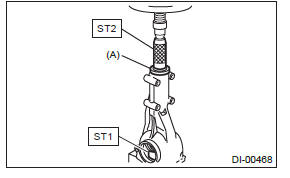
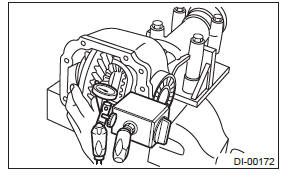
- Turn the ST by hand to slowly seat the bearing, and tighten the self-locking nut while measuring the initial load or initial torque with a spring scale or torque wrench. Select the preload adjusting washer and spacer so that the specified preload is obtained when nut is tightened to the specified torque.
NOTE:
- Use a new self-locking nut.
- Measure the preload in direction of tangent to the flange.
- Be careful not to give excessive preload.
- When tightening the self-locking nut, lock ST1 with ST2 as shown in the figure.
ST1 498447150 DUMMY SHAFT
ST2 398507704 BLOCK
Tightening torque: 191 N*m (19.5 kgf-m, 140.9 ft-lb)
Initial load: 12.7 - 32.2 N (1.3 - 3.3 kgf, 2.9 - 7.2 lbf)
Initial torque: 0.48 - 1.22 N*m (0.05 - 0.12 kgf-m, 0.35 - 0.90 ft-lb)
2) Adjusting drive pinion height: Adjust the drive pinion height with pinion height adjusting washer installed between the rear bearing cone and the back of pinion gear.
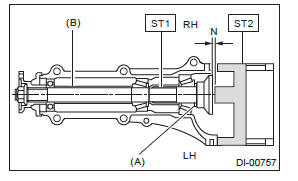
- Attach the ST2.
NOTE: At this time, install a provisionally selected or previously used pinion height adjusting washer.
ST1 498447150 DUMMY SHAFT
ST2 498505501 DIFFERENTIAL CARRIER
GAUGE
Part No. 32285AA000 Spacer
- Pinion height adjusting washer
- Spacer (SUBARU genuine parts)
- Measure the clearance "N" between the end of ST2 and the end surface of ST1 by using a thickness gauge.
NOTE: Make sure there is no clearance between the differential carrier and ST2.
ST1 498447150 DUMMY SHAFT
ST2 498505501 DIFFERENTIAL CARRIER
GAUGE
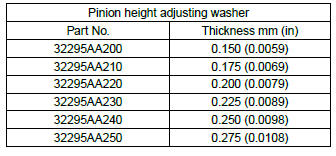
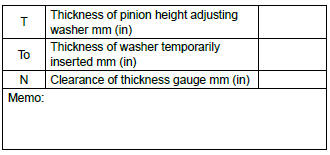
- Obtain the thickness of pinion height adjusting washer to be inserted from the following formula, and replace the temporarily installed washer with this one.
NOTE: Adjust it using the 1 - 3 washers.
T = To + N - 0.05 mm (0.0020 in)
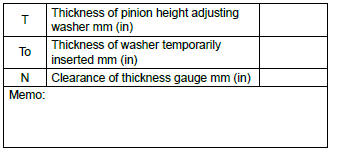
(Example of calculation)
To = 0.15 mm (0.0059 in)
N = 0.1 mm (0.0039 in)
T = 0.15 + 0.1 - 0.05 = 0.2 mm (0.0079 in)
Result: Thickness = 0.2 mm (0.0079 in)
Therefore use part number 32295AA220.
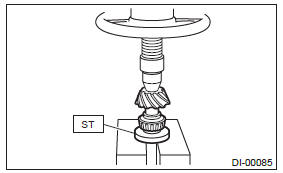
3) Install the selected pinion height adjusting washer on drive pinion, and press the rear bearing cone into position with ST.
ST 498175500 INSTALLER
4) Insert the drive pinion into the differential carrier, and install the preselected preload adjusting spacer and washer.
- Drive pinion
- Preload adjusting spacer
- Preload adjusting washer
- Differential carrier
5) Press-fit the front bearing cone into the carrier with ST1, ST2 and the spacer.
ST1 399780104 WEIGHT
ST2 899580100 INSTALLER
Part No. 32285AA000 Spacer
- Spacer (SUBARU genuine parts)
6) Insert the spacer, then press-fit the pilot bearing with ST1 and ST2.
ST1 399780104 WEIGHT
ST2 899580100 INSTALLER
7) Using the ST, install the oil seal.
NOTE:
- Use a new oil seal.
- Press-fit until the oil seal end comes 1 mm (0.04 in) inward from end of carrier.
- Apply differential gear oil to the oil seal lips.
ST 498447120 INSTALLER
8) Press-fit the companion flange with ST1 and ST2.
NOTE: Be careful not to damage the pilot bearing.
ST1 899874100 INSTALLER
ST2 399780104 WEIGHT
9) Attach the self-locking nut and use the ST to fix the companion flange in place, then tighten the self-locking nut.
NOTE:
- Use a new self-locking nut.
- Before installing the self-locking nut, apply the seal material to the threads of the drive pinion shaft and to the seating surface of the self-locking nut.
Seal material: THREE BOND 1324 (Part No. 004403042) or equivalent
Tightening torque: 191 N*m (19.5 kgf-m, 140.9 ft-lb)
ST 498427200 FLANGE WRENCH
10) Check the initial torque or initial load.
Initial load: 12.7 - 32.2 N (1.3 - 3.3 kgf, 2.9 - 7.2 lbf)

Initial torque: 0.48 - 1.22 N*m (0.05 - 0.12 kgf-m, 0.35 - 0.90 ft-lb)
11) Assembling differential case
- Install the side gears and pinion mate gears, with their thrust washers and pinion mate shaft, into the differential case.
NOTE:
- Apply gear oil on both sides of the washer and on the side gear shaft before installing.
- Insert the pinion mate shaft into the differential case by aligning the pin holes.
- The thrust washer inner surface has a chamfered side. Install the washer with the chamfered side facing toward the side gear.
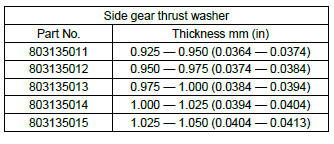
- Measure the side gear backlash.
Side gear backlash: 0.05 - 0.15 mm (0.002 - 0.006 in)
- Adjust the side gear backlash by selecting side gear thrust washer.
- Check the condition of rotation after applying oil to the gear tooth surfaces and thrust washer surfaces.
- Drive the spring pin into the differential case.
NOTE: Use new spring pin.
12) Install the hypoid driven gear to differential case.
NOTE:
- Before installing bolts, apply seal material to bolt threads.
Seal material: THREE BOND 1324 (Part No. 004403042) or equivalent
- Tighten opposing bolts in order.
- Tighten the hypoid driven gear mounting bolts to the specified torque using the ST.
ST 18270KA020 SOCKET (E20)
Tightening torque: 20 N*m (2.0 kgf-m, 14.8 ft-lb)
- While checking the tightening angle with the ST, further tighten the hypoid driven gear mounting bolts.
Tightening angle: 35º+-2º
ST 18554AA000 ANGLE GAUGE
13) Using the ST, press-fit the side bearing to the differential case.
ST 498485400 DRIFT
14) Assemble the side retainer.
- Install the oil seal into side retainer RH and LH.
CAUTION: Pay attention to the left and right of the oil seal.
NOTE: Use a new oil seal.
ST 498447100 INSTALLER
- Install the bearing race into side retainer RH and LH.
CAUTION: Make sure that the bearing outer races and cones are properly assembled.
ST 398477702 DRIFT
- Install the differential case assembly into differential carrier in the reverse order of disassembly.
NOTE: Be careful not to hit the teeth of hypoid driven gear against the differential carrier.
- Temporally tighten the side retainers RH and LH in differential carrier to install.
15) Perform the backlash adjustment between the hypoid driven gear and drive pinion, and preload adjustment of differential side bearing.
- Turn the drive pinion with ST for better fitting of differential side bearing.
ST 498427200 FLANGE WRENCH
- Using the ST, tighten side retainer RH, and then tighten side retainer LH until there is no backlash.
ST 18630AA010 WRENCH COMPL RETAINER
- Loosen the side retainer LH by approx. 1 and 1/2 teeth, and tighten the side retainer RH by approx. 2 teeth [amount that the side retainer LH is turned back (1 and 1/2) + approx. 0.5 teeth]. Difference between [amount that the side retainer LH is turned back (approx. 1 and 1/2 teeth) ] and [amount that the side retainer RH is tightened (approx. 2 teeth) ] gives preload.
- Temporarily tighten the lock plate.
NOTE: Turn over the lock plate to shift the holder by 1/2 tooth.
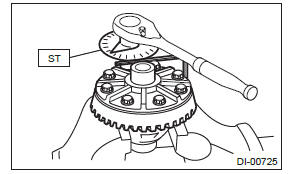
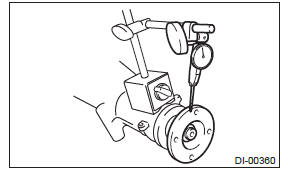
- Measure the hypoid driven gear-to-drive pinion backlash. Set the magnet base on differential carrier. Align the contact point of dial gauge with tooth face of hypoid driven gear, and move hypoid driven gear while holding drive pinion still. Read the value indicated on dial gauge.
NOTE: If measured value of backlash is not within the specified range, repeat the procedures for pinion driven gear set backlash adjustment and the differential side bearing preload adjustment.
Backlash: 0.10 - 0.15 mm (0.004 - 0.006 in)
16) Put alignment marks on both the differential carrier and side retainer. Remove the side retainers one side at a time. After installing an O-ring and applying oil to the threaded portion, restore them to the original position.
- Alignment mark
- Side retainer
17) Install the lock plate, and tighten the bolts to the specified torque.
Tightening torque: 25 N*m (2.5 kgf-m, 18.4 ft-lb)

18) Recheck the backlash between hypoid driven gear and drive pinion.
Backlash: 0.10 - 0.15 mm (0.004 - 0.006 in)
19) Checking and adjusting the tooth contact of hypoid driven gear
- Apply lead-free red dye evenly on the both sides of three to four teeth of the hypoid driven gear. Check the contact pattern after rotating the hypoid driven gear several revolutions back and forth until a definite contact pattern appears on the hypoid driven gear.
- When the contact pattern is not correct, readjust.
NOTE: Be sure to wipe off the lead-free red dye completely after the adjustment is completed.
- Correct tooth contact
Check item: Tooth contact pattern is slightly shifted toward toe side under no-load rotation.
(When driving, it moves towards the heel side.)
- Toe side
- Heel side
- Face contact
Check item: Backlash is too large.
Contact pattern
Corrective action: Increase thickness of pinion height adjusting washer according to the procedure for bringing drive pinion close to hypoid driven gear side.
- Flank contact
Check item: Backlash is too small.
Contact pattern
Corrective action: Reduce the thickness of pinion height adjusting washer according to the procedure for bringing drive pinion away from hypoid driven gear.
- Toe contact (inside contact)
Check item: Teeth contact area is too small.
Contact pattern
Corrective action: Reduce the thickness of pinion height adjusting washer according to the procedure for bringing drive pinion away from hypoid driven gear side.
- Heel contact (outside end contact)
Check item: Teeth contact area is too small.
Contact pattern
Corrective action: Increase thickness of pinion height adjusting washer according to the procedure for bringing drive pinion close to hypoid driven gear side.
20) If correct tooth contact is not obtained, readjust the drive pinion height and the differential side bearing preload (already mentioned) and the hypoid gear backlash.
21) Install the gasket and rear cover to the differential carrier, and tighten the bolts to specified torque.
NOTE: Use a new gasket.
Tightening torque: 25 N*m (2.5 kgf-m, 18.4 ft-lb)
- Rear cover
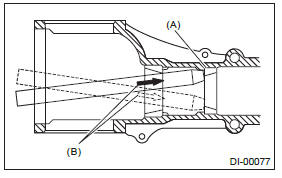
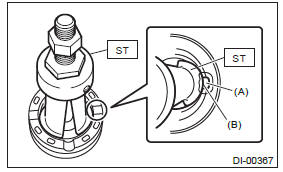
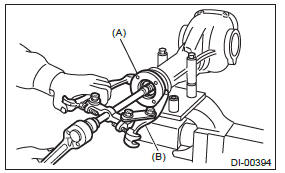
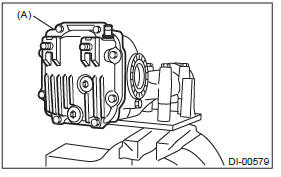
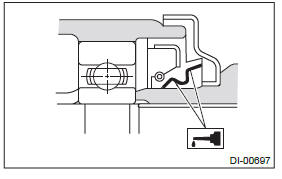
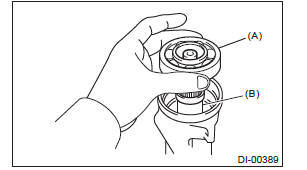
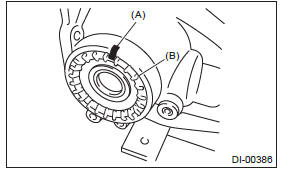
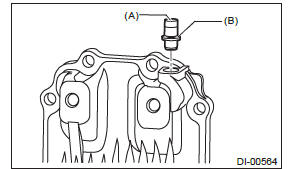
22) Install the air breather cap.
NOTE: When installing the air breather cap, do not tap section (A). Be sure to tap section (B) to install.

23) Install the drain plug.
NOTE: Use a new gasket.
Tightening torque: 50 N*m (5.1 kg-m, 36.9 ft-lb)
24) Install the filler plug.
NOTE: After installing the rear differential assembly to the vehicle, fill the gear oil, then use a new gasket, and tighten to the specified torque. <Ref. to DI-23, REPLACEMENT, Differential Gear Oil.>
2. VA2-TYPE
NOTE:
- Assemble in the reverse order of disassembly.
- Check and adjust each part during assembly.
- Use new gaskets and O-rings.
- Keep the shims and washers in order, so that they are not improperly installed.
- Thoroughly clean the surfaces on which the shims, washers and bearings are to be installed.
- Apply gear oil when installing the bearings and thrust washers.
- Attach tags not to mix up the RH and LH bearing races.
- Replace the oil seal and O-ring with a new part at every disassembly.
- Apply differential gear oil to the lips when installing the oil seal.
1) Adjusting preload for front and rear bearings
NOTE: Adjust the bearing preload between front and rear bearings with preload adjusting spacer and washer.
Pinion height adjusting washer is not affected by this adjustment. The adjustment must not be carried out with oil seal inserted.
- Install the rear bearing race into the differential carrier using ST1 and ST2.
ST1 398477701 HANDLE
ST2 398477703 DRIFT 2
- Using the ST, press-fit the front bearing race to the differential carrier.
ST 499277200 INSTALLER
- Insert the front bearing cone.
NOTE: Use new front bearing cone.
- Measure and record the thickness of the pinion height adjusting washer.
NOTE: If tooth contact (drive pinion and hypoid driven gear) is normal in the inspection before disassembling, verify that the washer is not deformed, and then reuse the used washer.
- Insert the ST1 into carrier with the pinion height adjusting washer and rear bearing cone fitted onto it.
NOTE: Use new rear bearing cone.
- Install the preload adjusting spacer, washer, front bearing cone, spacer, pilot bearing, companion flange, and self-locking nut.
ST1 18678AA000 DUMMY SHAFT
- Pinion height adjusting washer 0.90 ft-lb)
- Preload adjusting spacer
- Preload adjusting washer
- Spacer
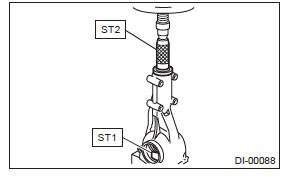
- Turn the ST1 by hand to smooth the bearing, and tighten the self-locking nut while measuring the initial load or initial torque with a spring scale or torque wrench. Select the preload adjusting washer and spacer so that the specified preload is obtained when nut is tightened to the specified torque.
NOTE:
- Use a new self-locking nut.
- Measure the preload in direction of tangent to the flange.
- Be careful not to give excessive preload.
- When tightening the self-locking nut, lock companion flange with ST2 as shown in the figure.
ST1 18678AA000 DUMMY SHAFT
ST2 498427200 FLANGE WRENCH
Tightening torque: 191 N*m (19.5 kgf-m, 140.9 ft-lb)
Initial load: 12.7 - 32.2 N (1.3 - 3.3 kgf, 2.9 - 7.2 lbf)
Initial torque: 0.48 - 1.22 N*m (0.05 - 0.12 kgf-m, 0.35 - 0.90 ft-lb)
2) Adjusting drive pinion height: Adjust the drive pinion height with pinion height adjusting washer installed between the rear bearing cone and the back of pinion gear.
- Attach the ST2.
NOTE: At this time, install a provisionally selected or previously used pinion height adjusting washer.
ST1 18678AA000 DUMMY SHAFT
ST2 18831AA010 DIFFERENTIAL CARRIER
GAUGE

- Pinion height adjusting washer
- Install the side retainer LH to the left side of the differential carrier in reverse direction.
- Measure the clearance "N" between the end of ST2 and the end surface of ST1 by using a thickness gauge.
NOTE: Make sure there is no clearance between the differential carrier and ST2.
ST1 18678AA000 DUMMY SHAFT
ST2 18831AA010 DIFFERENTIAL CARRIER
GAUGE
- Obtain the thickness of pinion height adjusting washer to be inserted from the following formula, and replace the temporarily installed washer with this one.
NOTE: Adjust it using the 1 - 3 washers.
T = To + N - 0.05 mm (0.0020 in)
(Example of calculation)
To = 0.15 mm (0.0059 in)
N = 0.1 mm (0.0039 in)
T = 0.15 mm (0.0059 in) + 0.1 mm (0.0039 in) -
0.05 mm (0.0020 in) = 0.2 mm (0.0079 in)
Result: Thickness = 0.2 mm (0.0079 in)
Therefore use part number 32295AA370.

3) Install the selected pinion height adjusting washer on drive pinion, and press the rear bearing cone into position with ST.
ST 398177700 INSTALLER
4) Insert the drive pinion into the differential carrier, and install the preselected preload adjusting spacer and washer.
- Drive pinion
- Preload adjusting spacer
- Preload adjusting washer
- Differential carrier
5) Set ST and differential carrier to the press and install the front bearing cone.
ST 399780104 WEIGHT NOTE: Set the carrier to the press until the companion flange is installed.

6) Insert the spacer, then install the pilot bearing.
- Pilot bearing
- Spacer
7) Using the ST, install the oil seal.
NOTE:
- Use a new oil seal.
- Press-fit until the oil seal end comes 1 mm (0.04 in) inward from end of carrier.
- Apply differential gear oil to the oil seal lips.
ST 499277200 INSTALLER

8) Press-fit the companion flange with ST.
NOTE: Be careful not to damage the bearing.
ST 899874100 INSTALLER
9) Apply seal material on the drive pinion shaft thread and new self-locking nut seat.
Seal material: THREE BOND 1324 (Part No. 004403042) or equivalent
10) Install the self-locking nut while holding the companion flange with ST.
Tightening torque:
191 N*m (19.5 kgf-m, 140.9 ft-lb)
ST 498427200 FLANGE WRENCH
11) Check the initial torque or initial load.
Initial load: 12.7 - 32.2 N (1.3 - 3.3 kgf, 2.9 - 7.2 lbf)
Initial torque: 0.48 - 1.22 N*m (0.05 - 0.12 kgf-m, 0.35 - 0.90 ft-lb)
12) Assembling differential case
- Attach the circlip to the side gear.
- Install the side gears and pinion mate gears, with their thrust washers and pinion mate shaft, into the differential case.
NOTE:
- Apply gear oil on both sides of the washer and on the side gear shaft before installing.
- Insert the pinion mate shaft into the differential case by aligning the pin holes.
- Measure the side gear backlash.
Side gear backlash: 0.13 - 0.18 mm (0.005 - 0.007 in)
- Adjust the side gear backlash as specified by selecting side gear thrust washer.
- Check the condition of rotation after applying oil to the gear tooth surfaces and thrust washer surfaces.
- Attach the spring pin to the differential case.
NOTE: Use new spring pin.
13) Install the hypoid driven gear to differential case.
NOTE:
- Set a cushioning such as wooden block, aluminum plate or shop cloth between vise and differential case if the side gear comes into contact with vise.
- Before installing bolts, apply seal material to bolt threads.
Seal material: THREE BOND 1324 (Part No. 004403042) or equivalent
- Tighten opposing bolts in order.
- Tighten the hypoid driven gear mounting bolts to the specified torque using the ST.
ST 18270KA020 SOCKET (E20)
Tightening torque: 20 N*m (2.0 kgf-m, 14.8 ft-lb)
- While checking the tightening angle with the ST, further tighten the hypoid driven gear mounting bolts.
Tightening angle: 33º+-2º
ST 18554AA000 ANGLE GAUGE
14) Using the ST, press-fit the side bearing to the differential case.
ST 398487700 DRIFT
15) Assemble the side retainer.
- Install the oil seal into side retainer RH and LH.
NOTE: Use a new oil seal.
ST 498447100 INSTALLER
- Install the bearing race into side retainer RH and LH.
CAUTION: Make sure that the bearing outer races and cones are properly assembled.
ST 398417700 DRIFT
- Install the differential case assembly into differential carrier in the reverse order of disassembly.
NOTE: Be careful not to hit the teeth of hypoid driven gear against the differential carrier.
- Temporally tighten the side retainers RH and LH in differential carrier to install.
16) Perform the backlash adjustment between the hypoid driven gear and drive pinion, and side bearing preload adjustment.
- Turn the drive pinion with ST for better fitting of differential side bearing.
ST 498427200 FLANGE WRENCH
- Using the ST, tighten side retainer RH, and then tighten side retainer LH until there is no backlash.
ST 18630AA010 WRENCH COMPL RETAINER
- Back off the side retainer LH by approx. 1.5 teeth, and tighten the side retainer RH by approx. 2 teeth [amount that the side retainer LH is turned back (1.5) + 1/2 teeth].
NOTE: Difference between [amount that the side retainer LH is turned back (approx. 1 and 1/2 teeth) ] and [amount that the side retainer RH is tightened (approx. 2 teeth) ] gives preload.
- Temporarily attach the lock plate.
NOTE: Turn over the lock plate to shift the holder by 1/2 teeth.

- Measure the hypoid driven gear-to-drive pinion backlash. Set the magnet base on differential carrier. Align the contact point of dial gauge with tooth face of hypoid driven gear, and move hypoid driven gear while holding drive pinion still. Read the value indicated on dial gauge.
NOTE: If measured value of backlash is not within the specified range, repeat the procedures for the backlash adjustment between hypoid driven gear and drive pinion, and the differential side bearing preload adjustment.
Backlash: 0.10 - 0.15 mm (0.004 - 0.006 in)
17) Put alignment marks on both the differential carrier and side retainer. Remove the side retainers one side at a time. After installing an O-ring and applying differential gear oil to the threaded portion, restore them to the original position.
- Alignment mark
- Side retainer
18) Tighten the bolt of lock plate to specified torque.
Tightening torque: 25 N*m (2.5 kgf-m, 18.4 ft-lb)
19) Recheck the hypoid driven gear to pinion backlash.
Backlash: 0.10 - 0.15 mm (0.004 - 0.006 in)
20) Checking and adjusting the tooth contact of hypoid driven gear
- Apply lead-free red dye evenly on the both sides of three to four teeth of the hypoid driven gear. Check the contact pattern after rotating the hypoid driven gear several revolutions back and forth until a definite contact pattern appears on the hypoid driven gear.
- When the contact pattern is not correct, readjust.
NOTE: Be sure to wipe off the lead-free red dye completely after the adjustment is completed.
- Correct tooth contact
Check item: Tooth contact pattern is slightly shifted toward toe side under no-load rotation.
(When driving, it moves towards the heel side.)

- Toe side
- Heel side
- Face contact
Check item: Backlash is too large.
Contact pattern
Corrective action: Increase thickness of pinion height adjusting washer according to the procedure for bringing drive pinion close to hypoid driven gear side.
- Flank contact
Check item: Backlash is too small.
Contact pattern
Corrective action: Reduce the thickness of pinion height adjusting washer according to the procedure for bringing drive pinion away from hypoid driven gear.
- Toe contact (inside contact)
Check item: Teeth contact area is too small.
Contact pattern
Corrective action: Reduce the thickness of pinion height adjusting washer according to the procedure for bringing drive pinion away from hypoid driven gear.
- Heel contact (outside end contact)
Check item: Teeth contact area is too small.
Contact pattern
Corrective action: Increase thickness of pinion height adjusting washer according to the procedure for bringing drive pinion close to hypoid driven gear side.

21) If correct tooth contact is not obtained, readjust the drive pinion height and the differential side bearing preload (already mentioned) and the hypoid gear backlash.
22) Install the gasket and rear cover to the differential carrier, and tighten the bolts to specified torque.
NOTE: Use a new gasket.
Tightening torque: 34 N*m (3.5 kgf-m, 25.1 ft-lb)
23) Install the air breather cap.
NOTE: When installing the air breather cap, do not tap section (A). Be sure to tap section (B) to install.
24) Install the drain plug.
NOTE: Use a new gasket.
Tightening torque: 50 N*m (5.1 kgf-m, 36.9 ft-lb)
25) Install the filler plug.
NOTE: After installing the rear differential assembly to the vehicle, fill the gear oil, then use a new gasket, and tighten to the specified torque. <Ref. to DI-23, REPLACEMENT, Differential Gear Oil.>
E: INSPECTION
Wash all the disassembled parts clean, and examine them for wear, damage or other defects. Repair or replace the defective parts as necessary.
1) Hypoid driven gear and drive pinion
- If there is evidently an abnormal tooth contact, find out the cause and adjust until the teeth contact correctly. Replace the gear if there is an excessive worn or an incapable adjustment.
- If crack, cutout or seizure is found, replace the parts as a set. Slight damage of some teeth can be corrected by oil stone or the like.
2) Side gear and pinion mate gear
- Replace if cracks, scoring or other defects are evident on the tooth surface.
- Replace if thrust washer contact surface is worn or seized. Slight damages of the surface can be corrected by oil stones or equivalent.
3) Bearing
Replace if seizure, peeling, wear, rust, dragging during rotation, noise or other defect is evident.
4) Thrust washer of the side gear and pinion mate gear:
Replace if seized, flawed, abnormally worn or having other defects.
5) Oil seal
Replace if deformed or damaged, and at every disassembling.
6) Differential carrier
Replace if the bearing bores are worn or damaged.
7) Differential case
Replace if its sliding surfaces are abnormally worn, burned, or cracked.
8) Companion flange
Replace if the oil seal lip contact surface shows cracking.
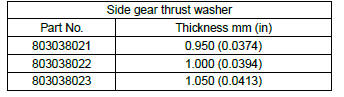
1. SIDE GEAR BACKLASH
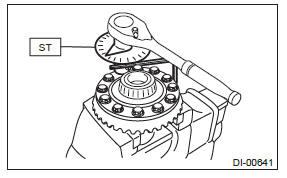
Using a dial gauge, check the backlash of side gear.
Side gear backlash:
VA1-type:
0.05 - 0.15 mm (0.002 - 0.006 in)
VA2-type:
0.13 - 0.18 mm (0.005 - 0.007 in)
If the side gear backlash is outside the specification range, select the side gear thrust washer and adjust the side gear backlash as specified.

2. HYPOID DRIVEN GEAR BACKLASH
Using a dial gauge, check the backlash of hypoid driven gear.
Hypoid driven gear backlash: 0.10 - 0.15 mm (0.004 - 0.006 in)
If the hypoid driven gear backlash is outside the specification range, adjust the side bearing preload and repair if necessary.
3. COMPANION FLANGE
1) If rust or dirt is attached to the companion flange, remove them.
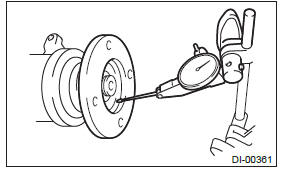
2) Set a dial gauge at a companion flange surface (mating surface of propeller shaft and companion flange), and then measure the companion flange runout.
Limit of runout: 0.08 mm (0.003 in)
3) Set the gauge inside of the companion flange, and measure the runout.
Limit of runout: 0.08 mm (0.003 in)
4) If either runout exceeds the limit, move the phase of companion flange and drive pinion 90º each, and find the point where the runout is within the limit.
5) If the runout exceeds the limit even after changing the phase, replace the companion flange and recheck the runout.
6) If the runout exceeds the limit after replacing the companion flange, the drive pinion may be assembled incorrectly or bearing is faulty.
4. TOOTH CONTACT BETWEEN HYPOID DRIVEN GEAR AND DRIVE PINION
Inspect the tooth contact between the hypoid driven gear and drive pinion. <Ref. to DI-52, ASSEMBLY, Rear Differential (VA-type).>
F: ADJUSTMENT
1. SIDE GEAR BACKLASH
Adjust the side gear backlash. <Ref. to DI-52, ASSEMBLY, Rear Differential (VA-type).>
2. HYPOID DRIVEN GEAR BACKLASH
Adjust hypoid driven gear backlash. <Ref. to DI-52, ASSEMBLY, Rear Differential (VA-type).>
3. TOOTH CONTACT BETWEEN HYPOID DRIVEN GEAR AND DRIVE PINION
Adjust the tooth contact between hypoid driven gear and drive pinion gear. <Ref. to DI-52, ASSEMBLY, Rear Differential (VA-type).>
READ NEXT:
 Rear Differential Front Oil
Seal
Rear Differential Front Oil
Seal
A: INSPECTION
Make sure that there is no leakage from front oil
seal portion. If there is any leakage, replace the oil
seal and inspect the propeller shaft.
B: REPLACEMENT
1) Shift the select lever or
Rear Differential Mount Bushing
A: INSPECTION
Check the rear differential mount bushing for
cracks, hardening or damage. If cracking, hardening
or damage is excessive, replace rear differential
mount bushing.
B: REPLACEMENT
CAUTION:
Transfer Case
General Description
A: NOTE
For general description, refer to "5AT", "CVT" or
"6MT" section.
5AT model:
<Ref. to 5AT-2, General Description.>
CVT model:
<Ref. to CVT-3, General Description.&g
SEE MORE:
Cooling or dehumidifying
For cooling and dehumidification of the passenger compartment, air flows through
the instrument panel outlets:
1. Set the air inlet selection button to the OFF position.
2. Press the “” button.
3. Set the air conditioner button to the “ON” position.
4. Set the temperature control dial
Automatic Transmission Fluid level, Differential Gear Oil
A: INSPECTION
NOTE: The level of ATF varies with fluid temperature. Pay attention to the ATF temperature when checking ATF level.
1) Raise the ATF temperature by driving a distance of 5 to 10 km (3 to 6 miles). Otherwise, idle the engine to raise ATF temperature to 70 - 80ºC (158 - 176ºF
