Subaru Outback (BR): Rear Differential Mount Bushing
A: INSPECTION
Check the rear differential mount bushing for cracks, hardening or damage. If cracking, hardening or damage is excessive, replace rear differential mount bushing.
B: REPLACEMENT
CAUTION:
- If there was so much rust in the rear differential mount bushing, remove the rust before starting work.
- Apply the molybdenum grease on the square thread of the ST (shaft and nut) before use.
1) Remove the rear differential. <Ref. to DI-26, REMOVAL, Rear Differential (T-type).> <Ref. to DI-46, REMOVAL, Rear Differential (VA-type).>
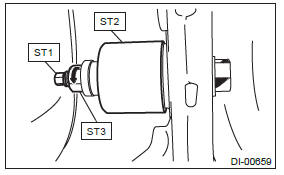
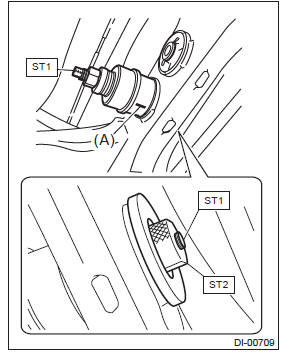
2) Fit the ST to the periphery of the sub frame cylinder, and make sure that the ST does not contact with welded spots or spatters.
ST 41399FG010 SPECIAL TOOL A
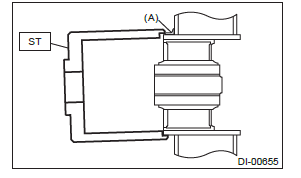
- Welded spot
3) If the ST contacts with welded spots or spatters, remove the excessive welds or spatters with sander or the equivalent so that the ST contacts the cylinder peripheral part.
CAUTION: Performing the operation with the ST contacting with welded spots or spatters may break the ST. Be sure to remove excessive welds or spatters before the operation.
4) Set ST1, ST2, ST3, ST4 and ST5 as shown in the figure.
ST1 41399FG091 SPECIAL TOOL SHAFT
ST2 41399FG070 SPECIAL TOOL NUT
ST3 41399FG050 SPECIAL TOOL SLEEVE
ST4 41399FG080 SPECIAL TOOL BEARING
ST5 41399FG010 SPECIAL TOOL A
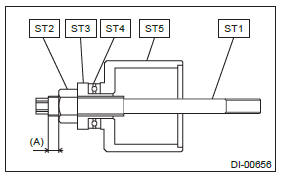
- 5 mm (0.2 in) or less
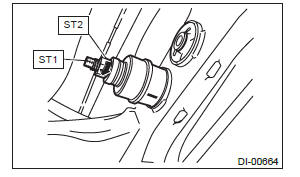
5) Fit and hold the ST1 and ST2 to the rear differential mount bushing from the rear side of vehicle.
ST1 41399FG031 SPECIAL TOOL C
ST2 41399FG061 SPECIAL TOOL RING
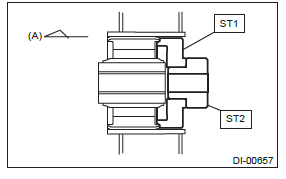
- Front side of vehicle
6) Insert the ST set in the step 4) through the rear differential mount bushing hole from the front side of vehicle, and screw in the ST1 by hand till the front end of ST1 comes out slightly from the rear end of ST2.
ST1 41399FG091 SPECIAL TOOL SHAFT
ST2 41399FG061 SPECIAL TOOL RING
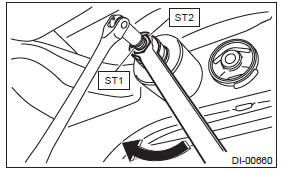
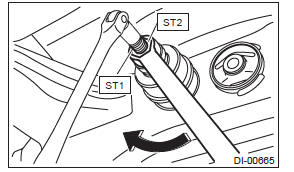
7) Hold the ST1 to prevent it from rotating, and screw in the ST3 by hand till there is no loose fit on the ST2.
CAUTION: When setting the ST to the vehicle, always make sure that the ST2 fits the periphery of the sub frame cylinder and is not tilted.
ST1 41399FG091 SPECIAL TOOL SHAFT
ST2 41399FG010 SPECIAL TOOL A
ST3 41399FG070 SPECIAL TOOL NUT
8) Hold the ST1 with a tool to prevent it from rotating, and screw in the ST2 to remove the rear differential mount bushing.
CAUTION:
- Rotation of ST1 will damage the screw at the
rear end of rear differential mount bushing.
Never rotate the ST1.
- If the ST starts to tilt while removing the rear differential mount bushing, stop the work and set the ST again.
ST1 41399FG091 SPECIAL TOOL SHAFT
ST2 41399FG070 SPECIAL TOOL NUT
9) Set ST1, ST2, ST3, ST4, ST5 and rear differential mount bushing as shown in the figure.
NOTE:
- Set the ST2 nut near to the end of ST1 screw.
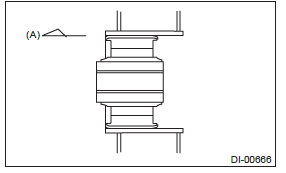
- Hold the rear differential mount bushing with the marked side facing toward the rear of the vehicle, and set the rear differential mount bushing to the ST so that the arrow mark faces upward.
- Mark the bottom end of rear differential mount bushing to identify the installing direction.
ST1 41399FG091 SPECIAL TOOL SHAFT
ST2 41399FG070 SPECIAL TOOL NUT
ST3 41399FG050 SPECIAL TOOL SLEEVE
ST4 41399FG080 SPECIAL TOOL BEARING
ST5 41399FG020 SPECIAL TOOL B
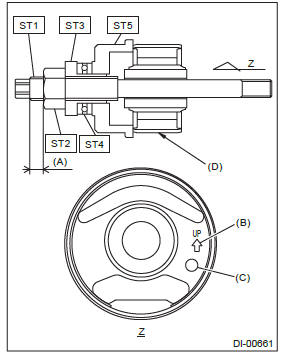
- 8 mm (0.31 in) or more
- Arrow mark
- Mark
- Marked position
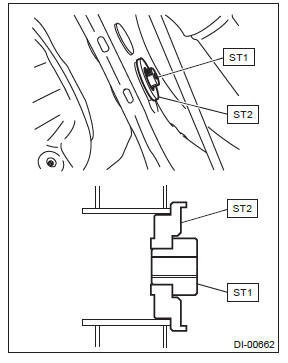
10) Attach ST1 to the ST2, and fit and hold the STs as a unit to the sub frame from the rear side of vehicle.
ST1 41399FG061 SPECIAL TOOL RING
ST2 41399FG041 SPECIAL TOOL D
11) Insert the ST and rear differential mount bushing set in the step 9) through the sub frame from the front side of vehicle, and screw in the ST1 by hand till the front end of ST1 comes out slightly from the rear end of ST2.
CAUTION: Set the rear differential mount bushing with its mark facing the bottom end direction.
ST1 41399FG091 SPECIAL TOOL SHAFT
ST2 41399FG061 SPECIAL TOOL RING
- Mark
12) Hold the ST1 to prevent it from rotating, and screw in the ST2 by hand till there is no loose fit on the ST and the rear differential mount bushing.
CAUTION: Make sure that the ST and rear differential mount bushing are not tilted.
ST1 41399FG091 SPECIAL TOOL SHAFT
ST2 41399FG070 SPECIAL TOOL NUT
13) Screw in the ST2 while holding the ST1 with a tool to prevent it from rotating, and press-fit the rear differential mount bushing to the front end of sub frame cylinder.
ST1 41399FG091 SPECIAL TOOL SHAFT
ST2 41399FG070 SPECIAL TOOL NUT
14) Make sure that the rear differential mount bushing is inserted to the front end of sub frame cylinder.
- Front side of vehicle
15) Install the rear differential. <Ref. to DI-28, INSTALLATION, Rear Differential (T-type).> <Ref. to DI-46, INSTALLATION, Rear Differential (VAtype).>
Rear Differential Inspection Mode
A: GENERAL DESCRIPTION
CAUTION: Be sure to perform Rear Differential Inspection Mode.
- Follow the messages displayed on the Subaru Select Monitor when working.
- "Rear Differential Inspection Mode" using the Subaru Select Monitor is available only for the CVT model.
- Perform Rear Differential Inspection Mode when the following work has been performed.
Transmission assembly replacement/Replacement of rear differential/Replacement of front differential hypoid gear set/Replacement of rear differential hypoid gear set
B: PROCEDURE
CAUTION: Do not turn the power of the Subaru Select Monitor OFF during work, and do not disconnect the data link connector.
1) Shift the select lever to "P" range.
2) Apply the electronic parking brake.
3) Lift up the vehicle.
WARNING: Lift up the vehicle until the tire bottom is 30 cm or more above the ground.
4) Connect the Subaru Select Monitor to data link connector.
5) Turn the ignition switch to ON. (In the case of a push button start, press the push button ignition switch twice without stepping on the brake.)
6) Select {AT related learning & inspecting mode} in the "Transmission Diagnosis" display screen of the Subaru Select Monitor.
7) Select {Rear differential inspection mode} in the "AT related learning & inspecting mode" display screen of the Subaru Select Monitor.
8) Follow the messages displayed on the Subaru Select Monitor screen when working.
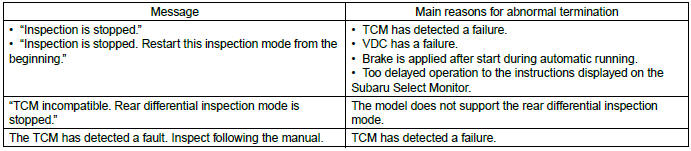
9) The results of the rear differential inspection mode are displayed on the Subaru Select Monitor screen.
- When ended normally: "The rear differential has been replaced normally."
- When ended abnormally: "A rear differential abnormality has been detected. Reinspect the items at the time of rear differential installation."
- When interrupted: "Inspection is stopped. Restart this inspection mode from the beginning."
10) After the message "Inspection has been completed. Set the ignition switch to OFF." appears, the rear differential inspection mode completes.
NOTE:
- For detailed operation procedures, refer to "PC application help for Subaru Select Monitor".
- If the rear differential inspection mode does not end normally, repeat the mode until it ends normally.
- When the inspection mode does not end normally, the AWD warning light will start blinking at 2 Hz.
- When the inspection mode ends abnormally, the front differential and rear differential may be different from the specifications for the vehicle.
- When the inspection mode is interrupted, the following reasons are possible.
11) Perform "Function Check Sequence" for VDC. <Ref. to VDC(diag)-18, FUNCTION CHECK, OPERATION, Subaru Select Monitor.> <Ref. to VDC-16, ADJUSTMENT, VDC Control Module and Hydraulic Control Unit (VDCCM&H/U).>
General Diagnostic Table
A: INSPECTION
READ NEXT:
 Transfer Case
General Description
A: NOTE
For general description, refer to "5AT", "CVT" or
"6MT" section.
5AT model:
<Ref. to 5AT-2, General Description.>
CVT model:
<Ref. to CVT-3, General Description.&g
General Description of Drive Shaft System
A: SPECIFICATION
1. PROPELLER SHAFT
2. FRONT DRIVE SHAFT ASSEMBLY
Axle diameter
Axle length
3. REAR DRIVE SHAFT ASSEMBLY
Axle diameter
Axle length
B: COMPON
SEE MORE:
Front fog light (if equipped)
NOTE
It may be difficult to replace the bulbs. We recommend that you have the bulbs
replaced by your SUBARU dealer if necessary.
1. Pull off the fender lining. Refer to “Pulling off the fender lining” F11-7.
2. Disconnect the electrical connector.
1) For left-hand side
2) For right-ha
Replacing an air filter
1. Remove the glove box.
(1) Open the glove box.
(2) Remove the damper shaft from the glove box.
(3) Pull out the glove box.
2. Remove the cover of the air filter.
3. Remove the air filter.
4. Replace the air filter element with a new one.
5. Reinstall the cover of the air filter.
