Subaru Outback (BR): Rear Differential Front Oil Seal
A: INSPECTION
Make sure that there is no leakage from front oil seal portion. If there is any leakage, replace the oil seal and inspect the propeller shaft.
B: REPLACEMENT
1) Shift the select lever or gear shift lever to neutral.
2) Release the parking brake.
3) Disconnect the ground cable from battery.
4) Lift up the vehicle.
5) Drain differential gear oil. <Ref. to DI-23, REPLACEMENT, Differential Gear Oil.>
6) Remove the rear exhaust pipe.
- 2.5 L SOHC model <Ref. to EX(H4SO)-9, REMOVAL, Rear Exhaust Pipe.>
- 2.5 L DOHC turbo model <Ref. to EX(H4DOTC)-15, REMOVAL, Rear Exhaust Pipe.>
- 3.6 L model <Ref. to EX(H6DO)-8, REMOVAL, Rear Exhaust Pipe.>
7) Remove the heat shield cover.
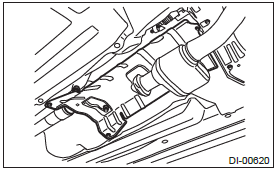
8) Remove the propeller shaft. <Ref. to DS-10, REMOVAL, Propeller Shaft.>
9) Check the initial torque and write it down.
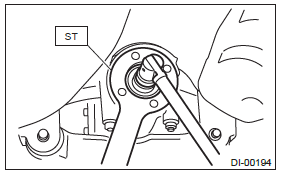
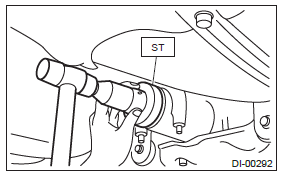
10) Remove the self-locking nut while holding the companion flange with ST.
ST 498427200 FLANGE WRENCH
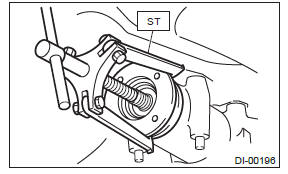
11) Extract the companion flange using the ST.
ST 399703600 PULLER ASSY
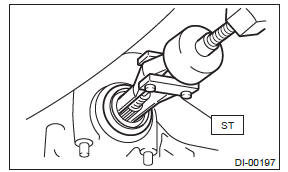
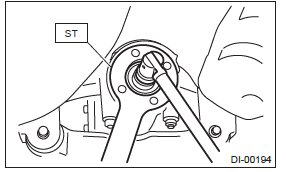
12) Remove the oil seal using ST or screwdriver.
ST 398527700 PULLER ASSY
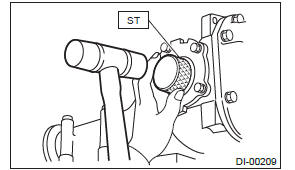
13) Using the ST, install the oil seal.
NOTE:
- Use a new oil seal.
- Apply differential gear oil to the oil seal lips.
ST 498447120 INSTALLER
14) Install the companion flange.
NOTE: Use a plastic hammer to install companion flange.
15) Tighten the self-locking nut to the specified torque so that the initial torque of companion flange becomes the same as that of before oil seal replacement.
NOTE:
- Use a new self-locking nut.
- Before installing the self-locking nut, apply the seal material to the threads of the drive pinion shaft and to the seating surface of the self-locking nut.
Seal material: THREE BOND 1324 (Part No. 004403042) or equivalent
Tightening torque:
T-type
167 - 196 N*m (17.0 - 20.0 kgf-m, 123.2 -
144.6 ft-lb)
VA-type
162 - 220 N*m (16.5 - 22.5 kgf-m, 119.5 -
162.3 ft-lb)
ST 498427200 FLANGE WRENCH
16) Hereafter, perform assembly in the reverse order of disassembly.
17) Fill differential gear oil. <Ref. to DI-23, REPLACEMENT, Differential Gear Oil.>
Rear Differential Side Oil Seal
A: INSPECTION
Make sure that there is no leakage from side oil seal. If there is any leakage, replace the oil seal.
B: REPLACEMENT
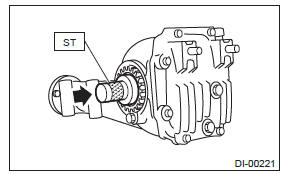
1) Remove the rear differential. <Ref. to DI-26, REMOVAL, Rear Differential (T-type).> <Ref. to DI-46, REMOVAL, Rear Differential (VA-type).>
2) Remove the rear differential side oil seal using a ST or screwdriver wrapped with vinyl tape to prevent the side retainer from scratching.
ST 398527700 PULLER ASSY
3) Using the ST, install the oil seal to the side retainer.
NOTE:
- Use a new oil seal.
- Apply differential gear oil to the oil seal lips.
- T-type and VA2-type
ST 398437700 DRIFT
- VA1-type
ST 498447100 INSTALLER
4) Install the rear differential. <Ref. to DI-28, INSTALLATION, Rear Differential (T-type).> <Ref. to DI-46, INSTALLATION, Rear Differential (VAtype).>
Rear Differential Front Member
A: REMOVAL
1) Disconnect the ground cable from battery.
2) Lift up the vehicle.
3) Support the rear differential using transmission jack, and then remove the rear differential front member.
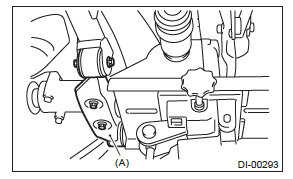
- Rear differential front member
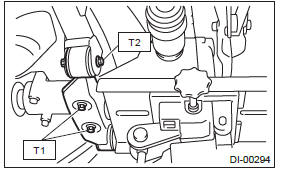
B: INSTALLATION
Install the rear differential front member with a new self-locking nut.
Tightening torque:
T1: 50 N*m (5.1 kgf-m, 36.9 ft-lb)
T2: 110 N*m (11.2 kgf-m, 81.1 ft-lb)
C: INSPECTION
1) Check the rear differential front member for damage, bend and corrosion.
If damage, bend or corrosion is excessive, replace the rear differential front member.
2) Check the bushings of rear differential member for cracking, hardening and damage. If cracking, hardening or damage is excessive, replace rear differential front member.
READ NEXT:
 Rear Differential Mount Bushing
A: INSPECTION
Check the rear differential mount bushing for
cracks, hardening or damage. If cracking, hardening
or damage is excessive, replace rear differential
mount bushing.
B: REPLACEMENT
CAUTION:
Transfer Case
General Description
A: NOTE
For general description, refer to "5AT", "CVT" or
"6MT" section.
5AT model:
<Ref. to 5AT-2, General Description.>
CVT model:
<Ref. to CVT-3, General Description.&g
SEE MORE:
Front Hub Unit Bearing
A: REMOVAL
1) Lift up the vehicle, and then remove the front wheels.
2) Remove the axle nut.
CAUTION:
Do not loosen the axle nut while the front axle is loaded. Doing so may damage
the hub bearing.
Lift the crimped section of axle nut.
Remove the axle nut using a socket wrench while depressing
System monitors
SRS airbag system warning light
A diagnostic system continually monitors the readiness of the seatbelt pretensioner
while the vehicle is being driven. The seatbelt pretensioners share the control
module with the airbag system. Therefore, if any malfunction occurs in a seatbelt
pretensioner,
