Subaru Outback (BR): Expansion Valve
A: REMOVAL
1) Disconnect the ground cable from battery.
2) Using the refrigerant recovery system, discharge refrigerant. <Ref. to AC-24, PROCEDURE, Refrigerant Recovery Procedure.>
3) Remove the connector and bolts, and remove the high-pressure hose and AC pipe from the expansion valve.
4) Remove the bolts, then remove the expansion valve.
Preparation tool: Hexagon wrench (4 mm)
B: INSTALLATION
CAUTION:
- Do not start the engine before charging refrigerant.
- If the engine is started with no refrigerant charge, replace the compressor.
- Replace the gasket and O-rings with new parts, and then apply compressor oil.
1) Install each part in the reverse order of removal.
2) Charge refrigerant. <Ref. to AC-25, PROCEDURE, Refrigerant Charging Procedure.>
Tightening torque:
Air conditioning unit: <Ref. to AC-10, AIR CONDITIONING UNIT, COMPONENT, General
Description.>
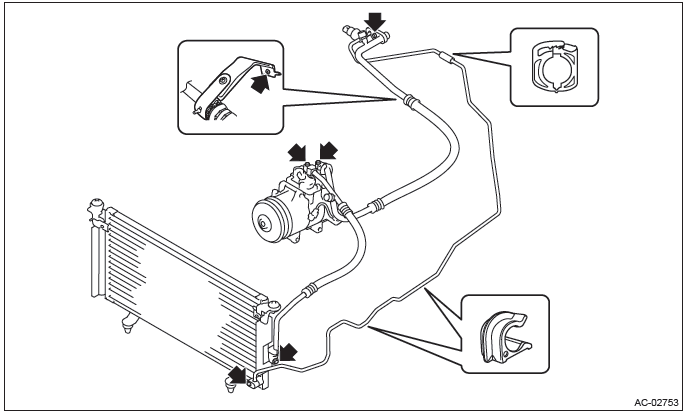
Hose and Pipe
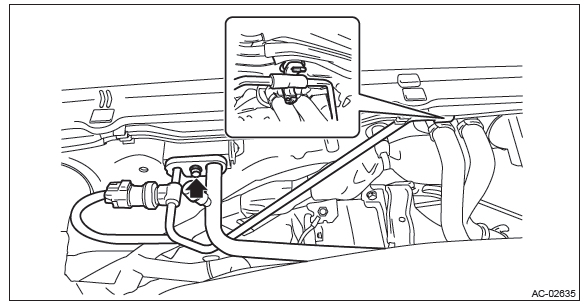
A: REMOVAL
CAUTION:
- When disconnecting hoses, do not apply excessive force.
- Seal the disconnected hose with a plug or vinyl tape to prevent foreign matter from entering.
1) Disconnect the ground cable from battery.
2) Using the refrigerant recovery system, discharge refrigerant. <Ref. to AC-24, PROCEDURE, Refrigerant Recovery Procedure.>
3) Remove the bolts and screws and detach the hoses and pipes.
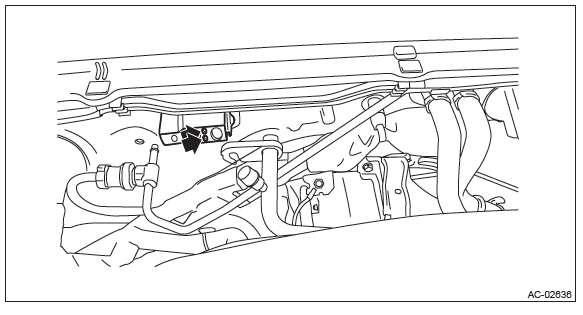
B: INSTALLATION
CAUTION:
- Do not start the engine before charging refrigerant.
- If the engine is started with no refrigerant charge, replace the compressor.
- Replace the O-rings with new parts, and then apply compressor oil.
- When connecting hoses, do not apply an excessive force to them. After installing, check that no torsion or excessive tension applied to the hoses.
1) Install each part in the reverse order of removal.
2) Charge refrigerant. <Ref. to AC-25, PROCEDURE, Refrigerant Charging Procedure.>
Tightening torque: Refer to "COMPONENT" of "General Description". <Ref. to AC-10, AIR CONDITIONING UNIT, COMPONENT, General Description.>
C: INSPECTION
1) Check the hoses for cracks, damage and expansion. Replace the hose if faulty.
2) Check the pipes for crack or damage. Replace the pipe if faulty.
READ NEXT:
 Pressure Sensor
A: INSPECTION
1) Perform a diagnosis code (DTC) check by connecting the Subaru Select
Monitor.
2) If any diagnosis code (DTC) is displayed, refer to "List of Diagnostic
Trouble Code (DTC)" in "HVAC
FRESH/RECIRC Door Actuator
A: REMOVAL
1) Set the intake door actuator to RECIRC position.
Turn the ignition switch to ON.
Operate the control panel and switch to RECIRC mode.
In the condition of step (2), turn the ignition
Air Mix Door Actuator
A: REMOVAL
1. DRIVER'S SEAT
1) Remove the instrument panel lower cover. <Ref. to EI-64, REMOVAL,
Instrument Panel Lower Cover.>
2) Remove the bolts, and remove the knee guard panel.
3) Remove
SEE MORE:
Glossary of tire terminology
● Accessory weight
The combined weight (in excess of those standard items which may be replaced)
of automatic transmission, power steering, power brakes, power windows, power seats,
radio, and heater, to the extent that these items are available as factory-installed
equipment (whether i
Rear Door
A: REMOVAL
1) Disconnect the ground cable from battery.
2) Remove the rear door trim. <Ref. to EI-61, REAR DOOR, REMOVAL, Door Trim.>
3) Remove the rear door speaker assembly.
Remove the screws.
Disconnect the harness connector and remove the rear speaker assembly.
4) Remove the rear se
