Subaru Outback (BR): Front Arm
A: REMOVAL
1) Lift up the vehicle, and then remove the front wheels.
2) Remove the front arm.
- Remove the nut and disconnect the front stabilizer link.
- Remove the bolt, and then remove the ball joint for the front arm.
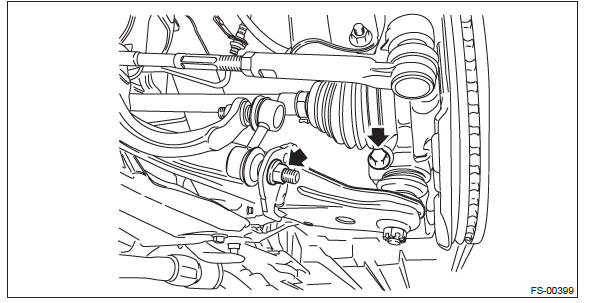
- Remove the bolts, then remove the front arm.
B: INSTALLATION
1) Before installation, inspect the following items and replace any faulty part with a new one.
- Check the front arm for damage or cracks, and replace if defective.
- Visually check the bushing for abnormal cracks, fatigue or damage.
- Visually check the dust cover on the ball joint for damage.
2) Using new self-locking nuts, temporary tighten the front arm.
3) Install the ball joint to the front axle housing.
CAUTION: Before tightening, make sure the lower side of front axle housing and stepped section of ball joint are in contact.
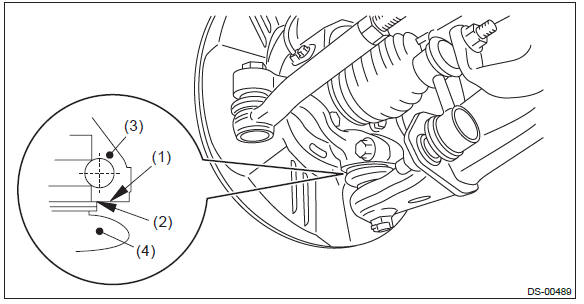
- Lower side of front axle housing
- Raised section of ball joint
- Front axle housing
- Ball joint
Tightening torque: 50 N*m (5.1 kgf-m, 36.9 ft-lb)
4) Install the stabilizer link.
Tightening torque: 60 N*m (6.1 kgf-m, 44.3 ft-lb)
5) Install the front wheels.
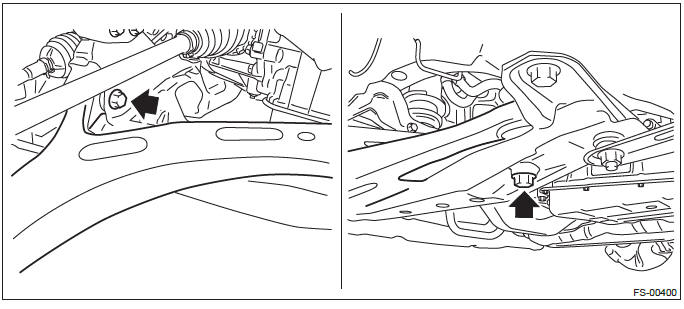
6) Unload the vehicle from lift, and tighten the bolt which secures the front arm to cradle with wheels in full contact with the ground and the vehicle at curb weight.
Tightening torque:
Front bushing side: 95 N*m (9.7 kgf-m, 70.1 ft-lb)
Rear bushing side: 140 N*m (14.3 kgf-m, 103.3 ft-lb)
7) Inspect the wheel alignment and adjust if necessary.
- Inspection: <Ref. to FS-9, INSPECTION, Wheel Alignment.>
- Adjustment: <Ref. to FS-14, ADJUSTMENT, Wheel Alignment.>
C: DISASSEMBLY
1. FRONT BUSHING
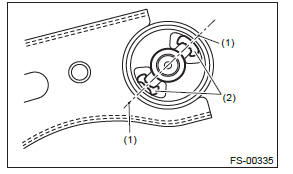
1) Put an alignment mark on the front arm based on the gap of bushing intermediate plate for front bushing.
CAUTION: Always put an alignment mark for aligning the position on bushing installation.
- Put an alignment mark.
- Gap of bushing intermediate plate
- Bushing intermediate plate
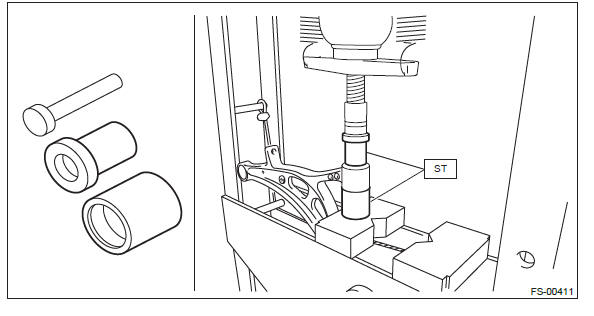
2) Using the ST and a press, remove the front bushing.
PREPARATION TOOL: ST: INSTALLER & REMOVER SET (927680000)
2. REAR BUSHING
1) Put an alignment mark on the front arm based on the center of rear bushing recess portion.
CAUTION: Always put an alignment mark for aligning the position on bushing installation.
- Put an alignment mark.
- Recess section
2) Using the ST and a press, remove the rear bushing.
PREPARATION TOOL:
ST1: REMOVER (20299AG000)
ST2: BASE (20299AG010)
- Press
- Front arm
- Rear bushing
D: ASSEMBLY
1. FRONT BUSHING
1) Before assembly, inspect the following items and replace any faulty part with a new one.
- Check the front arm for damage or cracks, and replace if defective.
- Visually check the bushing for abnormal cracks, fatigue or damage.
- Visually check the dust cover on the ball joint for damage.
2) Align the gap of bushing intermediate plate for front bushing with the alignment mark of the front arm.
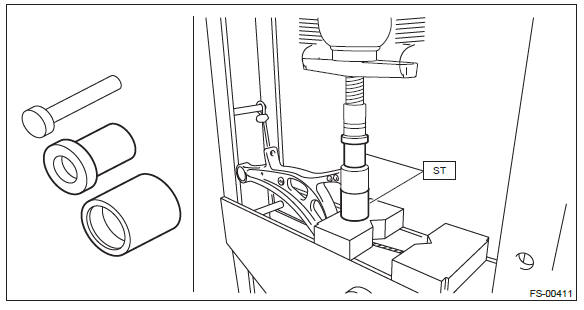
3) Using the ST and a press, install the front bushing.
PREPARATION TOOL: ST: INSTALLER & REMOVER SET (927680000)
2. REAR BUSHING
1) Before installation, inspect the following items and replace any faulty part with a new one.
- Check the front arm for damage or cracks, and replace if defective.
- Visually check the bushing for abnormal cracks, fatigue or damage.
- Visually check the dust cover on the ball joint for damage.
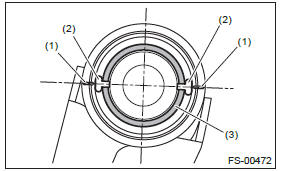
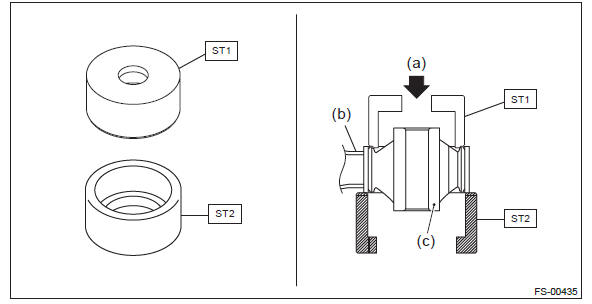
2) Align the center of recess portion with the alignment mark on the front arm, with the protrusion (A) of recess portion facing the front side of vehicle.
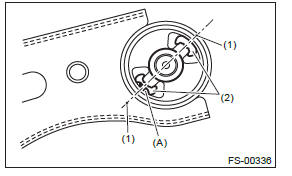
- Alignment mark
- Recess section
3) Using the ST and a press, install the rear bushing.
CAUTION: Align the upper face of front arm and the end of bushing during installation.
- Aligned
- Not aligned
PREPARATION TOOL:
ST1: REMOVER (20299AG000)
ST2: BASE (20299AG010)

- Press
- Front arm
- Rear bushing
READ NEXT:
 Front Strut
A: REMOVAL
1) Lift up the vehicle, and then remove the front wheels.
2) Remove the front strut.
Place an alignment mark on the camber adjusting bolt and strut.
Remove the brake hose bracket.
R
General Description of Rear Suspension
A: SPECIFICATION
Refer to "SPECIFICATIONS" in "FRONT SUSPENSION" section for rear suspension specifications. <Ref. to FS-2, SPECIFICATION, General Description.>
NOTE:
SEE MORE:
Remote start confirmation transmitter feature
Your remote engine start transmitter is equipped with a unique bidirectional
confirmation feature. This feature will allow the transmitter’s backlit button to
display the status of the system under the condition that the vehicle and transmitter
are within the operational range of the system.
Scan
The scan mode lets you listen to the first 10 seconds of each track/file in succession.
Press the “SCAN” button to start scanning upward beginning with the track/ file(s)
following the currently selected one. After all track/file(s) in the disk/folder
have been scanned, normal playback w
