Subaru Outback (BR): Front Door Glass
A: REMOVAL
1) Remove the front door trim. <Ref. to EI-60, FRONT DOOR, REMOVAL, Door Trim.>
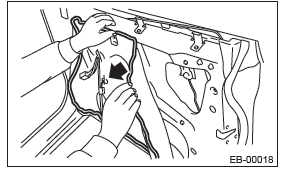
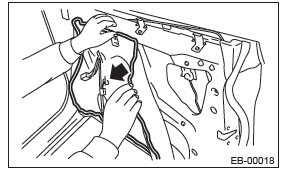
2) Remove the sealing cover.
CAUTION:
- Carefully remove the butyl tape. Excessive force will easily break the cover.
- If cover gets broken, replace it with a new part.
3) Remove the inner pad.
4) Attach the battery ground cable and power window switch and turn the ignition to ON.
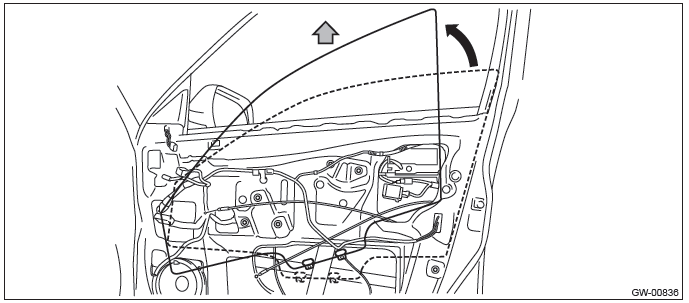
5) Remove the front door glass.
- Operate the power window switch to move the front door glass to the position where the mounting bolts can be seen.
- Remove the bolt.

- While tilting the glass, remove the windshield glass.
CAUTION: Avoid impact and damage to the glass.
B: INSTALLATION
CAUTION: Make sure that the glass run rubber is placed securely in the door frame and sash.
Install each part in the reverse order of removal.
Tightening torque: Refer to "COMPONENT" of "General Description". <Ref. to GW-4, FRONT DOOR GLASS, COMPONENT, General Description.>
Front Regulator and Motor Assembly
A: REMOVAL
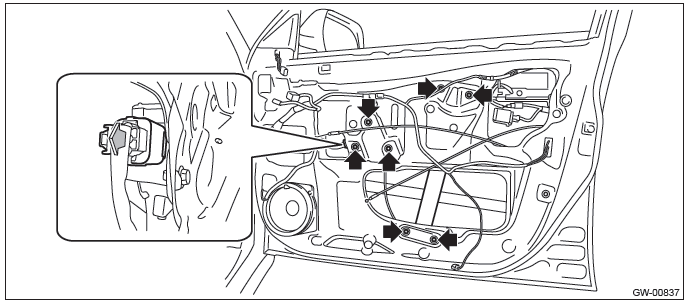
1) Remove the front door trim. <Ref. to EI-60, FRONT DOOR, REMOVAL, Door Trim.>
2) Remove the sealing cover.
CAUTION:
- Carefully remove the butyl tape. Excessive force will easily break the cover.
- If cover gets broken, replace it with a new part.
3) Remove the inner pad.
4) Attach the battery ground cable and power window switch and turn the ignition to ON.
5) Remove the front door glass.
- Operate the power window switch to move the front door glass to the position where the mounting bolts can be seen.
- Remove the bolt.
- While tilting the glass, remove the windshield glass.
CAUTION: Avoid impact and damage to the glass.

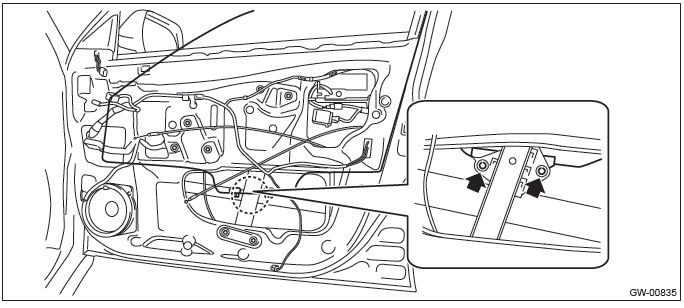
6) Remove the front regulator and motor assembly.
- Disconnect the connector.
- Remove the bolts, and then remove the front regulator and motor assembly.
B: INSTALLATION
Install each part in the reverse order of removal.
Tightening torque: Refer to "COMPONENT" of "General Description". <Ref. to GW-4, FRONT DOOR GLASS, COMPONENT, General Description.>
C: INSPECTION
1) Disconnect the motor connector.
2) Apply battery voltage between the motor connector terminals and check the motor operation.
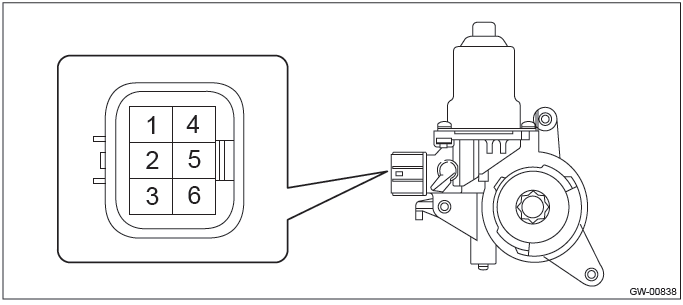

3) If the inspection results in improper operation, replace the front regulator and motor assembly.
Remote Control Mirror System
A: WIRING DIAGRAM
Refer to "Remote Control Mirror System" in the wiring diagram. <Ref. to WI-221, WIRING DIAGRAM, Remote Control Mirror System.>
B: INSPECTION
1. SYMPTOM CHART
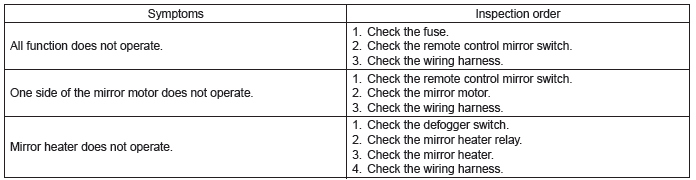
NOTE: The mirror heater operates with the rear window defogger at the same time. Refer to the inspection procedure of rear window defogger system for details. <Ref. to GW-55, INSPECTION, Rear Window Defogger System.>
C: NOTE
For operation procedures of each component of the remote control mirror system, refer to the respective sections.
- Scalp cap: <Ref. to GW-23, Scalp Cap.>
- Outer mirror assembly: <Ref. to GW-28, Outer Mirror Assembly.>
- Outer mirror: <Ref. to GW-30, Outer Mirror.>
- Remote control mirror switch: <Ref. to GW-32, Remote Control Mirror Switch.>
READ NEXT:
 Scalp Cap
A: REPLACEMENT
1. MODEL WITHOUT ELECTRIC RETRACTABLE MIRROR
CAUTION:
When removing the mirror, be careful not to damage the back surface
of mirror with a flat tip screwdriver.
When installing the
Outer Mirror Assembly
A: REMOVAL
1) Remove the front door trim. <Ref. to EI-60, FRONT DOOR, REMOVAL, Door
Trim.>
2) Remove the outer mirror assembly.
Disconnect the connector.
Remove the bolts to remove outer mi
Rear Door Glass
A: REMOVAL
1) Remove the rear door trim. <Ref. to EI-61, REAR DOOR, REMOVAL, Door Trim.>
2) Remove the sealing cover.
CAUTION:
Carefully remove the butyl tape. Excessive force will easily bre
SEE MORE:
How to jump start
1. Make sure the booster battery is 12 volts and the negative terminal is grounded.
2. If the booster battery is in another vehicle, do not let the two vehicles
touch.
3. Turn off all unnecessary lights and accessories.
4. Connect the jumper cables exactly in the sequence illustrated.
1) Con
Trailer lights
CAUTION
Direct splicing or other improper connection of trailer lights may damage your vehicle’s electrical system and cause a malfunction of your vehicle’s lighting system.
Connection of trailer lights to your vehicle’s electrical system requires modifications to the vehicle&r
