Subaru Outback (BR): Fuel gauge
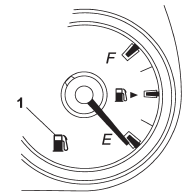
1) Low fuel warning light
The fuel gauge shows the approximate amount of fuel remaining in the tank. When the ignition switch is in the “LOCK” or “Acc” position, the fuel gauge shows “E” even if the fuel tank contains fuel.
The gauge may move slightly during braking, turning or acceleration due to fuel level movement in the tank.
If you press the trip knob while the ignition switch is in the “LOCK” or “Acc” position, the fuel gauge’s dial will light up and the needle will indicate the amount of fuel remaining in the tank.
If, while the fuel gauge needle is indicating the amount of fuel remaining in the tank, you (a) do not press the trip knob for 10 seconds or (b) open and close the driver’s door, the fuel gauge needle will drop to the “E” position and the dial and needle will turn off.
NOTE
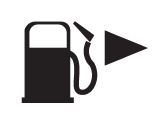
You will see the “ ” sign in the fuel
gauge.
This indicates that the fuel filler door (lid) is located on the right side of the vehicle.
READ NEXT:
 If the Low fuel warning light lights up
The fuel tank's low fuel warning light activates when it's nearly empty and only functions with the ignition switch in the "ON" position. When this light comes on, it's crucial to refill the
ECO gauge
1) U.S.-spec. models
2) Except U.S.-spec. models
The ECO gauge shows the difference between the average rate of fuel consumption
and the current rate of fuel consumption. Using the average rate
Warning and indicator lights
Several of the warning and indicator lights illuminate momentarily and then go
out when the ignition switch is initially turned to the “ON” position. This permits
checking the operation of the
SEE MORE:
Wiper operation when snowing
Before driving in cold weather, make sure the wiper blades are not frozen to
the windshield or rear window.
If the wiper blades are frozen to the windshield or rear window, perform the
following procedure.
● To thaw the windshield wiper blades, use the defroster with the airflow selectio
Towing
WARNING
Never tow AWD vehicles (including AT, MT and CVT) with the front wheels raised
off the ground while the rear wheels are on the ground, or with the rear wheels
raised off the ground while the front wheels are on the ground. This will cause
the vehicle to spin away due to the operation
